May Stamp of the Month

Oh my goodness! I think I have to make an awesome apology to you dear reader. I have not been offering to the world some creative inspiration for, I am ashamed to say it, a year! Goodness gracious. I have been promising myself I would get back to the blog, but didn’t act on it…until now. I am going to put the get up and go do it on Mel Robbins and her book The 5 Second Rule. Since discovering this book I have stopped hitting snooze on my alarm and got more done in my day. This week I am doing my 30 before 7.30. It works – go look it up! 54321 Do it…don’t delay, but please come back here when you are done! #5secondrule works. Every day I thought about the blog…today I 54321 acted on it.

Sunraysia Stash Scrappers has now been realised in Mildura and we hold successful monthly crops thanks to the beautiful members of The Creative Hearts team who run them and bring their customers along. Our workshops in Mildura are a 6 hour event offering you time to do something with the new and scrap your stash all in one day. Drop me a line at thecreativeheart@nenifoofer.com.au if you would like to know more! Now on to what I have to offer you.

I am too late for stamp of the month blog hops this month but I would like to share with you a design that was originally inspired by something on Pinterest, executed by one of my team members Kristy, with the stamp ‘Hello’ which was exclusive to the Seasonal Expressions collection that has just finished. Close To My Heart has replicated with design concept in the Stamp of the Month program. It has loads of uses. Check it out!

s1705

Here is what we made with it:

sotm may17

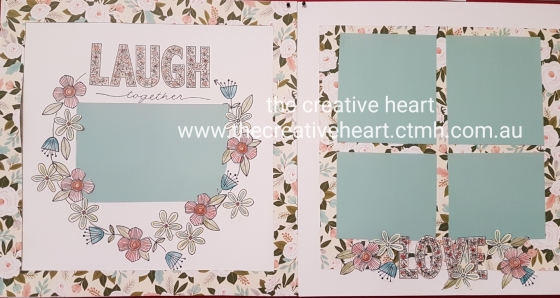
Here is how you can easily replicate this design.

First use a plate to mark off a circle on a sheet of white cardstock. Then take a printed pattern paper (this one is Hello Lovely from SE1 and NLA but there is sure to be a pretty print you have in your stash you can use) and use your trimmer to cut out a one inch border. Keep the sheet whole. To do this I insert my blade in the fiskars trimmer at 1 inch and stop at 11 – rotate to cut all four sides. This will provide you the border for the left hand page where your circle is and an 11 inch square for the base of the right.

Now start with the sentiment and stamp it at the top of your circle. I used our Archival Black ink for all the stamping. Grab some sticky notes or other scrap paper to use as a mask when necessary and stamp an arrangement of the flowers and leaves around the circle masking over areas already stamped. Stamp more flowers and leaves on scrap white along with another of the words to cut out and mount up on the right hand side. Colour these in in colours that will compliment your printed paper design. I used our watercolour pencils because I wanted the softer look. I was also deliberately suggestive rather than accurate when colouring the words. It gives them a painterly touch.

On the circle page I then used a craft knife to cut slots where flowers and leaves would overlap a photo mount. Remember your Versamat works as a cutting mat! I used a 6×4 mount. Mark the edge in pencil the you can see where you need to cut so the mount will slide under. Then fussy cut and assemble your letters and motifs on the right hand page. Add photo mounts as required and you are done. You can repeat this design with lots of different papers and stamps. Give it a try!

If you would like to purchase this stamp set you can get it at full price or pay just $7.50if you place a qualifying $75 order. That is why I love Stamp of the Month! Find out more here,

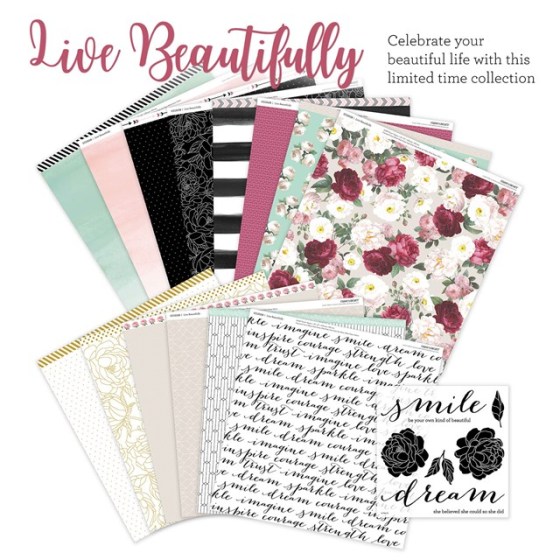
Up Next – Stay tuned for artwork from the NEW Seasonal Expressions Idea book AND check out Live Beautifully for National Scrapbook Month!

1705-cc-nsm-paper-packet-stamp

Thanks for stopping by and thanks for browsing my online store! Your order is important to me,

Jenny

PS Here is a link to the brand new Seasonal Expressions released today!


7

July 2015: Life Is Wonderful Blog Hop

July

S1507 Life is Wonderful

Hello and welcome to our Close To My Heart international Blog Hop. If you have arrived here from Kathy Burros you are in the right place. If you have just hopped in please join us full circle by clicking hop links at the end of each post. If you get lost along the way a complete list of bloggers is here. We have a fabulous SOTM for you and because Life is Wonderful we need to celebrate it:) July Stamp of the Month Life is Wonderful. is only available for JULY. It is FREE in the Jump on it July campaign! Yes…FREE! Or, you can purchase it for $5 with a $75 AU Purchase, or $27 just for the stamp alone.

During the month of July, when you purchase $32.50 AUD in current, retail priced stamps, you qualify to receive either the July Stamp of the Month, My Acrylix® Life Is Wonderful, FREE or any one of the Hostess Rewards stamp sets featured in Annual Inspirations 2014–2015 or Seasonal Expressions 2 for only $6.50 AUD!


Today I would like to share with you a creation which features Close To My Heart’s July Stamp of the Month Life is Wonderful.

thecreativeheart.ctmh.com.au #sotm S1507 #ctmh

July SOTM Life is wonderful with Chalk It Up and Coloured Chalk Technique

To Make my elements featuring the stamp of the month I have first stamped them in White Pigment ink. I then heat set this to make sure it was all very dry. DRY Colour the white with selected colours for our Water Colour Pencil collection. This is really important. If you use wet techniques you will reactivate the with pigment ink and not end up with the desired result. Just colour in. Because we have stamped whit on Black it won’t matter if you cannot stay in the lines, but a good sharp pencil will help!

S1507 Life is Wonderful

S1507 Life is Wonderful

s1507 Life is Wonderful

s1507 Life is Wonderful

To finish my pieces I sanded the edges before mounting them to the page.

chalkitup july (1)

S1507 Life is Wonderful SOTM

I hope you are inspired to try a little chalkboard art with this stamp set. Your next step in the hop is  Catherine Nowak Please hop along and see what wonderful art she has made to share. 

This is a perfect scrapbookers stamp set. I have had a lot of fun making pages with it and hope you do too!


Shopping list All products can be purchased by Australian readers from my online store or by contacting me directly.

S1507 Life is Wonderful

Chalk it up Paper Packet

Black Cardstock 1386

Kraft Cardstock

White Daisy Pigent Ink Z2163

Watercolor Pencils 3505

11

Life Is Wonderful Australasian Blog Hop

AUNZ blog hopHello and welcome aboard our Australasian Close to My Heart Blog Hop.

If you have arrived here from  Simone’s Blog, Scrappy Matters you are in the right place. If you landed here by accident, no problem, please join in by following the link at the end of this post.


Today I would like to share with you a creation which features Close To My Heart’s July Stamp of the Month Life is Wonderful.

You can get this stamp of the Month for FREE this month in the Jump on it July campaign! Yes…FREE!

During the month of July, when you purchase $32.50 AUD in current, retail priced stamps, you qualify to receive either the July Stamp of the Month, My Acrylix® Life Is Wonderful, FREE or any one of the Hostess Rewards stamp sets featured in Annual Inspirations 2014–2015 or Seasonal Expressions 2 for only $6.50 AUD!

I do believe this is a scrapbookers stamp set. I can see some of it used in card making but I have had a lot of fun making pages with it.

SOTM July S1507 Life is Wonderful FREE with stamp purchases of $32.50 in July.

SOTM July S1507 Life is Wonderful FREE with stamp purchases of $32.50 in July.

I have scraplifted this page and shared it with my weekly class group. I had the photo printed at 5 x 7 (8 x 10 can be too big). Slice it into 1 inch strips. If you wish to avoid a face start either side of the face, knowing you may leave off the two odd sized end pieces. This technique generally works super well with scenic photos but I did manage to make it work with this shot of me and my students did get good results with people photos too.

Keep Strips In Order

Use your Versamat or other grid and start placing strips from the centre. I used the Ruler and allowed 1/4 inch between strips. We found some look better with just 1/8 inch in the gap. The CTMH Ruler Z1471  was very useful for this process and helped keep things straight.

Versamat and ruler

  • All stamping is done using black ink.
  • Stamp the square on a piece of Kraft Card stock for your journalling.Your story matters.
  • Stamp and fussy cut Wonderful piece.
  • Stamp life is for the top corner.
  • Adhere some Black Arrow Washi to scrap white cardstock to add as embellishment on the Black Background.
  • Use a fine line Back pen to add faux stitching.
  • Punch the border with Chevron Border Punch and adhere a colour behind it to complement your photo.

See below for a full list of CTMH supplies.

This exclusive Life is Wonderful stamp is only available during July from your consultant. .It can be yours for just $5 with a qualifying order of $75 or for $27.00 if ordered separately from your CTMH consultant. It is also available FREE  for the Jump in July Campaign– Just order $32.50 worth of regular priced stamps. Remember many of these will retire very soon!

If you do not have a consultant please contact me or place an order here 

I’d love you to leave a comment before heading off to the next stop, Patricia Manhire – Patricia Manhire’s Creative Corner

The following Close To My Heart products have been used.

22

Icecream Dreams SOTM Australasia Blog Hop

AUNZ blog hop

Hello and welcome aboard ourStamp of the month Australasian Close to My Heart Blog Hop. If you have arrived here from Marguerite Svendsen-Designs by Marguerite– then you are in the right place. If you landed here by accident, no problem, please join in by following the link at the end of this post.


Today I would like to share with you this card which features June Stamp of the Month Icecream Dreams S1506  available exclusively throughout June for $27 or for just $5 when you spend $75.

20150528_172810

I started this fun card stamping up a few versions of it using just Black ink to stamp the label but this one features a Black embossing powder I have. I have also used out glitter paper and sequins.

I am going to share with you some tips for colouring the icecreams and the dogs in this post. If you want to skip ahead, your next stop in the hop is Maz. Please leave me a comment before you go.

A few variations of the same idea before they make it to a card

A few variations of the same idea before they make it to a card

You have 2 choices for colouring here and they both begin by squishing your ink pad so some ink ends up on the lid as shown. You need to choose to use either your colourless Shin Han Marker Z2469 or a paintbrush. I have a fillable paint brush commonly available from craft stores. You can also use a standard size 3 nylon brush. 20150527_215302


Add water to the ink you have transferred to your lid and you have a water colour to play with. All you need is to remember a few simple rules,

  • a softer colour requires a mix of more water, less ink – and vice versa – a strong vibrant colour will come with less water and more ink.
  • rinse between colours
  • do not over wet CTMH White cardstock – it will bleed no matter what ink you use for the image to colour if it gets too wet from either your brush or your marker.
  • Paper towel nearby is a useful blotter to remove too much water
  • turn your work so you are pulling colour toward you. You will notice I often turn my work in my videos.
  • Enjoy he pocess and fuss less. These will go on a card, not win an art award….

I believe cards need to be made with scraps and these samples have all been made with a strip scrap after last months workshop. (Look for my give away at the bottom of the post)

Brush colouring on right, clear marker colouring on left - you decide which you like.

Brush colouring on right, clear marker colouring on left – you decide which you like best

You CAN use your colourless Shin Han Marker if you are not comfortable with a brush. I have illustrated this in the video. However, I find this process too slow and tedious and much prefer to paint. I also have much more control over the colour and its intensity as you will see.I can get a much softer blend too. (However I acknowledge I am very comfortable with a paintbrush in my hand)

20150527_215332

You can also see I have stamped a number of these elements on one card. Make sure it is thoroughly dry. The next step is to give them a good coverage of Liquid Glass z769. Your liquid glass will cause bleeding if the artwork is not bone dry. (Try setting it with a heat gun). Be sure to leave it a long time. (OVERNIGHT). You can then fussy cut the items out and mount them to the card.Once cut you can ‘hide’ the white core by colouring the edge with a Shin Han Black marker.Z2446

20150528_171657

20150527_213146The full palette of colours is inspired by the palette listed for the Blossom papers. Exclusive Inks Lagoon, Blossom, Sorbet, Flaxen and Pear. I used Cocoa for the Dog. (it does look green when you add water – don’t panic, it dries brown.)

To finish off my card I have used some Teal glitter paper z1991 and Sorbet Cardstock. I have used the Coral sequins too.

Here is a Video to show you how I colour with both the pen and the brush. *embedding you tube does not want to play the game nicely with  me tonight so here is the Link to click.

June Stamp of the Month Icecream Dreams S1506  available exclusively throughout June for $27 or for just $5 when you spend $75. You can shop online right now with The Creative Heart.  or contact your consultant.

I sincerely hope I have inspired you to give brush colouring a go and compare it to the Colourless Shin Han Marker. Give each a try and see what is a good fit for you!

Your next stop along the hop is Maz 


Shopping

6

SOTM Blog Hop – A Happy Hello by Independent Consultants

FebSOTMBlogBadge

A Happy Hello!

Hello and welcome to this awesome international celebration of the February Stamp Of the Month a Happy Hello! I am very excited to be one of the contributors and hope I inspire you. Stamp of the Month is only available in February for $27 AU or $5 with your $75 AU order. If you arrived here from  Nikka Geers Blog you are in the right place.

This layout began with just one scrap – that 4 inch piece on the left side page. It was so pretty, I could not throw it out. Now I had a use for it!

sotmhappyhellopage


I attempted to replicate it on the right hand side but know that is nigh on impossible when doing ‘messy stuff’. (and I LOVE my messy stuff!) It goes a but like this – drop some Canary, Pixie and Sweet leaf drops of reinker on the all purpose craft mat. Add some salt. Spray with water. Place the paper down and press and twist, rub. Don’t forget the corners. Dry. Add more blotches – sparay some, flick some, sponge some. The trick is to know when enough is enough and not get the paper too wet.

Once I had a piece of paper I could use for the right side I rotated it a few times and aha there it was. I added some more messy stuff such as the rings from the stamp A1170 Doodled Designs in various colours on both pieces to help tie them together as well as the double stitched cirle. I trimmed 4 inches from the page on the right to create the symmetry across the centre of the layout. The Butterfly from Brush WOTG was already on that inspiring scrap of inky mess!. A happy accident:)

I set these pieces on Sweet leaf background and went to work with A Happy Hello to make flowers.

flower detail

I found enough scrap to create the Yellow Scallops with Buttercup Ink using the giant half circle stamp. I used the pretty petalled cicle and buttercup card stock for the base of my three flowers and stamped the solid circle with the really fine lines on it on the pink B and T paper. This took away the white from the background. I then daubed the edge in more pink to give it more dimension. I fussy cut these and used foam tape to mount the centres. I stamped the leaves and stems in Pear ink, attached the flowers and used what I had left of my Brushed Compliments to finish off the flowers and add the Banner flags. I did put some of these stickers on white cardstock and fussy cut them because of their transparency.

I wasn’t quite done yet, I did want to mess it up a little more. I pulled out a spray pen that has some left over pearlised sweet leaf spray and went to town with it on the sweet leaf background and let it run down the page. I little more painterly I think! We do not carry the pearl paint anymore ( sad face)  but so little of it is used in a spray bottle you may have some left in your stash. Don’t be afraid to use it! To support photos you might add to the page I would use the same B and T paper to mount them as shown in the example.

pearl detail

I hope you are inspired to get a little messy with this stamp set – it is great for both random stamping and flower making! For a full list of supplies see the shopping list below. Please leave a comment before you move along to the next stop in the hop  Pam Jarrett and see what she has in store for you.
Thanks for stopping by!
Jen
jenny sig
CTMH Products used in this project can be ordered online or in person from The Creative Heart. Let me know if you need some help with your order!
13

Australasian Blog Hop Stamp of the Month S1502 A Happy Hello

AUNZ blog hop

A Happy Hello! CTMH Stamp of the Month Australasian Blog Hop.

Welcome to a new month aboard our Stamp of the Month Australasian Close to My Heart Blog Hop. If you have arrived here from  Meryl Cheetham – Mez’s Craft Room then you are in the right place. If you landed here by accident, no problem, please join in by following the link at the end of this post.

Cooee!!  G’day!  I am barely over the excitement of Australia Day and Back to School  time for us. (Myself included following a two year break!) However, I am happy to share this piece of Artwork I created for A Happy Hello S1502 which is available for February only at $27 AU or just $5 with your $75 order placed with me or online.

sotm1502happyhello

I first did this for a card swap and am now pleased to share it with you. I love that we can do layers with this stamp and build up circles in all kinds of ways. I also love the stem and leaves and am positive it will get pulled out time and again for just that purpose.  I am a fan of random stamping and this set is perfect for that as you can see with this card.

For the card I have random stamped the stem with Olive, the flowers with Whisper and flaxen. I added some gold spot Washi, some triangle studs and stamped the sentiment in Barn Red on a piece of scrap Champagne. (I did use a different sentiment – one of the must have sentiment sets for cardmaking was used in my card.)  I added a touch of bling with puffies. This card is very simple and effective. Why not try it with a completely different colour palette?

CTMH Supplies

S1502 is only available until Feb 28 from your CTMH consultant. I’d love you to leave a comment before heading off to the next stop    Denise’s Blog Scrap, Stamp, Share 

, Please leave a comment before you go. Thanks for stopping by!

Jen

jenny sig

OMG ….Deal of the decade!

CTMH sure know how to celebrate an anniversary! OMG!! I am a bit excited to tell you about this! There is no better time to party!! Book your gathering in person or online and reap the rewards!

We have been celebrating their 30 years in the industry, we have just celebrated the 5th birthday of Studio J and now we celebrate 10 years of their signature  My Acrylix Stamps with the Deal of the Decade!

For Australian Readers! This is so exciting…..

 (If you are located elsewhere you will need to hunt out a CTMH consultant in your country.)
thecreativeheart.ctmh.com.au Shop online for this special deal.

Shop online now for your Deal of the Decade Stamp sets! Click this image to find out more!


Ever since I began with CTMH I have been impressed by the quality of My  Acrylix clear polymer stamps, the designs and the price point. I am now even more pleased to share with you this Deal of the Decade! You can’t go wrong at this price – now is the time to shop for those stamps that might have been out of your budget or just on your wishlist. Grab your Annual Inspirations, check through the green section and see what you can list! Book and host your own gathering to get even more!

My personal wishlist includes Delightful Ditty Instruments, Season of thanks backgrounds, Lifetime of happiness (great for card making) Happy Autumn, Noel (will make a fab addition to my xmas stamp collection) Reason for the Season, Bodacious Banners, Nursery Charms, Rainy Day….Yes, in spite of what my customers think I do not own every stamp set!  What is on your wishlist? Let me know in your comment below!

I could save $100’s of dollars if I whittled my list down to the must haves as opposed the would likes and set a budget. Here is an example. If I have a budget of $200 (a Christmas gift to myself)  I could buy what I really like from the new Seasonal Expressions 1, and get the Stamp of the Month (total $80) and then pick a dozen C or D sized sets!!! (totaling $120)  Wohoo How much fun would that be??? If I also hosted and a few freinds made purchases I could also get anything from $30 and up to several 50% Off items for being the host. To find out about host rewards click here. You can host in person, or online. Let me tailor a gathering to suit you.

So what is the catch with this deal?

Place an order of Regular priced items totaling $75 or more. That is it!

Once you achieve the qualifying order total, there is no limit to the number of eligible stamp sets you can purchase at this discounted price. You will be eligible not only to get Stamp of the Month Cutie Pie for $5 but ANY C or D sized Stamp set from the Green section in our Annual Inspirations book for just $10 each.

Yep Any C or D Sized Stamp  (from Annual Inspirations Idea Book) and As Many as you like! Just $10 each after reaching the qualifying order level.

Now for something extra

My gift to you! If you place an order online by Dec 5  I will personally put something in the post to go under your tree! When ordering, be sure to join my Online Host Draw to be eligible. You could win the host rewards to spend on items such as new Seasonal Expressions stamps and Papers. (more to come on those in another post!)

Your Loved One needs a Santa shopping hand? No worries!

Do you need to have a hand to get your partner doing good shopping for you? No problem. Just email me your personal wishlist, then ask your partner or family member to email me nenifoofer@gmail.com and I will organise it all for you. For your order to be under the tree I will need to order it by the end of this week Dec 5! No Promises but I will do my best.

So jump online and place your order, or contact me to organise your personal ordering or arrange to host your own gathering (complete form below)  so you are assured of getting host rewards as well!

Woo Hoo – it is all very exciting! Keep your eye out for posts and hints about Sticky Boy too!

The Creative Heart – Jen

5

Australasian Stamp of the Month Blog Hop S1412 Cutie Pie

sotm blog hop

Hello and welcome aboard our Stamp of the month Australasian Close to My Heart Blog Hop. If you have arrived here from Maz’s Inky Fingers then you are in the right place. If you landed here by accident, no problem, please join in by following the link at the end of this post.


How cute is this???

S1412 Cutie Pie

I Love it and I have had a LOT of fun making cards and pages with it already! I know many of us have been hanging out for this Stamp of the Month to get here and yippeee here it is! December Stamp of the Month is Cutie Pie S1412 and it is available  for $27 or for just $5 when you spend $75 with your consultant. (Ask your consultant about the additional Deal of the Decade if your order is at this amount!)

I have decided to pair my SOTM project up with the new paper collection Heartstrings because it comes with a card making kit rather than a WOTG, and we have a yummy mini pack of coordinating PML Cards. So, it did not take me long to come up with this layout.

sotm cupcakes layout

I have focussed on the blues in the PML cards. The best match card stock and ink was Crystal Blue. I used our biggest block (4 x 5 Y1012) and started by mounting all 4 cupackes on the block in random directions. I then stamped this rotating the block 90 degrees and 180 and even rotating the paper. This gave me the random stamped cupcake background.

sotm cupcake block

sotm make background


The side strips are a 2 inch strip of Crystal Blue embossed with the new Diamond Embossing folder. It looks and feels really quilted! I added the flourish from the Heartstrings complements, inked the edges of my selected pml cards and added a zip strip to one of the photos mounts. Random scraps also make a great washi look and you need that bit of bling with silver shimmer trim.

Dec sotm cupcakes

I had already been playing in my paper packet so I had B and T scraps to use – but you could use PML cards if that is all you have. Stamp a cupcake (or 3!)  using Black ink on the Heartstrings B and T papers. Mix it up. Separate the wrapper from the top of each one and shuffle them around. Adhere them to a small strip of scrap paper as you put them back together. This will support them. Then use foam mounting tape to adhere them to the page. I used a strip of B and T paper as a ‘shelf’ to put them on. Don’t forget the sparkle for the top!

I added some heart stamps and some puffy hearts from the new Stuck on you Puffies just to finish it off with a bit of red.

To complete this project you will need

December SOTM is only available through till Dec 31 is from your CTMH consultant.I’d love you to leave a comment before heading off to the next stop,  Wendy Hopper,to see what she has created for you.

PS Make sure you have a go at the page by CTMH on page 16. It is a LOT of fun to make.

PPS…Be sure to follow the hop…grab a cuppa and hop along to Wendy Hopper and keep going! There is some really inspirational artwork this month!

Take a cupcake with you!

Jenny

The creative Heart


5

November Stamp of the Month Blog Hop S1411 It’s The Little Things

sotm blog hop


It’s The Little Things

Hello and welcome aboard our Stamp of the month Australasian Close to My Heart Blog Hop. If you have arrived here from Lauren Moore – CTMH Craftings  then you are in the right place. If you landed here by accident, no problem, please join in by following the link at the end of this post. 

I Love SPRING, and flowers! Don’t you? I can see these lovely flowers adorning gifts of all sorts as well as Spring Racing Carnival Pages if you are lucky enough to be heading off to a Melbourne Cup celebration. Here is a nice relaxing project I have made with this stamp of the Month. I hope you enjoy it.

PicsArt_1414727107737

Two little gifts which feature November Stamp of the Month S1411 It’s The Little Things available exclusively throughout November for $27 or for just $5 when you spend $75. One is a Slate Designer Creations Bag Z2053, the other is the Slate Designer Crreations Paper Bag Z2036

We all have a scrap bin right? With LITTLE THINGS …little bits of paper in it! This stamp set is perfect for using up some of those scraps! You can stamp tone on tone, stamp colour on white, Rock n Roll, do overstamping, grab your spray pens Z1380 and reinkers and try a little over spraying, or even get out your Watercolour pencils 3505!

Let the little girl who loved to colour in come out to play here!

PicsArt_1414727691748

In this shot I show you some of the stages I went through to create my two projects. I started by simply stamping up pieces and colouring some. I then fussy cut them out so I ended up with a pile of cut flowers and foliage.

I did do a lot of spraying on my leaves to get texture. I sprayed in green with a little of that pearl paint we no longer have (but want back) and some darker olive green – or was that black? (Our black reinker has a green base so I often use that) I hope you can see this helped add some texture to the foliage pieces.

PicsArt_1414727243558

If you follow my blog, or come to my classes you will know about the dress rehearsal step. I played with those flowers and nothing seemed to work for me until I supported them with simple white cardstock. Then like magic the two gift wrappings came together.

PicsArt_1414726859178


Here is what I did.

  • I used card measuring 3 x 3 1/4.
  • I stamped the sentiment Just for you top on one and bottom on the other just so you can see you can very this too.
  • I have a band of Silver Shimmer Trim supporting this.
  • Next layer the flowers out until the arrangement is appealing.
  • Take a photo of it! . (I love that we can do this in the modern world!)
  • Slide all the pieces off and start adhering them using the photo as a guide. You won’t have to remember where they went! Some are adhered flat with EZ dots adhesive. Some are mounted with 3D Foam Tape.
  • Bling it up – pop in some Thistle striped ribbon, coloured Bitty sparkles (Use our Shin Han Twin Touch markers) and some other bling gems.

PicsArt_1414726782015


Fill your little goodie bags with your gift – My Slate Paper Bag contains a handful of Mentos. The Slate Button Bag has a lovely Bath Bomb. (I had to include it in the photo because it is like the flowers I had been stamping!)

Close To My Heart Products used in these projects

s1411 It’s The Little Things

November Stamp of the Month S1411 It’s The Little Things available exclusively throughout November for $27 or for just $5 when you spend $75. with your CTMH consultant. I’d love you to leave a comment before heading off to the next stop,  Sue’s Blog, Patricia Manhire – Patricia Manhire’s Creative Corner


New Product Feature – Chalk it up!

New  product blog hop

1688930_10151786132052574_233543346_n

I will confess right now for those of you who don’t know. In my formal job I am a teacher. Being a teacher is in my soul. Mother tells me I used to play ‘school’ with my little brother. So when CTMH brought us a paper pack and a Picture my Life pack called Chalk it up naturally even at 51 I am excited and also quite nostalgic since we do not use blackboard and chalk anymore. Who can remember a teacher who was really good with her artwork on the chalk board? I wonder if these are the reasons why chalk boards are currently also popular decor items!

Now if you really like this new Chalk it up kit it is the kit currently included in your Consultant kit!

new consultant kit – just $130 plus $19.50 P and H contains $500 worth of product including Chalk It Up WOTG AND Tthe Fore Always PML KIT! You get inks, blocks, embellishments, a n E size alphabet stamp set, some markers, some washi and more!

The Chalk It Up WOTG kit gives you all the instructions you need to create this page layout

Here is some additional some artwork I have done with Chalk it up WOTG and Chalk it up PML.

Pages and cards using the Chalk it up collection

Pages and cards using the Chalk it up collection

You can see the papers on page 26 of the Annual Inspirations Idea Book or check them online here. Contact me (see below)  if you would like a hard copy of the new Idea Book. I have also used the Chalk It Up Picture My Life Z2018 program on the page layout. This makes for speedy decoration of a page!

You can see the WOTG kit (workshop on the go kit) on page 28-29 and the host rewards stamp Better With a Friend D1608 is on page 11. You will not find this stamp online as it is exclusive to our gathering hosts. Be sure to talk to me about our broad range of gathering options.

I have also used the lines, titles and graduation cap from the Teacher Appreciation Stamp D1612 on this page layout.

At this time of the year with Year twelve students only 12 weeks from graduating now is the time to get organised with your school graduation photos and thank you gifts for teachers. Teachers do not often get a thanks but they sure do appreciate it when they do. There are some ideas in the Idea Book for you to follow. The bunch of pencils is an awesome ideas as I remember forever handing students a pen or pencil because they ‘forgot theirs at home’! 

You will find the Great Job stamp set C1588 and card on page 32.You can use this stamp set to congratulate your child or anyone else for that matter, on a job well done! I am going to be teaching the techniques from the card displayed in the idea book at my Tuesday Technique class.

I have also used the owl from this month’s Stamp Of The Month What a Hoot S1408. This stamp set is only $5 with every $75 order.

To view and purchase any of the products in this range of artwork click the links below to head to my online store to place your order. Be sure to join my August Online Host gathering  to go into the draw for the host rewards at the end of the month! (you could get Better with a friend for free!)

Here are some more ideas with Chalk it Up

Shadow box frame put to use to encourage your child’s success


Powered by Linky Tools

Click here to enter your link and view this Linky Tools list…