2014 in review – Thank you for stopping by – see you in 2015!

The WordPress.com stats helper monkeys prepared a 2014 annual report for this blog.It is rather interesting to me at least! Thanks for being a follower, a reader, or someone who commented.

Here’s an excerpt:

The concert hall at the Sydney Opera House holds 2,700 people. This blog was viewed about 12,000 times in 2014. If it were a concert at Sydney Opera House, it would take about 4 sold-out performances for that many people to see it.

Click here to see the complete report.

Merry Christmas

merry xmas1Hey there!

Merry Christmas to you all!!!

I just wanted to pop in with this brief post to say a huge Thank You for being a follower of this blog. I am indebted to you for following along and look forward to bring you more wonderful tips and projects in the new year. May your Christmas be joyful, fun and safe!

Jen

The Creative Heart

6

Everything ABC’s Letter Z

abc bloghopWelcome to everything ABC’S blog Hop.

For this hop we will be featuring the letter Z. This may be the name of a paper, a stamp set or an embellishment. Whatever the crafter has chosen as their # element will be featured in their post.

If you came from Catherine Nowak ~ Catscrapbooking.com Catscrapping you are in the right place. For a full list of hoppers hop onto Scrappy Therapy

I will be back to edit later but I am about to ship off and enjoy a family Xmas dinner.  I am caught short of time in the lead up to Christmas.  My Letter Z is for Zócalo and our products that start with the code letter z including embossing folders.


Did you know we can emboss 12 inches worth of cardstock? In this layout I have used the Damask Embossing Folder Z1994

Damask Embossing Folder

To emboss for this page I cut 4 inch x 12 inch strips. I embossed the first section, slid the card through the slot and embossed the rest. Pattern matching was a little difficult with this folder and did not really matter. With other folders pattern matching 1/2 inch ensures a smooth transition in your second run through the embossing machine.

20141219_175140

Floral Borders Top and Bottom using the Floral Embossing Folder.


20141219_175639

Pop the side flap into an flip flap


20141219_175717

This is how he page looks when sitting in the album


20141219_175707

Peek a Boo I see you – more detail is hidden under the flap:) You can see here where I have adhered the sticky strip.


20141219_175734

This is how it all sits in the album.


I have used the Floral embossing folder Z1994. I have also used Flip Flaps Z1325, an essential addition to any album doing lots if photos of one day or event. I had been having Flip Flap withdrawals as I had done 3 layouts, all unfinished as I am totally out of 6 x 4 flip flaps. I was really happy to get this one finished as I still had some of my 12 inch assortment to use! I used Pear and New England Ivy Card Stock and Exclusive Inks.  The whole layout is in our lovely tough and durable Page Protectors Z1968 and housed in one of our brand new Post Bound Albums Z2094. I LOVE this new albm. It is so easy to put together with the little lift up thingy on the screw and it feels super strong. Did you know the flap over the screw is magnetised so it won’t flap about?

I have done some stamping on this page. I secondary stamped a flourish from Inspriational Flourishes C1581, the Butterfly from Brushed WOTG Stamp set G1087 and Picture this is from Believe In Yourself C1574. Deal of the Decade is still on if you are keen on these stamps.I kept the layout and embellishing really simple because the photos tell muchof the story in this part of my album.

Shopping list

Your next stop on the hop is Anita Autore Cards & Coffee. Have fun and please leave a comment for us along the way. tell us if you have enjoyed the ABC’s hop so we might do it again in 2015!

Have fun! Have a safe and Merry Christmas.

Jen

jenny sig


5

Everything ABC’s Letter Y

abc bloghop

Welcome to the Everything ABC’s Blog Hop!

For this hop we will be featuring the letter Y. This may be the name of a paper, a stamp set or an embellishment. Whatever the crafter has chosen as their # element will be featured in their post. If you have just hopped onto my blog, please start at the beginning at Linda’s blog ~ Scrappy Therapy. If you came from Catherine Nowak ~ Catscrapbooking.com ~ you are in the right place. 


For My Y project it was easy to punce on Yuletide Carol x7187b. Yay!  We have a specific product with a letter for the hop! I do hope you enjoy the way I have used this lovely paper.

It is almost Christmas and we are almost done with our Christmas crafting opportunities (yes we should be that organised….if only!)  but I had to share this really cute one sheet bag with you! No Cutting required!!!

yuletide carol bag


This can be used at ANY time of the year with any pretty paper you have. I took the idea from a number of you tube videos – but the one by Kelly Gettlefinger is the one I chose to follow for its clear instructions. Once I did one, I could do many.

Here are my variations from the dimensions and directions given. 

  • I scored 1/2 inch to fold over the top edge taking advantage of our double sided B and T papers to trip the top edge before doing anything else
  • When she folds ‘in’ to the 6 inch mark – I actually score at 3 inches to do this folding in – and it is scored opposite the first step.
  • When she scores at 5 inches and 7 inches I did 4 1/2, rotate 180  and score at 41/2. There are two reasons – 4 1/2 is because I used 1/2 for the turn down on the top and flip for the second score because our CTMH scroeboard is sized to 6 inches.
  • Please crease this fold – it does help with the next step. I like it creased all the way – it is up to you.
  • Once you reach that point in the video watch carefully – what she shows you is easier than me trying to describe it. However it is easier to do with the paper vertically placed in front of you. Pay attention 3 minutes into this video – watch what happens and you will soon be able to do it yourself.

Here is the video by  Kelly Gettelfinger

My  Verbal directions for students go like this:

  1. Remove the zip strip. Determine the  top and bottom edges. Score these at 1/2 inch and fold the desired trim forward. Stick this down with bonding memories glue. Now with that edge against the top side of the Score Board (so you have now rotated the whole thing 90 degrees) score at 3 inches. Rotate 180 degrees and score the second line of 3 inches.
  2. Take the paper to your table and fold in at the 3 inch marks so the sides meet in the middle.
  3. Now while this is folded – back to the scoring board you go. With the longest edge running across the top of the score board score at 4 1/2 inches. (The video says 5 – but we have used 1/2 inch for our trim!) Rotate 180 degrees (aka flip) score at 4 1/2 inches again.
  4. Now back to a nice flat surface. Open it all out and give those 4 1/2 inch scores a bit of a crease to make the next step easier.
  5. Turn the paper, fold it on the 3 inch lines and place it lengthwise to you. Press one finger in a scored corner (4 1/2 inch line). Use the other hand to bring the folded score line from the middle out and parallel to the edge. Crease inside. Repeat for all four corners. ‘Push out, push in and press’….(Video)
  6. We are going to push the sides in and pinch it – just as it is in the video. I describe this as ‘push it in the back and pinch it’. Keep it even at the sides and it will look nice.
  7. You bag will almost stand now. You can glue the 3 inch folds down along the top edge and I prefer you do the inner corners too or your lovely purse will flop open and not look pretty. A little glue between this gusset and the front and back will hold the bag in a nice shape and voila you have a bag without any cutting!
  8.  Decorate to your hearts content. I used a standard single hole punch to thread wide ribbon through as my handles. You could use cord, you could also loop ribbon over from the back to a button or toggle in the front. You can ad an additional flap as seen int he video. All mine at done just with ribbon from my stash.  Check your stash and use what is there!

Decoration

Cricut flores mounted

I chose to decorate my Yuletide Carol bag with black accents at first. I started with the trendy Eiffel Tower from Artfully Sent. I also cut the Silhouette lady but ended up leaving that out. My flowers are a mix of all sorts from what I now call my flower basket. I have mounted these onto a piece of card some time ago – they fit this project just right. Each flower and leaf is cut from either Art Philosophy or Artiste in a variety of shades of cardstock. I have used spray pens and liquid glass in making them. I added tht little bit fo glam with the black shimmer trim and some bling gems. Finally I tucked in the sentiment just for you from Novembers Stamp of the Month. (NLA)

Close To My Heart Products used in this project are available to order from www.thecreativeheart.ctmh.com.au 

Please have a go at this quick easy bag! You do not need to make flowers to go on it – a simple fussy cut stamp, some buttons, bows or ribbons will do. It has been a real hit with my team and customers and is a lovely way to use up some of your stash for gift giving in any season! I hope you have enjoyed this post and will come visit again. Please leave a comment before you head off on the blog hop to the next post. Your next stop on our Everything ABC’S blog Hop is Diana Saunders

In case you get lost along the way…go to Scrappy Therapy (link: found on signup doc) for a complete list of participants!

PS You can make a ruffle just like on the bag in the video by wetting 1/ to 1 inch of your B and T or card stock. Don’t be afraid to get it wet it is quite strong at this width. Gently crumple if desired then unravel. Now place it on your all purpose craft mat or other non stick surface. Mold it into the ruffle shape you want. You can use pins and mini pegs for supports to hold wet paper up if need be. leave dry over night. It is ready to be glued onto your bag. Too easy! 

Jen

The Creative Heart


OMG ….Deal of the decade!

CTMH sure know how to celebrate an anniversary! OMG!! I am a bit excited to tell you about this! There is no better time to party!! Book your gathering in person or online and reap the rewards!

We have been celebrating their 30 years in the industry, we have just celebrated the 5th birthday of Studio J and now we celebrate 10 years of their signature  My Acrylix Stamps with the Deal of the Decade!

For Australian Readers! This is so exciting…..

 (If you are located elsewhere you will need to hunt out a CTMH consultant in your country.)
thecreativeheart.ctmh.com.au Shop online for this special deal.

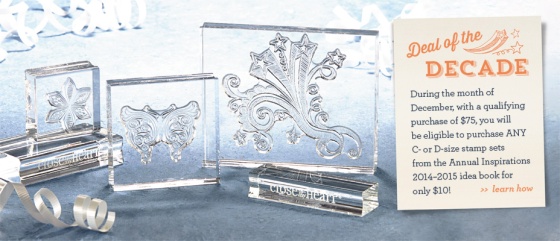
Shop online now for your Deal of the Decade Stamp sets! Click this image to find out more!


Ever since I began with CTMH I have been impressed by the quality of My  Acrylix clear polymer stamps, the designs and the price point. I am now even more pleased to share with you this Deal of the Decade! You can’t go wrong at this price – now is the time to shop for those stamps that might have been out of your budget or just on your wishlist. Grab your Annual Inspirations, check through the green section and see what you can list! Book and host your own gathering to get even more!

My personal wishlist includes Delightful Ditty Instruments, Season of thanks backgrounds, Lifetime of happiness (great for card making) Happy Autumn, Noel (will make a fab addition to my xmas stamp collection) Reason for the Season, Bodacious Banners, Nursery Charms, Rainy Day….Yes, in spite of what my customers think I do not own every stamp set!  What is on your wishlist? Let me know in your comment below!

I could save $100’s of dollars if I whittled my list down to the must haves as opposed the would likes and set a budget. Here is an example. If I have a budget of $200 (a Christmas gift to myself)  I could buy what I really like from the new Seasonal Expressions 1, and get the Stamp of the Month (total $80) and then pick a dozen C or D sized sets!!! (totaling $120)  Wohoo How much fun would that be??? If I also hosted and a few freinds made purchases I could also get anything from $30 and up to several 50% Off items for being the host. To find out about host rewards click here. You can host in person, or online. Let me tailor a gathering to suit you.

So what is the catch with this deal?

Place an order of Regular priced items totaling $75 or more. That is it!

Once you achieve the qualifying order total, there is no limit to the number of eligible stamp sets you can purchase at this discounted price. You will be eligible not only to get Stamp of the Month Cutie Pie for $5 but ANY C or D sized Stamp set from the Green section in our Annual Inspirations book for just $10 each.

Yep Any C or D Sized Stamp  (from Annual Inspirations Idea Book) and As Many as you like! Just $10 each after reaching the qualifying order level.

Now for something extra

My gift to you! If you place an order online by Dec 5  I will personally put something in the post to go under your tree! When ordering, be sure to join my Online Host Draw to be eligible. You could win the host rewards to spend on items such as new Seasonal Expressions stamps and Papers. (more to come on those in another post!)

Your Loved One needs a Santa shopping hand? No worries!

Do you need to have a hand to get your partner doing good shopping for you? No problem. Just email me your personal wishlist, then ask your partner or family member to email me nenifoofer@gmail.com and I will organise it all for you. For your order to be under the tree I will need to order it by the end of this week Dec 5! No Promises but I will do my best.

So jump online and place your order, or contact me to organise your personal ordering or arrange to host your own gathering (complete form below)  so you are assured of getting host rewards as well!

Woo Hoo – it is all very exciting! Keep your eye out for posts and hints about Sticky Boy too!

The Creative Heart – Jen

5

Australasian Stamp of the Month Blog Hop S1412 Cutie Pie

sotm blog hop

Hello and welcome aboard our Stamp of the month Australasian Close to My Heart Blog Hop. If you have arrived here from Maz’s Inky Fingers then you are in the right place. If you landed here by accident, no problem, please join in by following the link at the end of this post.


How cute is this???

S1412 Cutie Pie

I Love it and I have had a LOT of fun making cards and pages with it already! I know many of us have been hanging out for this Stamp of the Month to get here and yippeee here it is! December Stamp of the Month is Cutie Pie S1412 and it is available  for $27 or for just $5 when you spend $75 with your consultant. (Ask your consultant about the additional Deal of the Decade if your order is at this amount!)

I have decided to pair my SOTM project up with the new paper collection Heartstrings because it comes with a card making kit rather than a WOTG, and we have a yummy mini pack of coordinating PML Cards. So, it did not take me long to come up with this layout.

sotm cupcakes layout

I have focussed on the blues in the PML cards. The best match card stock and ink was Crystal Blue. I used our biggest block (4 x 5 Y1012) and started by mounting all 4 cupackes on the block in random directions. I then stamped this rotating the block 90 degrees and 180 and even rotating the paper. This gave me the random stamped cupcake background.

sotm cupcake block

sotm make background


The side strips are a 2 inch strip of Crystal Blue embossed with the new Diamond Embossing folder. It looks and feels really quilted! I added the flourish from the Heartstrings complements, inked the edges of my selected pml cards and added a zip strip to one of the photos mounts. Random scraps also make a great washi look and you need that bit of bling with silver shimmer trim.

Dec sotm cupcakes

I had already been playing in my paper packet so I had B and T scraps to use – but you could use PML cards if that is all you have. Stamp a cupcake (or 3!)  using Black ink on the Heartstrings B and T papers. Mix it up. Separate the wrapper from the top of each one and shuffle them around. Adhere them to a small strip of scrap paper as you put them back together. This will support them. Then use foam mounting tape to adhere them to the page. I used a strip of B and T paper as a ‘shelf’ to put them on. Don’t forget the sparkle for the top!

I added some heart stamps and some puffy hearts from the new Stuck on you Puffies just to finish it off with a bit of red.

To complete this project you will need

December SOTM is only available through till Dec 31 is from your CTMH consultant.I’d love you to leave a comment before heading off to the next stop,  Wendy Hopper,to see what she has created for you.

PS Make sure you have a go at the page by CTMH on page 16. It is a LOT of fun to make.

PPS…Be sure to follow the hop…grab a cuppa and hop along to Wendy Hopper and keep going! There is some really inspirational artwork this month!

Take a cupcake with you!

Jenny

The creative Heart