Hello and welcome to our mid month blog hop featuring the lovely new Zoe paper collection. If you came from Lauren Moore – CTMH Craftings- you are in the right place. As the hop goes full circle you can follow along to the next link at the bottom of this post.
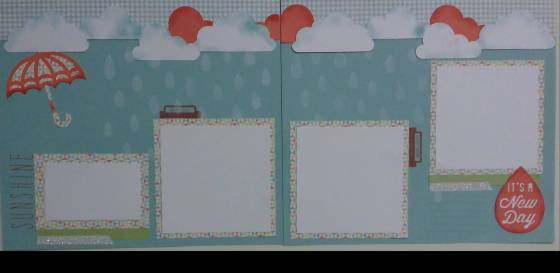
Today I am bringing you a delightful double page layout featuring the Zoe Paper collection and some cuts made with the new Cricut Artistry Cartridge. I love the new icons and with over 700 images it is good value for money. I used umbrella key on page 38 to make the clouds, the umbrella, the new day and to cut the stencil for the raindrops. I cut the rain drop stencil at 6 inches and inked the drops with white pigment ink.
Zoe papers and raindrops from Artistry
For the rest of the pieces I distressed the edges with sponge daubers using tone on tone and Glacier on white. I also added a little extra decoration with the Zip strip and some stamps from the Zoe WOTG stamp set which I adore. It is a very versatile set for scrapbooking and even includes a set of lines for journalling. Finally I have still got Coral sequins so a little White Shimmer trim and sequins have finished off the page. All I need now is a rainy day to get some photos! (it does not rain here much!)
Use a dauber and the rain drop overlay to get the rain drops.
All of the products are available from my online store. We have a fabulous Stamp of the Month and the Get organised campaign as well. The Zoe Collection is the first of the new papers we have coming your way September 1 in our new Idea Book! Get excited, there is more exciting stuff to come!
I love getting feedback, so please leave a comment before you move on to the next stop on the hop with Meryl Cheetham – Mez’s Craft Room Hop along and see what lovely artwork she has to share with you.
Close to My Heart Products used in this project include:
Hi and welcome to the Jump on it July Campaign Blog Hop.
If you have arrived here from Jeanie Burchyou are in the right place. If you have just joined in please look out for the next place to hop to at the end of my post.
Jump on it July is a fabulous campaign. it almost feels like Xmas in July…could be if you got the Xmas stamp. All you need to do in Australia is purchase $32.50 worth or regular priced stamps and you are entitled to get either the fabulous Life is Wonderful Stamp of the month for Free or any of these host reward stamp sets for just $6.50.
Jump on it July
How exciting is it that you can get these exclusive stamp sets without hosting. Remember it is this month only and there is no time like the present to grab some of those retiring sets you have had your eye on!
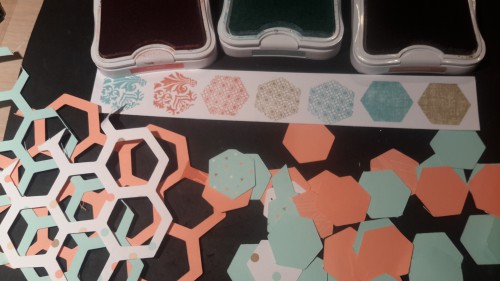
I am a little hexagon happy. It is a great shape to use in scrapbooking and I love the Host reward stamp set Happy Hexagons. It goes really well with another stamp set called Honeycomb C1537 and of course the hexagon Overlay in Artbooking. I sized the hexagon overlay to match the Happy Hexagon sized stamp. (I have lost that ccr file in the switch to Cricut Explore) Here you can see I have made use of some scraps, matched up some inks and got ready to play mix and match. The stamp here is the Honeycomb – after that I have used the Host reward set Happy Hexagons.
C1537 Honeycomb stamp set coordinates well with Host rewards set Happy Hexagons.
Here is the completed artwork in my album. To achieve this I randomly sponged some ink into the hexagon overlay pieces using them as a mask. I kept some to stick down and support the hexagons I stamped as well. all of this work surrounds just one special photo.
Close up of hexagon detail. Paper here are NLA – but the concept works no matter what paper collection you use.
Completed page
In this second page, my calendar is the subject. I decided to tissue stamp in the hexagon overlay and I have used colonial white for the creamy look. I added the photo frame, the faux washi and the Happy Hexagons.
Use a tissue to sponge into the page with an overlay of hexagons
I hope you are inspired by these pages to get into hexagons and grab your Jump on it July special!
Please leave a comment before hopping along to the next stop at Wendy Coffman
Jump on it July Australia
This offer enables you to get one of these stamps sets for $6.50 with every $32.50 worth of regular priced stamps you purchase. You can shop online at my website and join my monthly virtual gathering or contact your consultant.
Here are the stamps you can get in this special. Just type the code or part of the title into the shop search box.
S1507 My Acrylix® Life Is Wonderful C1614 My Acrylix® Tagged with Love C1613 My Acrylix® Paper Bird B1477 My Acrylix® Exotic Flower D1615 My Acrylix® Sweet As Sugar B1454 My Acrylix® Thanksgiving Wreath C1596 My Acrylix® Happy Hexagons C1587 My Acrylix® Sing Glory B1455 My Acrylix® Be Jolly C1593 My Acrylix® Hats Off A1169 My Acrylix® Well Wishes D1608 My Acrylix® Better with a Friend B1458 My Acrylix® Cuddly Salutations A1163 My Acrylix® Practical Planning
Products used in these projects
C1537 Honey Comb (Retiring)
Hand Written Print Alphaset (retiring)
Exclusive Inks – Creme Brulee; Autumn Terracotta, Cocoa, Barn Red, Crystal Blue, Canary, Sorbet, Colonial White Pigment ink
Operation Smile is a private, not for profit organisation providing reconstructive surgery to children and young adults born in developing countries. On 1st December Close to My Heart Consultants released our Seasonal Expressions Idea Book. On the back page of this Idea book you will find the C- sized, You’re the bomb stamp set. By purchasing this set at full retail price of $21 you can help change the life of a child as CTMH will donate $US3 from your purchase to Operation smile. Since 2008, Close To My Heart has provided support to change the lives of over 1,500 children and their families.
Today we will be sharing some inspiration using “You’re the Bomb”. We hope you will be compelled to purchase this set and in so doing, contribute to the life changing work of operation smile. The blog hop is a loop with about 10 participants so follow along and you will end up right back here. If you get lost there is a list of participants on Mandy’s Blog here.
Double Page Layout using Pathfinding papers and Your The Bomb Stamp Set
and here is the Stamp Set
If you would like further information and photos on my project and Operation Smile please continue reading,
Otherwise, pop over and see what Tracey at Tracey’s Blog created. Remember to speak to your consultant about how you too can support Operation Smile. Enjoy your journey!
At Convention USA I started to come to an understanding of the importance of Operation Smile to Close To My Heart. However, I was deeply moved at the Australasian Convention when Brian Holman gave us a presentation of his trip as a volunteer helping the team doing the work. He had the task of looking after the children during the fasting before the operation and was able to share his story with such heart every consultant in that convention room was moved by the story. This presentation has not only informed me about Operation Smile, it has cemented it into my very core as an essential aspect of being part of the Close To My Heart Family.
As consultants we take pride in doing something we believe is really really important.
We show you how to celebrate relationships through discovering your creativity, to preserve and share the moments that matter most.
These moments usually involve precious smiles that we take for granted. I have been so moved by the Operation Smile foundation and the work they do, as well as the role Close To My Heart leadership has taken in the organisation I now raise funds for Opration Smile with a monthly raffle at the Mildura crop to donate to this worthy cause. I am also no longer afraid to ask a customer if they would like to round up for Operation Smile. I invite you to get on board with this worthy cause and include this stamp set with your next order along with a ’round up’ so Close To My Heart can provide even more smiles!
So let’s take a closer look at that art work shall we? Yes, my Grandson is all smiles…smiles of different kinds in each of these snaps from day care.
Double Page Layout using Pathfinding paper collection and You’re The Bomb Stamp Set
Close up of the Left Hand page shows all the lovely hand written labels that would enhance any scrapbook page. Just recently CTMH has shared a lovely tip for cutting shapes like a circle from your photos with your Cricut on their facebook page. Be sure to check them out!
I cut the title William with the Cricut – so easy! I have used the Paper Fundamentals for this and they cut really well!
Thanks for joining me on this journey, the “You’re the Bomb” stamp set is available from your CTMH consultant and $3USD from every purchase will go directly to Operation Smile. This stamp set is only available until March 31. You can also choose to make a donation of any size directly to your consultant, donations over $2 are tax deductable.
To continue your journey, hop over to see what Tracey at Tracey’s Blog
For this hop we will be featuring the letter Y. This may be the name of a paper, a stamp set or an embellishment. Whatever the crafter has chosen as their # element will be featured in their post. If you have just hopped onto my blog, please start at the beginning at Linda’s blog ~ Scrappy Therapy. If you came from Catherine Nowak ~ Catscrapbooking.com ~ you are in the right place.
For My Y project it was easy to punce on Yuletide Carol x7187b. Yay! We have a specific product with a letter for the hop! I do hope you enjoy the way I have used this lovely paper.
It is almost Christmas and we are almost done with our Christmas crafting opportunities (yes we should be that organised….if only!) but I had to share this really cute one sheet bag with you! No Cutting required!!!
This can be used at ANY time of the year with any pretty paper you have. I took the idea from a number of you tube videos – but the one by Kelly Gettlefinger is the one I chose to follow for its clear instructions. Once I did one, I could do many.
Here are my variations from the dimensions and directions given.
I scored 1/2 inch to fold over the top edge taking advantage of our double sided B and T papers to trip the top edge before doing anything else
When she folds ‘in’ to the 6 inch mark – I actually score at 3 inches to do this folding in – and it is scored opposite the first step.
When she scores at 5 inches and 7 inches I did 4 1/2, rotate 180 and score at 41/2. There are two reasons – 4 1/2 is because I used 1/2 for the turn down on the top and flip for the second score because our CTMH scroeboard is sized to 6 inches.
Please crease this fold – it does help with the next step. I like it creased all the way – it is up to you.
Once you reach that point in the video watch carefully – what she shows you is easier than me trying to describe it. However it is easier to do with the paper vertically placed in front of you. Pay attention 3 minutes into this video – watch what happens and you will soon be able to do it yourself.
Here is the video by Kelly Gettelfinger
My Verbal directions for students go like this:
Remove the zip strip. Determine the top and bottom edges. Score these at 1/2 inch and fold the desired trim forward. Stick this down with bonding memories glue. Now with that edge against the top side of the Score Board (so you have now rotated the whole thing 90 degrees) score at 3 inches. Rotate 180 degrees and score the second line of 3 inches.
Take the paper to your table and fold in at the 3 inch marks so the sides meet in the middle.
Now while this is folded – back to the scoring board you go. With the longest edge running across the top of the score board score at 4 1/2 inches. (The video says 5 – but we have used 1/2 inch for our trim!) Rotate 180 degrees (aka flip) score at 4 1/2 inches again.
Now back to a nice flat surface. Open it all out and give those 4 1/2 inch scores a bit of a crease to make the next step easier.
Turn the paper, fold it on the 3 inch lines and place it lengthwise to you. Press one finger in a scored corner (4 1/2 inch line). Use the other hand to bring the folded score line from the middle out and parallel to the edge. Crease inside. Repeat for all four corners. ‘Push out, push in and press’….(Video)
We are going to push the sides in and pinch it – just as it is in the video. I describe this as ‘push it in the back and pinch it’. Keep it even at the sides and it will look nice.
You bag will almost stand now. You can glue the 3 inch folds down along the top edge and I prefer you do the inner corners too or your lovely purse will flop open and not look pretty. A little glue between this gusset and the front and back will hold the bag in a nice shape and voila you have a bag without any cutting!
Decorate to your hearts content. I used a standard single hole punch to thread wide ribbon through as my handles. You could use cord, you could also loop ribbon over from the back to a button or toggle in the front. You can ad an additional flap as seen int he video. All mine at done just with ribbon from my stash. Check your stash and use what is there!
Decoration
I chose to decorate my Yuletide Carol bag with black accents at first. I started with the trendy Eiffel Tower from Artfully Sent. I also cut the Silhouette lady but ended up leaving that out. My flowers are a mix of all sorts from what I now call my flower basket. I have mounted these onto a piece of card some time ago – they fit this project just right. Each flower and leaf is cut from either Art Philosophy or Artiste in a variety of shades of cardstock. I have used spray pens and liquid glass in making them. I added tht little bit fo glam with the black shimmer trim and some bling gems. Finally I tucked in the sentiment just for you from Novembers Stamp of the Month. (NLA)
Please have a go at this quick easy bag! You do not need to make flowers to go on it – a simple fussy cut stamp, some buttons, bows or ribbons will do. It has been a real hit with my team and customers and is a lovely way to use up some of your stash for gift giving in any season! I hope you have enjoyed this post and will come visit again. Please leave a comment before you head off on the blog hop to the next post. Your next stop on our Everything ABC’S blog Hop is Diana Saunders
In case you get lost along the way…go to Scrappy Therapy (link: found on signup doc) for a complete list of participants!
PS You can make a ruffle just like on the bag in the video by wetting 1/ to 1 inch of your B and T or card stock. Don’t be afraid to get it wet it is quite strong at this width. Gently crumple if desired then unravel. Now place it on your all purpose craft mat or other non stick surface. Mold it into the ruffle shape you want. You can use pins and mini pegs for supports to hold wet paper up if need be. leave dry over night. It is ready to be glued onto your bag. Too easy!
Cyber Monday is pretty new to me – but very popular and anticipated by online shoppers – so here we go. CTMH have something for you on Cyber Monday!!
NB Aussie Readers Only!
Have you been wanting to purchase one of our four amazing Cricut collections? Have you been dropping big hints to your family that such a collection would look good under your tree? Nudge Nudge Wink Wink 🙂 Need help with the hints? How about a 20% discount all through Monday December 1 Cyber Monday?
CTMH is participating in #cybermonday for the first time ever with 20% off all of the Cricut Collections. Choose from Art Philosophy, Artiste, Artbooking or the recently released Artfully Sent. Share a link – below – to the collection of your choice with your selected loved one (who has ultimate command of your wishlist) by clicking an image below. This will take you right to my store to pop it into your cart.
Would you like more?…OK!
Anyone ordering their Cricut Collection online will be in the draw for host rewards! Min $30 to spend, but it could be a lot more!
Add a lift to your scrapbooking with Artbooking
Fun dimensional possibilities with Artiste
Make Pretty things! Save 20% #cybermonday
Art Philosophy contains many must have shapes and card bases. 700 images means super value in this cartridge!
Artfully Sent is loaded with many different types of cards and tons of fun elements you can use.
Each collection comes with 3 exclusive stamps sets and more! Featuring Loads of images and card options these are must have cartridges for Cricut lovers. So head on over to my online store and get yours sent right to your door! Alternatively email me nenifoofer@gmail.com and I will handle the ordering for you.
Remember, here is the deal – 20% off Cricut collections, Cyber Monday, 0000 hours to 2400 Monday December 1 ONLY!
Enjoy your shoppping! If you woud like some help to decide which cartridge to get or what else to put in that parcel give me a call! nenifoofer@gmail.com
A great big Happy Birthday to CTMH as we celebrate #30yearsofhappy stamping and enjoy the FREE stamp set with 30 mini stamps! This month I am also featuring all things Birthday at my Monthly crop and the best paper collection for this lind of celebration is Confetti Wishes.
Birthday Explosión box
I have created this exploding box card for display and inspiration at my upcoming workshop on September 21st. (If you are local be sure to book now!). This piece showcases what we can achieve with Confetti Wishes X7189B paper, the Artiste Cricut cartridge and our awesome Pink glitter paper Z1792!
If you have not tried the glitter paper out yet then I suggest you do. It doesn’t flake and cuts clean on the cricut with blade set to 6 and doing a double cut as I did for the title here. Slow it down for intricate designs, and lift carefully from your mat. If it is really a really sticky mat you will need the spatula.
There are a lot of tutorials on exploding box cards so I will not detail that here. For the cupcake I cut a cupcale holder from artiste at 4 inches. I guestimated the size I needed and it worked out just right. I stamped and embellished this before folding it with ‘Gliitter girl’ from Glitter Glam B1465 and the foliage from ‘Love This’.B1432. I sat a 3 inch styrofoam ball in the cupcake holder and covered that with double sided tape and removed the covering from the tape leaving sticky side ready for use.
Time to decorate the cup Cake!
Thoroughly wet 3 1/2inch pieces of Thistle card stock and scrunch each one up. Gently unfold these and lay them on the open double sided tape on the top of the Cup Cake. It won’t stick while it is wet – just position it , prod it, move it till you are happy with the look. (Dressmakers pins will hold it if need be) Here is the trick….Allow to dry overnight. By then it will be stuck and nice and firm again for you to play with.
Add a touch of Bonding Memories glue 1512 around the top of the cupcake rim and over the iced top. Sprinkle with glitter. (My messy mat – All purpose Mat Z2045 helps make this job much easier to clean up!) Add something on top, some Bitty Sparkles Z1263 and you are done. I have adhered the cup cake to the card by stacking 4 layers of 3D foam tape Z1151 in the centre of the card so the stack reaches the bottom of the styrofoam ball. On the lid of the box I have used sponge daubers and more glitter to finish it off.
Glitter Paper Tip
I have found the stickers are not staying put on the glitter paper. The answer to that problem is liquid glass.!!! Our answer to anything that needs to be Stuck! 3D Foam tape also works well on this surface.
Shopping list – Note – this shoping list entitles you to add – Free #30yearsofhappy stamp and Stamp of the month Family is Forever! – That is and additional $48 worth of stamping fun for just $5!
Thank you for stopping by. I would love to have some feed back in a comment before you go! I hope you are inspired by this project. If you are local to Mildura and would learn to make one of these in a class setting please let me know in your comment below. Don’t forget our workshop is coming up. Here is a sneak peek.
You can order all you need online right here. Be sure to join my September Virtual Gathering to be in the draw for the Host rewards. Happy Stamping Month!
Did you know Close To My Heart regularly gives us fabulous creative ideas for projects and techniques we can use on pages, cards and off the page projects?
Well they do and my Cricut is begging to be running hot with some of these ideas and I take these ideas to my classes and workshops. I can show you how to make the most of your kit and your cartridge and even help you source a Cricut Machine if you do not have one.
I am especially excited this much as Close To My Heart has a gift for you if you decide to join our family where everyone is welcome. You can choose the Artbooking Cartridge free if you join this month! Take a look at the ideas presented here as an example of what this Cricut Collection can do for you.
You can do these on a page, in your project 360 album, or on anything else that will work for you! The exclusive stamp sets are part of the Free cricut collection!
If you would like to know more about joining Close To My Heart and getting your creative on complete this contact form and I will respond as soon as I can!
For this hop we will be featuring the letter G. This may be the name of a paper, a stamp set or an embellishment. Whatever the crafter has chosen as their G element will be featured in their post. If you have just hopped onto my blog, please start at the beginning at Linda’s blog ~ Scrappy Therapy If you came from Darlys Recker – Crafty Happy then you’re on the right track!
G is for Glamour!
Close up of some of the Glam with CTMH
We have plenty of Glamour at Close To My Heart! There is of course lots of shimmer and bling to choose from. We have glitter papers that do not flake everywhere. We have a whole range of colours in sparkles and gems including the Sparkle Black Flourishes. I also I love our alphasets and I especially love the Glamour sets D1537 and D1522. It is this alpha set that was the starting place for my project.
Glamour Upper Case Stamp Set
Glamour Lower Case set
From this decision and selecting the photo I then went for a browse through my Cricut Collections and found an overlay in Artbooking which has doubled as a stencil and glamour icons Artiste. There is the Eiffel Tower, a Dressmakers manikin, a dress, a coat hanger, a chandelier and more on p 40-41. I cut the overlay from page of Artbooking p 47. Then I did a bit of everything else. I tried a few different pieces and not all made it to the completed page. But that is ok – that is what Mixed media is about!
In my stash I had gold ribbons, paper clips and some other bits and pieces along with my Gesso, Texture paste and Spray pens.
Finally I grabbed my Base and Bling rhinestones ( I could have chosen more!) and I had a rather large assortment of Glamour pieces to choose from for my page to go with the Glam look of my girlfriend and I celebrating in style.
Of course red an purple are hard to work with. By sticking with neutrals of Black, Bamboo, and Desert Sand in both Ink and cardstock I was able to back this photo and not create too much competition.
Here is the final page I came up with
The finished page minus some journalling
The How
I began with a white cardstock base and first sealed it with gesso. (Available from art supply and craft stores) CTMH cardstock is very absorbent for any wet techniques so this step is important. I then used my overlay as a stencil and added texture paste. (Available from art supply and craft stores). Wipe the excess paste off the stencil and you then have the overlay ready when dry for inking. This step was left overnight to dry.
Use a spatula, knife or tongue depresser to spread texture paste over the stencil.
Lift the overlay (stencil) away, wipe off excess and leave to dry. Baking paper is excellent for this as nothing sticks!
I then sprayed black ink onto the surface. It looked more grey than black when dry but that was ok. You can see a touch of green in this when sprayed too. I rubbed the dried texture paste with the ink pad and got a nice strong black as a stark contrast. I then smudged the background with Bamboo Pigment in and then background stamped the page with Bamboo and Black. For the black I used secondary stamping technique. This means you stamp once on scrap then on the project. This took the ‘strong’ black out so it did not compete with what was to come. The stamp set for this section of the work is from Inspiration Flourishes Stamp Set C1581. I also used this stamp set in the embellishments on the page.
Get some nice big drips, hold the page ertical and let it run for a little more fun!
I rubbed the overlay piece with bamboo pigment ink. I also smudged this into the background.
. Next I had to bling up the Paper for the photo so I used Versamark ink and some Silver embossing powder. You could easily use Silver Glitter paper to do this without all the fuss!
Dress Ups! This is the fun bit. Play around with your elements and where you may place them on the page. Once you are happy with it you can begin to stick it down.
Now I finished off elements ready for the page. I used liquid glass on the Chandelier and Eiffel Tower, distressed the edges of the dress, put overlay on the manikin and stamped and distressed the title and other elements.I found the overlay needed black behind it so I did that and my piece of scrap silver was too big so I made it smaller. I added and took away bits of ribbon and things from my sewing stash too. You get the idea. play dressups and see what you come up with.
My Gold ribbon was wired. To stick it down I used Liquid Glass and a bit of weight thanks to a craft knife and scissors while the glue dried. I also used foam tape to help with height for the other pieces.
Weight used to allow liquid glass time to dry and hold the ribbon
I then went ahead sticking all the other bits down. At last minute I decided to add the ivy lane flowers and therefore needed a bit of green – I had some other pieces I had cut and the negative spaces from these so they did the job. The finished arrangement is not like the first – the dress or the tower….I wanted the Eiffel Tower to fit in. I also needed to sponge a little more black under the dressmakers manikin so it didn’t get lost.
Finally I decided the page needed an edge so with the help of daubers and Bamboo and Desert sand I got a distressed edge.
Here is another look at the finished piece.
I hope you have enjoyed this project and are inspired by this way of taking your scrapbooking to a new level with mixed media and the help of the Cricut Collections. I hoe you know by now you can get a Cricut Collection Free this month if you join us at Close To My Heart.Discover the Art of Business Promotion. That is a whopping $130 AU extra for your kit to get started. Please chat to your consultant about the April 2014 CTMH opportunity!
This is the final stop on our Everything ABC’S blog Hopfor the letter G. I hope we have inspired you! You can go back to the beginning Linda Norman- Scrappy Therapy . If you have just entered the hop be sure to head over there and go through all the posts. Hop on over there and See what she has done with G!
CTMH Products used in this project are available to purchase online.
Picture yourself having loads of FUN with like minded creative people.
Picture yourself growing confidence in your creative talents.
Picture yourself in a room with dozens of other inky fingers.
Picture yourself with a funky machine doing all that fancy cutting for you.
Picture yourself with growing self confidence.
Picture yourself with new Friends.
Picture yourself with access to hundred of free and discounted products giving you an affordablehobby.
Picture yourself nurtured and supported.
Picture yourself in a position to grow.
Picture yourself opening a box of creative goodies valued at $300 that only cost $99!
If you would like to turn this picture into reality then the Close To My Heart family is for you!
Picture this funky brand new scrapbooking product being yours when you join my team!
Join in the fun with us and reap the benefits!
Since joining Close To My Heart I have blossomed! My creative buttons have all been turned on, my confidence us up and my team is growing. I have gone from a struggling direct selling consultant to a successful team leader in a short few months of the change over to this company. CTMH is NEW for us in Australia but the company is very solid with a sound 30 year reputation in the USA and they have it right! I have made some awesome new friendships, I have been fully acknowledged for successes, had some awesome events, and I save a LOT of money doing what I love – scrapbooking and crafting and teaching other how to do it too. EVERYONE is welcome is the company motto and I just love how welcoming that feels. I have team members brand new to scrapbooking, as well as those with loads of experience in paper craft who constantly inspire me. The support and training from CTMH is not just applicable to running a business – it is also applicable to every day life.
Here is what Founding Director Diane Lampert has had to say about Becoming part of the Close To My Heart opportunity
“After 15 years with Creative Memories in Australia, I wondered what my future held when the company ceased operations. Uncertainty turned to certainty—the BEST THING EVER—a new business opportunity with Close To My Heart!
The results are astounding: my Team business is larger than it was previously and my Team is thriving; attendance at events is at an all-time high; new Consultants are engaged and enthusiastic, and everyone is happy working with the expansive Close To My Heart product line and this wonderful company. It’s so exciting to be involved in this fresh start!
Company founder Jeanette Lynton has built this debt-free company over the past 30 years and she has a vision for the next 30 years that every single member of the corporate team embraces and executes every day. Instead of being worried about the direction of my future, I am proud to represent Close To My Heart products and the brand that has been passionately built for many years.
I encourage anyone thinking about making a switch to consider Close To My Heart. I am thankful to have a solid, fun, welcoming new home that values memory keeping as much as I do!” — Diane Lampert, Senior Executive Director
The bottom line for me is this: I have rediscovered my happy place with Close To My Heart and have total faith that I will be part of this family for many years to come. It would be awesome to share that joy with you and NOW is an especially good time for you to do that.
Everyone who joins Close To My Heart between now and December 15th will have the opportunity to get this brand new product FREE as soon as it is launched! Isn’t it awesome!
A sneak peek at 6 of the 8 designs coming with this brand new exciting product – your free after joining and qualifying with CTMH
This program provides you with the ease of scrapbooking life’s moments as they happen. With adorable pre-designed cards featuring unique sentiments, icons, and journaling space, all you have to add is your own photo collection! The several themes can be mixed and matched for more versatility. The prompts on several of the cards will help you creatively journal, and the various assortments of Memory Protectors™ will make your finished products truly unique.
Now I did mention a Funky Machine to do all the cutting for you. Here in Australia Close To My Heart consultants have exclusive access to ArtDeco Creations, the official importers of the Cricut Machine which we all need to make the most of the fantastic Cricut cartridges by Close To My Heart. Not only do these cartridges carry 700 images, Close To My Heart regularly posts inspirational ideas and how to’s to support our use of these cartridges! Picture this one as a Christmas gift – from your special other or yourself to YOU! You deserve it don’t you?
The Cricut Exppression II Contact me today to find out more about how you can get one of these essential crafting machines.
Why YOU?
Whether you are an experienced crafter, a total newbie, a seasoned network seller or just for me hobbyist you will be very welcome with Close To My Heart!
You will have compensation and incentives
22% base comission and up to 35% comission
Access to training, team events, webinars, conventions and retreats. Training includes hands on creating!
A huge diversity of products! 100’s of them!! If you have looked at our Product Launch Guide you may feel just a tad excited about the range and variety….wait till Feb 1st when we have the FULL range here in Australia!
If you join now you will have access to this full range in January!
All the passion and support from CTMH for memory keeping and memory making with top selling scrapbooking products
Picture yourself making the switch!
If you have been a consultant for another company, scrapbooking or any other direct selling for that matter, take a look at this
Can you feel the warmth and hear the excitement of Christine? That is what Close To My Heart is all about! I would love to have you join my team! Near or far, as long as you are in Australia I can help you to get started!
Picture yourself as part of a team of wonderful remote from the city consultants who network and support each other. Come and join my team!
*Your Invitation*
For those of you within Cooee of Mildura I extend to you an invitation to attend one or two events within the next week.
Sunday Nov 24th we have a play day at the Mildura Masonic Centre. You are welcome to attend for FREE if you mention this post. I will give you the details when you book in.
Monday Nov 25th Come along and meet team members and learn more about Close To My Heart. This is another free one for you – just let me know you intend to come. I have challenged myself to run out of chairs! (Have you ever counted how many chairs you have in your home?)
For those of you too far away or unable to come give me a holler via the form below and I will meet with you at another time for coffee or contact you by phone. There is absolutely no need for you to miss out on one of the boxes I have here ready and waiting for you!
Hello and welcome to the promised part 2 of my Magical Days of Christmas Flip calendar. if you missed part 1, it is here.
Our journey continues with stamps, cricut cuts and bit of glitter and shine!
13 stars and bling
15 Summer fun! The frame is from Artbooking
16 Inpired by the postage stamp style I cut this mat with the Cricut Artbooking cartridge
I lacy frame was needed to go with 16. The cricut is becoming my friend!
Trees and more tress. By now my inspiration is truly coming from the stamp design!
BTW have you finished your shopping? By the 19th you are running out of time!
Oh little tree…oh little sparkle stamp!
I love this little tree stamp – and at just $4 it is a very useful addition to my Christmas stamp collection!
21 swirls and curls
I love the various artbooking pages in the Artbooking Cartridge and this swirly curly one is no different. I added a splash of glitter here having discovered the ease of a generous dose of Mod Podge and a sprinkle of glitter. If you do this do it on baking paper for easy return of excess to the bottle and binning the rest.
Awesome overlay on the Artbooking cartridge, a bit of Mod Podge and glitter, a reindeer and voila Christmas is all bling and shine
Overlays….oh my! I love the Artbooking overlays and this was cut quickly and easily with Artbooking. As a bonus I have the negative shapes ready to put on other projects! The reindeer is also in Artbooking – a touch of glitter and a sparkle red nose added a finishing touch.
Baubles and the circle shape from the Halloween section of the Artbooking cartridge comes to life for Christmas. All I had to do was think outside Halloween – lollies go with Christmas and the round shape of the page suited the bauble.
Ho Ho Ho it is so hot where I am I would be hoping for snow!
It is by now Christmas eve and in the land downunder we are likely to be cooling off in a pool in my region! It may be over 40 Celsius here! The kids are excited with the traditional image of Santa and his Reindeer, and we can only dream of cool snow. Ho Ho Ho we have our Christmas cheer on at least! The Ho Ho Ho stamp is another of those cute little $4 ones that is essential to my little collection.
December 25 cut right from the Artbooking Cartridge!
This page is cut at recommended settings in Artbooking. The Yo Yo is 2 2×12 inch strips accordion folded at 1/4 inch. Onto these I have popped a sparkly snowflake and finally the 25 stamp. I used white behind ‘December’ to help it pop out!
I have enjoyed doing this project and look forward to taking a page off the stand as each day goes by and journaling or adding a photo each day.
All products used in this project are available from my online store to any resident in Australia. Why not head over there now and start shopping?
Your Wish list to make this project:
WOTG Sparkle and Shine pack G1071
Sparkle and Shine Paper Pack X7176B
Magical Days Stamp Set D1552
Santa Clause Stamp Set C1567
Santa’s Greeting M1028
Tee Delights M1032
SOTM Scandinavian wishes S1310
Silver Z1799 and Red Z1848 Shimmer trim
White Chalk Marker Z1767
Inks – Slate Z2173 Cranberry Z2116 Juniper Z2165 Colonial white Z2168 or white daisy Z2163
Flip Stand Z1896
Artbooking Cricut Collection Z1906
Art Philosophy Cricut Collection Z1686
3D foam Tape Z1151
If you do not have a Cricut machine yet ask me how you can get one at wholesale price just in time for Christmas!
* The Holidays from the Heart guide has starred items. You are entitled to one FREE starred item with every $130 purchase. Order online and have your goodies sent straight to your door. All orders over $75 are also able to get Stamp Of The Month (SOTM) for just $5. Awesome savings for you!
** The Holidays from the Heart catalogue now includes more products including washi tape and gift bags – take a look!
If you have questions at all please post a comment and I will try and answer them for you. If you live in or around Sunraysia and want to see this and many more projects, or join in on a Play Day let me know. Thanks for stopping by!


