23

Summer Crush Campaign

Welcome to the Summer Crush Blog Hop

SummerCrushBadge

During the month of June, when you purchase any My Crush™ book and its accompanying assortment pictured in Annual Inspirations 2014–2015, you will receive the coordinating stamp set FREE! That is a savings of at least $15 AUD. Every My Crush book features a hard cover with wire binding and cardstock-weight pages that are printed with eye-catching designs to form the perfect bases for your memory keeping. There are coordinating assortments featuring sticker sheets, envelopes, alphabets, cards, and journaling spots, which along with your free stamp set, will help you to be well on your way to your own gorgeous mini book creation! This offer is only available while supplies last and once they’re gone, these books are gone for good, so put your orders in early! Contact your Close to My Heart Consultant today.  PS These books make awesome Christmas gifts!

 If you have arrived her from Krista Hershberger you are in the right place. Like always, our hops go in a circle. So just keep hopping until you get back where you started.  If you do get lost along the way a complete list of hoppers is available at Melinda’s Blog Here. In this hop I hope you get to see lots of artwork ideas and consider these awesome little books as potential surfaces for treasured keepsakes, or just more awesome paper to use in a way you choose. I think they make the best Jounals and have always been good stocking fillers.

 Purchase your choice of Crush Book and coordinating assortment and you will get your stamp set for free! Click for more details.  They are perfect for adults like me but tweens love them too!

I gathered my stuff together - Blue Bird Book, Bluebird assortment, Glacier twine, Aqua Dots, Shin Han Markers, Blocks, ink,

I gathered my stuff together – Blue Bird Book, Bluebird assortment, Glacier twine, Aqua Dots, Shin Han Markers, Blocks, ink,

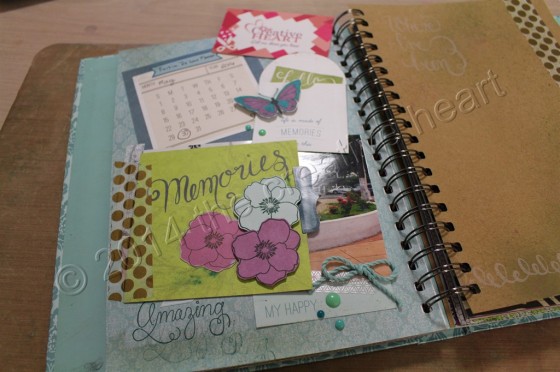
There are 5 books to choose from altogether – Modville, Bluebird, In the Pink, Wildwood and Holiday Happenings. For this post I am sharing a page I created in the My Crush® Bluebird/Memories Combo.There are actually 2 combos for this book to choose from because there are 2 assortment packs!

To begin with I have no real plan – just a whole lot of coordinating product. I have the book, a photo, and the stamp. I have the assortment, some washi tapes, aqua dots, Shin Han Markers and Ponderosa Pine ink. I begin by deciding on possible embellishments from the assortment. Here are the steps I followed:

  • I do a little dress rehearsal with different elements to see what I like.
  • I stamp some of the flowers on the coloured card in that assortment and fussy cut them. I stamped others and the butterfly and coloured them.
  • Looking at the stickers I use a deep teel green and a fuschia coloured tab sticker back to back to create a tab and have the Gold Dot Washi and Silver washi ready as hinges to make a flap for journalling.(I am feeling pretty sentimental so lots of journal space is needed on this page. I may even write a whole lot more on the page next to this one. )
  • I begin laying down and layering the elements and decide to stamp on the page. Since I have already got some things in this book it is necessary to put my versamat under the page and right up against the coil binding so as to get a flat even surface to stamp.
  • I made the journaling pieces and did the journalling before sticking them down.
  • I did decide after I had put some things down to add a little spray mist with reinkers and that was not as successful as I hoped.
20150605_175528

Using the versamat under the page for a stable stamping surface.

Crushbooks are fun projects for odds and sods in your photos abd memorabilia. They will reveal the quirks of you and your life providing your family an insight into you.  I have filled one Crush book almost completely, made a good start on a second and made a start on a third. I treat them very much as reflective journals and try to use them to offer my children and theirs an insight into my everyday life.

Here is the completed pagefrom today’s effort. (I must fix the watermark date!)

Jenny Gilbert thcreativeheart.ctmh.com.au

Finished Page


Jenny Gilbert thcreativeheart.ctmh.com.au

Inside journalling

Jenny Gilbert thcreativeheart.ctmh.com.au

journal flap hinged with washi tape

Jenny Gilbert thcreativeheart.ctmh.com.au

Butterfly detail

 If I still have your attention please join me on a walk through my completed Modville Crishbook book. I am still not an expert in video making but this time I did use a tripod!

 Your next stop on the hop is the fabulous artwork by Nikka Geers Thank you for stopping by. Please leave a comment before you move on. (ps I have done what I can to try and stop the need for you to login in or sign up to comment so let’s see how that goes.) 

5

Everything ABC’s Letter Y

abc bloghop

Welcome to the Everything ABC’s Blog Hop!

For this hop we will be featuring the letter Y. This may be the name of a paper, a stamp set or an embellishment. Whatever the crafter has chosen as their # element will be featured in their post. If you have just hopped onto my blog, please start at the beginning at Linda’s blog ~ Scrappy Therapy. If you came from Catherine Nowak ~ Catscrapbooking.com ~ you are in the right place. 


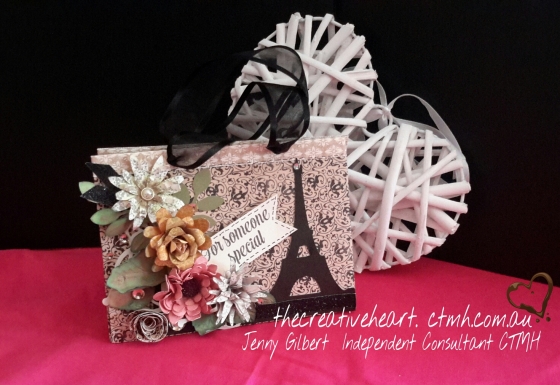
For My Y project it was easy to punce on Yuletide Carol x7187b. Yay!  We have a specific product with a letter for the hop! I do hope you enjoy the way I have used this lovely paper.

It is almost Christmas and we are almost done with our Christmas crafting opportunities (yes we should be that organised….if only!)  but I had to share this really cute one sheet bag with you! No Cutting required!!!

yuletide carol bag


This can be used at ANY time of the year with any pretty paper you have. I took the idea from a number of you tube videos – but the one by Kelly Gettlefinger is the one I chose to follow for its clear instructions. Once I did one, I could do many.

Here are my variations from the dimensions and directions given. 

  • I scored 1/2 inch to fold over the top edge taking advantage of our double sided B and T papers to trip the top edge before doing anything else
  • When she folds ‘in’ to the 6 inch mark – I actually score at 3 inches to do this folding in – and it is scored opposite the first step.
  • When she scores at 5 inches and 7 inches I did 4 1/2, rotate 180  and score at 41/2. There are two reasons – 4 1/2 is because I used 1/2 for the turn down on the top and flip for the second score because our CTMH scroeboard is sized to 6 inches.
  • Please crease this fold – it does help with the next step. I like it creased all the way – it is up to you.
  • Once you reach that point in the video watch carefully – what she shows you is easier than me trying to describe it. However it is easier to do with the paper vertically placed in front of you. Pay attention 3 minutes into this video – watch what happens and you will soon be able to do it yourself.

Here is the video by  Kelly Gettelfinger

My  Verbal directions for students go like this:

  1. Remove the zip strip. Determine the  top and bottom edges. Score these at 1/2 inch and fold the desired trim forward. Stick this down with bonding memories glue. Now with that edge against the top side of the Score Board (so you have now rotated the whole thing 90 degrees) score at 3 inches. Rotate 180 degrees and score the second line of 3 inches.
  2. Take the paper to your table and fold in at the 3 inch marks so the sides meet in the middle.
  3. Now while this is folded – back to the scoring board you go. With the longest edge running across the top of the score board score at 4 1/2 inches. (The video says 5 – but we have used 1/2 inch for our trim!) Rotate 180 degrees (aka flip) score at 4 1/2 inches again.
  4. Now back to a nice flat surface. Open it all out and give those 4 1/2 inch scores a bit of a crease to make the next step easier.
  5. Turn the paper, fold it on the 3 inch lines and place it lengthwise to you. Press one finger in a scored corner (4 1/2 inch line). Use the other hand to bring the folded score line from the middle out and parallel to the edge. Crease inside. Repeat for all four corners. ‘Push out, push in and press’….(Video)
  6. We are going to push the sides in and pinch it – just as it is in the video. I describe this as ‘push it in the back and pinch it’. Keep it even at the sides and it will look nice.
  7. You bag will almost stand now. You can glue the 3 inch folds down along the top edge and I prefer you do the inner corners too or your lovely purse will flop open and not look pretty. A little glue between this gusset and the front and back will hold the bag in a nice shape and voila you have a bag without any cutting!
  8.  Decorate to your hearts content. I used a standard single hole punch to thread wide ribbon through as my handles. You could use cord, you could also loop ribbon over from the back to a button or toggle in the front. You can ad an additional flap as seen int he video. All mine at done just with ribbon from my stash.  Check your stash and use what is there!

Decoration

Cricut flores mounted

I chose to decorate my Yuletide Carol bag with black accents at first. I started with the trendy Eiffel Tower from Artfully Sent. I also cut the Silhouette lady but ended up leaving that out. My flowers are a mix of all sorts from what I now call my flower basket. I have mounted these onto a piece of card some time ago – they fit this project just right. Each flower and leaf is cut from either Art Philosophy or Artiste in a variety of shades of cardstock. I have used spray pens and liquid glass in making them. I added tht little bit fo glam with the black shimmer trim and some bling gems. Finally I tucked in the sentiment just for you from Novembers Stamp of the Month. (NLA)

Close To My Heart Products used in this project are available to order from www.thecreativeheart.ctmh.com.au 

Please have a go at this quick easy bag! You do not need to make flowers to go on it – a simple fussy cut stamp, some buttons, bows or ribbons will do. It has been a real hit with my team and customers and is a lovely way to use up some of your stash for gift giving in any season! I hope you have enjoyed this post and will come visit again. Please leave a comment before you head off on the blog hop to the next post. Your next stop on our Everything ABC’S blog Hop is Diana Saunders

In case you get lost along the way…go to Scrappy Therapy (link: found on signup doc) for a complete list of participants!

PS You can make a ruffle just like on the bag in the video by wetting 1/ to 1 inch of your B and T or card stock. Don’t be afraid to get it wet it is quite strong at this width. Gently crumple if desired then unravel. Now place it on your all purpose craft mat or other non stick surface. Mold it into the ruffle shape you want. You can use pins and mini pegs for supports to hold wet paper up if need be. leave dry over night. It is ready to be glued onto your bag. Too easy! 

Jen

The Creative Heart


5

November Stamp of the Month Blog Hop S1411 It’s The Little Things

sotm blog hop


It’s The Little Things

Hello and welcome aboard our Stamp of the month Australasian Close to My Heart Blog Hop. If you have arrived here from Lauren Moore – CTMH Craftings  then you are in the right place. If you landed here by accident, no problem, please join in by following the link at the end of this post. 

I Love SPRING, and flowers! Don’t you? I can see these lovely flowers adorning gifts of all sorts as well as Spring Racing Carnival Pages if you are lucky enough to be heading off to a Melbourne Cup celebration. Here is a nice relaxing project I have made with this stamp of the Month. I hope you enjoy it.

PicsArt_1414727107737

Two little gifts which feature November Stamp of the Month S1411 It’s The Little Things available exclusively throughout November for $27 or for just $5 when you spend $75. One is a Slate Designer Creations Bag Z2053, the other is the Slate Designer Crreations Paper Bag Z2036

We all have a scrap bin right? With LITTLE THINGS …little bits of paper in it! This stamp set is perfect for using up some of those scraps! You can stamp tone on tone, stamp colour on white, Rock n Roll, do overstamping, grab your spray pens Z1380 and reinkers and try a little over spraying, or even get out your Watercolour pencils 3505!

Let the little girl who loved to colour in come out to play here!

PicsArt_1414727691748

In this shot I show you some of the stages I went through to create my two projects. I started by simply stamping up pieces and colouring some. I then fussy cut them out so I ended up with a pile of cut flowers and foliage.

I did do a lot of spraying on my leaves to get texture. I sprayed in green with a little of that pearl paint we no longer have (but want back) and some darker olive green – or was that black? (Our black reinker has a green base so I often use that) I hope you can see this helped add some texture to the foliage pieces.

PicsArt_1414727243558

If you follow my blog, or come to my classes you will know about the dress rehearsal step. I played with those flowers and nothing seemed to work for me until I supported them with simple white cardstock. Then like magic the two gift wrappings came together.

PicsArt_1414726859178


Here is what I did.

  • I used card measuring 3 x 3 1/4.
  • I stamped the sentiment Just for you top on one and bottom on the other just so you can see you can very this too.
  • I have a band of Silver Shimmer Trim supporting this.
  • Next layer the flowers out until the arrangement is appealing.
  • Take a photo of it! . (I love that we can do this in the modern world!)
  • Slide all the pieces off and start adhering them using the photo as a guide. You won’t have to remember where they went! Some are adhered flat with EZ dots adhesive. Some are mounted with 3D Foam Tape.
  • Bling it up – pop in some Thistle striped ribbon, coloured Bitty sparkles (Use our Shin Han Twin Touch markers) and some other bling gems.

PicsArt_1414726782015


Fill your little goodie bags with your gift – My Slate Paper Bag contains a handful of Mentos. The Slate Button Bag has a lovely Bath Bomb. (I had to include it in the photo because it is like the flowers I had been stamping!)

Close To My Heart Products used in these projects

s1411 It’s The Little Things

November Stamp of the Month S1411 It’s The Little Things available exclusively throughout November for $27 or for just $5 when you spend $75. with your CTMH consultant. I’d love you to leave a comment before heading off to the next stop,  Sue’s Blog, Patricia Manhire – Patricia Manhire’s Creative Corner


2

Hip pics albums make an awesome gift!

Do you like to brag? I am a bragging Nana and now I have this awesome little handbag size album to go bragging with!

This is the awesome little hip pics album. The project features my Grandson on his first birthday at his cake smash photo shoot.

This is the awesome little hip pics album. The project features my Grandson on his first birthday at his cake smash photo shoot.

For those of you looking for the perfect Christmas gift here is an idea that will suit your budget, your time, and a number of different people on your list. The Hip Pics Album kit is now available to CTMH Australia for just $18 and can be done quickly and easily in under two hours. I did this one for myself, but can see it would easily make a fabulous gift for a loved one in a number of ways. A Hip Pics Album is a fast, easy, cost effective project for you to make for someone special- and we all know how much people love gifts with photos and memories in them – or you can purchase a kit for your best friend or mum who are crafters themselves. If you want just that Hip Pic album and use your stash to decorate it that is possible too as they can be ordered on their own for $12 each.

Assuming the photos are already picked out and printed in under an hour you could have this done – a little more if you like to decorate more.

Check out these pages

hip pics album pages mini pocket 3

There are 8 white pocket pages  in the book therefore room for 16 photos. All you need to do is trim photos to suit the 4×4 window and mount them on a piece of cardstock 4 1/4 x 6 and slide it into the sleeve. Put one photo each side of the card. Then decorate and journal. in the ample space below and around the borders.

The kit comes with 5 sheets of petite die cuts in kraft, navy blue, pink, aqua and yellow and are just the right mini size for these 4×4 photo windows. The kit also comes with a coordinating stamp set so you can decorate those die cut embellishments with your ink. Add more decoration with sentiments and icons from other stampsets in your stash (if you are like me and need to decorate a little more!) By the end of the project you will still have loads of those die cuts ready to pop into another Hip Pics album. If you would like to make one but do not have ‘all the gear’ let me know and we’ll get you booked into a class to get one done.

Isn’t this just darling?

awesome pages done fast makes good sense for a great gift!

awesome pages done fast makes good sense for a great gift!

Items used to create this project are all available online now at my Jen’s Creative Classroom Close To My Heart online shop. If you join in on this months Monthly Virtual Gathering you may end up being the winning host and earn some great rewards. Click the link here an select join the November Virtual Gathering to do your shopping. You can simply enter the codes listed below or jump straight to the Holidays from the Heart guide to fin the Hip Pics Album and more. Don’t forget, you can get Stamp of the Month Illuminate for just $5 with a $75 purchase, and a free starred item from Holidays from the Heart with every $130 purchase!

Items Used in the Hip Pics Album

Hip Pics Album Kit Z1915

Exclusive inks – slate Z2173. Outdoor Denim Z2140, Indian Corn Blue Z2130, Cranberry, Z2116

Stampsets from Artiste cricut collection Z1790 and Artbooking collection  Z1906

Bakers twine neutral assortment Z1701

Cranberry 1272 and Slate X5930 Card Stock 

Adhesives – Tombow adhesive 1514   Memory Book glue dots 1772   3D Foam Tape Z1151

Find your happy in getting scrappy

Jen