28

Zoe Collection Australasian Blog Hop

Zoe

Hello and welcome to our mid month blog hop featuring the lovely new Zoe paper collection. If you came from  Lauren Moore – CTMH Craftings-  you are in the right place. As the hop goes full circle you can follow along to the next link at the bottom of this post.


Today I am bringing you a delightful double page layout featuring the Zoe Paper collection and some cuts made with the new Cricut Artistry Cartridge. I love the new icons and with over 700 images it is good value for money. I used umbrella key on page 38 to make the clouds, the umbrella, the new day and to cut the stencil for the raindrops. I cut the rain drop stencil at 6 inches and inked the drops with white pigment ink.

http://jenscreativeclassroom.ctmh.com/Default.aspx

Zoe papers and raindrops from Artistry

For the rest of the pieces I distressed the edges with sponge daubers using tone on tone and Glacier on white. I also added a little extra decoration with the Zip strip and some stamps from the Zoe WOTG stamp set which I adore. It is a very versatile set for scrapbooking and even includes a set of lines for journalling. Finally I have still got Coral sequins so a little White Shimmer trim and sequins have finished off the page. All I need now is a rainy day to get some photos! (it does not rain here much!)

zoe

Use a dauber and the rain drop overlay to get the rain drops.

zoe6 zoe5

zoe3 zoe

All of the products are available from my online store. We have a fabulous Stamp of the Month and the Get organised campaign as well. The Zoe Collection is the first of the new papers we have coming your way September 1 in our new Idea Book! Get excited, there is more exciting stuff to come!

I love getting feedback, so please leave a comment before you move on to the next stop on the hop with Meryl Cheetham – Mez’s Craft Room Hop along and see what lovely artwork she has to share with you.


Close to My Heart Products used in this project include:

http://thecreativeheart.ctmh.com.au

Artistry Cricut Collection

http://thecreativeheart.ctmh.com.au

Zoe Workshop on the Go

White Daisy Pigment Ink

Dauber Value Pack

http://thecreativeheart.ctmh.com.au

Coral Reef Sequins

14

Jump on it July International Blog Hop

Hi and welcome to the Jump on it July Campaign Blog Hop.

Jump

If you have arrived here from Jeanie Burch you are in the right place. If you have just joined in please look out for the next place to hop to at the end of my post.

Jump on it July is a fabulous campaign. it almost feels like Xmas in July…could be if you got the Xmas stamp. All you need to do in Australia is purchase $32.50 worth or regular priced stamps and you are entitled to get either the fabulous Life is Wonderful Stamp of the month for Free or any of these host reward stamp sets for just $6.50.

Jump on It July Find our more at thecreativeheart.ctmh.com.au

Jump on it July

How exciting is it that you can get these exclusive stamp sets without hosting. Remember it is this month only and there is no time like the present to grab some of those retiring sets you have had your eye on!

I am a little hexagon happy. It is a great shape to use in scrapbooking and I love the Host reward stamp set Happy Hexagons. It goes really well with another stamp set called Honeycomb C1537 and of course the hexagon Overlay in Artbooking. I sized the hexagon overlay to match the Happy Hexagon sized stamp. (I have lost that ccr file in the switch to Cricut Explore) Here you can see I have made use of some scraps, matched up some inks and got ready to play mix and match. The stamp here is the Honeycomb – after that I have used the Host reward set Happy Hexagons.

C1537 Honeycomb stamp set coordinates well with Host rewards set Happy Hexagons. Shop online at thecreativeheart.ctmh.com.au

C1537 Honeycomb stamp set coordinates well with Host rewards set Happy Hexagons.

Here is the completed artwork in my album. To achieve this I randomly sponged some ink into the hexagon overlay pieces using them as a mask. I kept some to stick down and support the hexagons I stamped as well. all of this work surrounds just one special photo.

Close up of hexagon detail. Paper here are NLA - but the concept works no matter what paper collection you use.

Close up of hexagon detail. Paper here are NLA – but the concept works no matter what paper collection you use.

www.thecreativeheart.ctmh.com.au

Completed page

In this second page, my calendar is the subject. I decided to tissue stamp in the hexagon overlay and I have used colonial white for the creamy look. I added the photo frame, the faux washi and the Happy Hexagons.

hex 6

Use a tissue to sponge into the page with an overlay of hexagons

Use a tissue to sponge into the page with an overlay of hexagons

www.thecreativeheart.ctmh.com.au

I hope you are inspired by these pages to get into hexagons and grab your Jump on it July special!
Please leave a comment before hopping along to the next stop at Wendy Coffman

Jump on it July Australia

This offer enables you to get one of these stamps sets for $6.50 with every $32.50 worth of regular priced stamps you purchase. You can shop online at my website and join my monthly virtual gathering or contact your consultant.

Here are the stamps you can get in this special. Just type the code or part of the title into the shop search box.

S1507 My Acrylix® Life Is Wonderful C1614 My Acrylix® Tagged with Love C1613 My Acrylix® Paper Bird B1477 My Acrylix® Exotic Flower D1615 My Acrylix® Sweet As Sugar B1454 My Acrylix® Thanksgiving Wreath C1596 My Acrylix® Happy Hexagons C1587 My Acrylix® Sing Glory B1455 My Acrylix® Be Jolly C1593 My Acrylix® Hats Off A1169 My Acrylix® Well Wishes D1608 My Acrylix® Better with a Friend B1458 My Acrylix® Cuddly Salutations A1163 My Acrylix® Practical Planning


Products used in these projects

C1537 Honey Comb (Retiring)

Hand Written Print Alphaset (retiring)

Exclusive Inks – Creme Brulee; Autumn Terracotta, Cocoa, Barn Red, Crystal Blue, Canary, Sorbet, Colonial White Pigment ink

Calendar – Retiring

Artbooking


5

Everything ABC’s Letter Y

abc bloghop

Welcome to the Everything ABC’s Blog Hop!

For this hop we will be featuring the letter Y. This may be the name of a paper, a stamp set or an embellishment. Whatever the crafter has chosen as their # element will be featured in their post. If you have just hopped onto my blog, please start at the beginning at Linda’s blog ~ Scrappy Therapy. If you came from Catherine Nowak ~ Catscrapbooking.com ~ you are in the right place. 


For My Y project it was easy to punce on Yuletide Carol x7187b. Yay!  We have a specific product with a letter for the hop! I do hope you enjoy the way I have used this lovely paper.

It is almost Christmas and we are almost done with our Christmas crafting opportunities (yes we should be that organised….if only!)  but I had to share this really cute one sheet bag with you! No Cutting required!!!

yuletide carol bag


This can be used at ANY time of the year with any pretty paper you have. I took the idea from a number of you tube videos – but the one by Kelly Gettlefinger is the one I chose to follow for its clear instructions. Once I did one, I could do many.

Here are my variations from the dimensions and directions given. 

  • I scored 1/2 inch to fold over the top edge taking advantage of our double sided B and T papers to trip the top edge before doing anything else
  • When she folds ‘in’ to the 6 inch mark – I actually score at 3 inches to do this folding in – and it is scored opposite the first step.
  • When she scores at 5 inches and 7 inches I did 4 1/2, rotate 180  and score at 41/2. There are two reasons – 4 1/2 is because I used 1/2 for the turn down on the top and flip for the second score because our CTMH scroeboard is sized to 6 inches.
  • Please crease this fold – it does help with the next step. I like it creased all the way – it is up to you.
  • Once you reach that point in the video watch carefully – what she shows you is easier than me trying to describe it. However it is easier to do with the paper vertically placed in front of you. Pay attention 3 minutes into this video – watch what happens and you will soon be able to do it yourself.

Here is the video by  Kelly Gettelfinger

My  Verbal directions for students go like this:

  1. Remove the zip strip. Determine the  top and bottom edges. Score these at 1/2 inch and fold the desired trim forward. Stick this down with bonding memories glue. Now with that edge against the top side of the Score Board (so you have now rotated the whole thing 90 degrees) score at 3 inches. Rotate 180 degrees and score the second line of 3 inches.
  2. Take the paper to your table and fold in at the 3 inch marks so the sides meet in the middle.
  3. Now while this is folded – back to the scoring board you go. With the longest edge running across the top of the score board score at 4 1/2 inches. (The video says 5 – but we have used 1/2 inch for our trim!) Rotate 180 degrees (aka flip) score at 4 1/2 inches again.
  4. Now back to a nice flat surface. Open it all out and give those 4 1/2 inch scores a bit of a crease to make the next step easier.
  5. Turn the paper, fold it on the 3 inch lines and place it lengthwise to you. Press one finger in a scored corner (4 1/2 inch line). Use the other hand to bring the folded score line from the middle out and parallel to the edge. Crease inside. Repeat for all four corners. ‘Push out, push in and press’….(Video)
  6. We are going to push the sides in and pinch it – just as it is in the video. I describe this as ‘push it in the back and pinch it’. Keep it even at the sides and it will look nice.
  7. You bag will almost stand now. You can glue the 3 inch folds down along the top edge and I prefer you do the inner corners too or your lovely purse will flop open and not look pretty. A little glue between this gusset and the front and back will hold the bag in a nice shape and voila you have a bag without any cutting!
  8.  Decorate to your hearts content. I used a standard single hole punch to thread wide ribbon through as my handles. You could use cord, you could also loop ribbon over from the back to a button or toggle in the front. You can ad an additional flap as seen int he video. All mine at done just with ribbon from my stash.  Check your stash and use what is there!

Decoration

Cricut flores mounted

I chose to decorate my Yuletide Carol bag with black accents at first. I started with the trendy Eiffel Tower from Artfully Sent. I also cut the Silhouette lady but ended up leaving that out. My flowers are a mix of all sorts from what I now call my flower basket. I have mounted these onto a piece of card some time ago – they fit this project just right. Each flower and leaf is cut from either Art Philosophy or Artiste in a variety of shades of cardstock. I have used spray pens and liquid glass in making them. I added tht little bit fo glam with the black shimmer trim and some bling gems. Finally I tucked in the sentiment just for you from Novembers Stamp of the Month. (NLA)

Close To My Heart Products used in this project are available to order from www.thecreativeheart.ctmh.com.au 

Please have a go at this quick easy bag! You do not need to make flowers to go on it – a simple fussy cut stamp, some buttons, bows or ribbons will do. It has been a real hit with my team and customers and is a lovely way to use up some of your stash for gift giving in any season! I hope you have enjoyed this post and will come visit again. Please leave a comment before you head off on the blog hop to the next post. Your next stop on our Everything ABC’S blog Hop is Diana Saunders

In case you get lost along the way…go to Scrappy Therapy (link: found on signup doc) for a complete list of participants!

PS You can make a ruffle just like on the bag in the video by wetting 1/ to 1 inch of your B and T or card stock. Don’t be afraid to get it wet it is quite strong at this width. Gently crumple if desired then unravel. Now place it on your all purpose craft mat or other non stick surface. Mold it into the ruffle shape you want. You can use pins and mini pegs for supports to hold wet paper up if need be. leave dry over night. It is ready to be glued onto your bag. Too easy! 

Jen

The Creative Heart


Cyber Monday Special!

Cyber Monday is pretty new to me – but very popular and anticipated by online shoppers – so here we go.  CTMH have something for you on Cyber Monday!!

NB Aussie Readers Only!

cyber monday

Have you been wanting to purchase one of our four amazing Cricut collections?  Have you been dropping big hints to your family that such a collection would look good under your tree? Nudge Nudge Wink Wink 🙂  Need help with the hints? How about a 20% discount all through Monday December 1 Cyber Monday?

CTMH is participating in #cybermonday for the first time ever with 20% off all of the Cricut Collections. Choose from Art Philosophy, Artiste, Artbooking or the recently released Artfully Sent. Share a link – below – to the collection of your choice with your selected loved one (who has ultimate command of your wishlist)  by clicking an image below. This will take you right to my store to pop it into your cart.

Would you like more?…OK!

Anyone ordering their Cricut Collection online will be in the draw for host rewards! Min $30 to spend, but it could be a lot more!

cricut-artbooking-page (1)

Add a lift to your scrapbooking with Artbooking

cricut-artbooking-collection


cricut-artiste-collection

Fun dimensional possibilities with Artiste

cricut-artiste-gift-boxes

Make Pretty things! Save 20% #cybermonday

cricut-art-philosophy-collection

Art Philosophy contains many must have shapes and card bases. 700 images means super value in this cartridge!

cricut-art-philosophy-cards

14-ai-cricut-artfully-sent

Artfully Sent is loaded with many different types of cards and tons of fun elements you can use.

14-ai-cricut-opener (1)


Each collection comes with 3 exclusive stamps sets and more! Featuring Loads of images and card options these are must have cartridges for Cricut lovers. So head on over to my online store and get yours sent right to your door! Alternatively email me nenifoofer@gmail.com and I will handle the ordering for you.

Remember, here is the deal – 20% off Cricut collections, Cyber Monday, 0000 hours to 2400  Monday December 1 ONLY!

Enjoy your shoppping! If you woud like some help to decide which cartridge to get or what else to put in that parcel give me a call! nenifoofer@gmail.com


10

Everything ABC’s Letter V is for Volcanic

abc bloghop

Welcome to the Everything ABC’s Blog Hop! For this hop we will be featuring the letter V This may be the name of a paper, a stamp set or an embellishment. Whatever the crafter has chosen as their V element will be featured in their post. If you have just hopped onto my blog, please start at the beginning at Linda’s blog ~ Scrappy Therapy. If you came from “Lauren Moore – CTMH Craftings”  then you’re on the right track!


Hello and welcome to a small piece of my personal Scrapbooking world. I am a lover of mixed media and like to dabble in it from time to time. Choosing a V project isn’t easy but I have settled on this page that illustrates the fabulous Sun Pyramid, the largest structure in the Ancient City of Teotihuacan in Mexico. It is my V project because of the presence of coarse red volcanic rock which I have attempted to symbolise in the background art work on this page.
I first visited Mexico in 1979 as a child. I was an exchange student and at the mercy of host families to see the country. The day I was brought to visit these pyramids we found them closed. (I suspect that family knew little about them!) I dreamed of a return to Mexico, and promised myself that if I ever did I would go to the Sun and Moon Pyramid. Fast forward 35 years here I am on the Street of the Dead with the Sun Pyramid in the background! Volcanic rock heaven!!! I could not walk the street due to sciatica but I was there….right there…at last!
volcano texture

The Sun Pyramid of Teotihuacan. This page is presented in the Black Designed Decor Black Shadow Box frame It just makes the page even more stunning. I love how I can quickly pop pages in and out of these frames!

The pyramid rises 216 feet (66 metres) above ground level, and it measures approximately 720 by 760 feet (220 by 230 metres) at its base. It was constructed of about 1,000,000 cubic yards (765,000 cubic metres) of material, including hewed tezontle, a red, coarse volcanic rock of the region. (Read More about this fascinating landmark here).  Obsidian, a Volcanic Glass is also present in the ruins.

I have created this page in the following way:

  • Base 12 x 12 Slate cardstock
  • Overlay with Texture paste. I used the V shape of the overlay in the Sugar and Spice Key of artbooking page 80 and a knife to lay down this shape to reflect the steps of the pyramid. Allow this to dry well.
  • I used bubble wrap technique to add some spots for the round rocks evident in the stone work. I simply painted the wrap with gesso and pressed it onto the paper in places around the dried texture paste. Focus on ares that will not be hidden by the photo.
  • Smudge it all up! I used ink pads direct on the texture paste and in places of the spots. I used the sponge to add more and rub edges. I have not completely eliminated the slate grey background. I have used Slate, Cocoa, Chocolate and Barn Red inks to achieve the overall look. If you do this it will look different – it is the process rather than the outcome that is repeatable!
  • The next step is to rehearse the placement of the photos and mixed media embellishment pieces. These flowers and the champagne bottle button were from my stash. The Jute Ribbon is a product NLA from CTMH. The chain is a piece of a Base and Bling Faux Gold chain. Chain looks great on pages! Just snip a bit off with pliers!. These items are all quite deliberately grouped in the bottom right corner and help to tell the story. The hessian has the harsh texture of cloth from the time, the chiffon symbolises the wealth of the priveleged who lived here, the flowers represent Roses, a national symbol of Mexico, the bottle of bubbles my celebration for finally being there and the chain marks the sections of the city protected and still to be excavated.
  • If the eye is lost it can follow the stamped signs which are from different stamp sets. Here we Go D1600 and D1622 Wanderful WOTG set as well as A1160 All the details NLA (Host reward) Stamped embellishments are in Barn Red on Colobial White, smudged with Desert sand to age them out.
  • I adhered the photos to Kraft and Barn Red cardstock as a mount and used foam tape to stick it to the base. There is also a bit of Slate Washi Tape tucked in there.
  • Liquid glass is my best friend for sticking everything else down.

I am so pleased the Pyramids are all now under the good care of Authorities and are being properly investigated by archaeologists and historians. I am truly grateful to have had the opportunity to be gobsmacked, up close and personal with the pyramids and bringing a dream to reality!

What is really fun about mixed media is no page is ever the same. Sometimes you can start with a sketch, sometimes the photo, as was the case here. As long as you can tie it all together with a colour, a theme, and can clustering of embellishments it will work for you.

Here is a list of Current products used in this project. You can shop online at Jen’s Creative Classroom and have it delivered right to your door.


I love getting your comments and feedback. Be sure to leave a comment below before you move on in the hop! Thanks for stropping by

jenny sig

Your next stop on our Everything ABC’S blog Hop is Carol-Anne Grenier. In case you get lost along the way…go to Scrappy Therapy for a complete list of participants!

Confetti Wishes Exploding Card with a cupcake!

A great big Happy Birthday to CTMH as we celebrate #30yearsofhappy stamping and enjoy the FREE stamp set with 30 mini stamps! This month I am also featuring all things Birthday at my Monthly crop and the best paper collection for this lind of celebration is Confetti Wishes.

Birthday Explosión box

Birthday Explosión box

I have created this exploding box card for display and inspiration at my upcoming workshop on September 21st. (If you are local be sure to book now!). This piece showcases what we can achieve with Confetti Wishes X7189B paper, the Artiste Cricut cartridge and our awesome Pink glitter paper Z1792!

If you have not tried the glitter paper out yet then I suggest you do. It doesn’t flake and cuts clean on the cricut with blade set to 6 and doing a double cut as I did for the title here. Slow it down for intricate designs, and lift carefully from your mat. If it is really a really sticky mat you will need the spatula.

1410505545045


There are a lot of tutorials on exploding box cards so I will not detail that here. For the cupcake I cut a cupcale holder from artiste at 4 inches. I guestimated the size I needed and it worked out just right. I stamped and embellished this before folding it with ‘Gliitter girl’ from Glitter Glam B1465 and the foliage from ‘Love This’.B1432. I sat a 3 inch styrofoam ball in the cupcake holder and covered that with double sided tape and removed the covering from the tape leaving sticky side ready for use.

Time to decorate the cup Cake!

Thoroughly wet 3 1/2inch pieces of Thistle card stock and scrunch each one up. Gently unfold these and lay them on the open double sided tape on the top of the Cup Cake. It won’t stick while it is wet – just position it , prod it, move it till you are happy with the look. (Dressmakers pins will hold it if need be) Here is the trick….Allow to dry overnight. By then it will be stuck and nice and firm again for you to play with.

1410505229588

Add a touch of Bonding Memories glue 1512 around the top of the cupcake rim and over the iced top. Sprinkle with glitter. (My messy mat  – All purpose Mat Z2045 helps make this job much easier to clean up!) Add something on top, some Bitty Sparkles Z1263 and you are done. I have adhered the cup cake to the card by stacking 4 layers of 3D foam tape Z1151 in the centre of the card so the stack reaches the bottom of the styrofoam ball. On the lid of the box I have used sponge daubers and more glitter to finish it off. 

Glitter Paper Tip

I have found the stickers are not staying put on the glitter paper. The answer to that problem is liquid glass.!!! Our answer to anything that needs to be Stuck! 3D Foam tape also works well on this surface. 

Shopping list – Note – this shoping list entitles you to add – Free #30yearsofhappy stamp and Stamp of the month Family is Forever! – That is and additional $48 worth of stamping fun for just $5!

You might also need these inks – Thistle, Canary and Pacifica.

Additional Supplies – available as 50% off host reward items

Thank you for stopping by. I would love to have some feed back in a comment before you go! I hope you are inspired by this project. If you are local to Mildura and would learn to make one of these in a class setting please let me know in your comment below. Don’t forget our workshop is coming up. Here is a sneak peek.

1410505656103

You can order all you need online right here. Be sure to join my September Virtual Gathering to be in the draw for the Host rewards. Happy Stamping Month! 

Jenny

jenny sig

7

May Stamp of the Month S1405 You’ve Got a Freind

sotm blog hop

Welcome to the Australasian May Stamp of the Month You’ve got a Friend Blog Hop.

If you have arrived here from  Monika – A Sprinkle of Glitter  you are in the right place. If you landed here by accident, no problem, please join in by following the link at the end of this post.

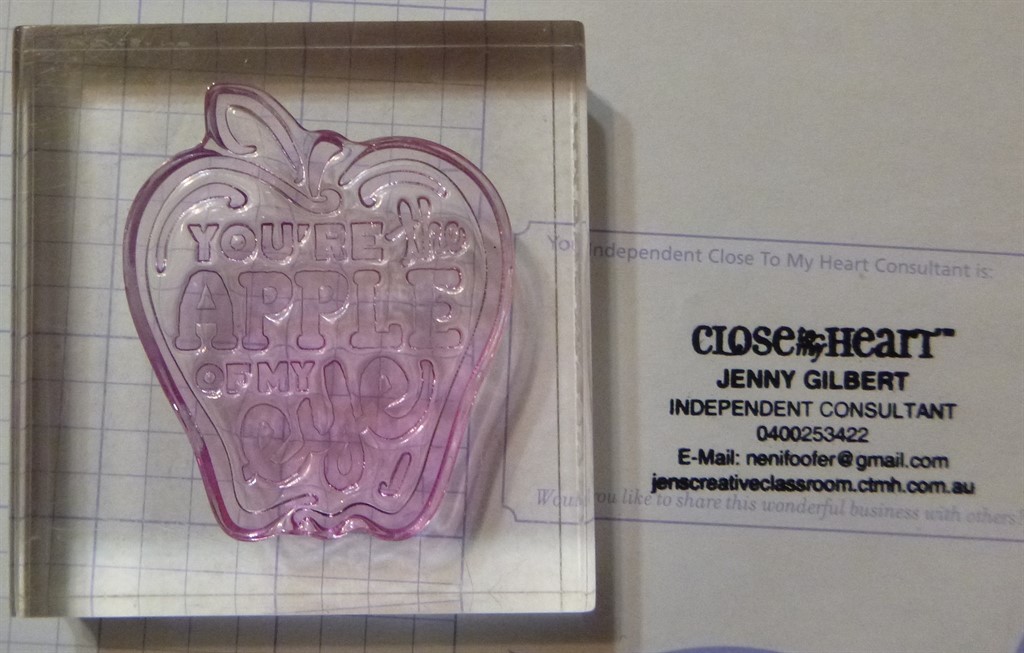
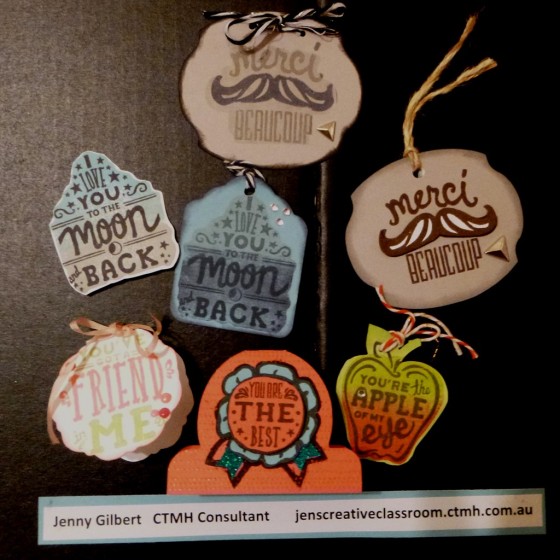
Today I would like to share with you a collection of Love Notes which features the May Stamp of the Month S1405 You’ve got a friend, available exclusively throughout May  for $24 or for just $5 when you spend $75.

love notes

I see this stamp set as the opportunity giving you some new stamping techniques so let’s get started!

Background stamping is a technique where we first stamp the flat back of the stamp in a colour before stamping the detail. pop your stamp on your block upside down. It will look like this. Being new, you will need to season this side – give it a good rub on your arm. Note this technique works best with asymetrical designs, but a little leafy green on the wrong die adds a quirkiness to this finished tag.

????????

Ink it up in one or more colours. On this item I have used Pear and Cranberry pigment inks. These are going on Sweet Leaf Cardstock. I have cut the apple shape from the Artboking Cartridge on page 69 at 2.75 inches. This shape is just right for an apple shaped tag.

???????? ????????

Now flip the stamp the right way up and stamp the sentiment.

????????

Add a hole with a hole punch and if you like trim a little of the extra green shape away. There is a cute little tag to stick in a lunch box or put with a gift.

Just to practice the technique let’s do it again! ???????? ????????


To use a precut tag, cut tags with Art Philosphy Tag page 40 at 3 inches. I have used Crystal blue cardstock for this tag. Finish the edge with one of the ink colours you have used in the stamping. I have used Outdoor denim, Whisper, and black for this sample. Punch a hole and thread with bakers twine or ribbon from your stash.  You can also do this design directly on card stock and fussy cut the shape with your awesome Microtip scissors.

Masking 

Masking with paper. This is a great opportunity to use up some scraps. Stamp the image on scrap paper. Cut out the word you wish to stamp in a different colour. Keep both pieces! So I cut the mustache away but also kept the thank you section intact,

????????

I background stamped this the same as the first two samples  but this time used the same colour as the card stock – whisper for a more subtle look. The shape is from p 46 in Art Philosophy. Using Cricut Craftroom I unlocked the aspect ratio and made the shape 3.5 x3 inches for the sentiment. Fist put the mustache scrap in place and stamp the sentiment in your first colour – in this case Slate,

????????

Then swap out the scrap pieces – and stamp the mustache section in a second colour. I chose black. Be sure to line up the mask nicely so you maintain the whole.

????????

Our clear cling stamps allow us to line things up easily. Stand up and look directly down through your stamp block to place exactly where you want it.

???????? ????????

Finish with edges distressing and some bakers twine. Add a stud too!

Layering

Here is the same stamp this time instead of masking I am layering. I stamped the image on the card,in cocoa  and on some scrap in black. I fussy cut the mustache and then added this to the card with foam tape. There is no background stamp on this sample.

????????


I have also used layering for ‘You’re the best’. The base is a card from Art Philosophy p 48 cut at 5.25 wide x 3.5 high. (Cricut craft room allows you to unclock the aspect ratio! )

????????

Stamp the image in pigment ink on the UV coated card (this is from the Free to be me collection). Stamp again on the lagoon, and on the back of the UV coated red to get 2 more layers. The thick black lines make fussy cutting a breeze if each layer is stamped in the same colour – black. Use foam tape to mount these pieces on.

Masking with Washi Tape

Finally let’s do masking with washi tape! Any washi tape will do. Mask out the bit you do not wish to ink, Ink up the stamp, REMOVE THE WASHI. (Yes I have forgotten to do this sometimes!) Stamp the image, Repeat the process covering what is already stamped and ink up in your second colour, Remove the washi – look through the block carefully for placement and stamp you second word.

???????? ????????

You end up with this colourful result.

????????

Finish with Flamingo dots and a bow and you have a cute card. I cut this card from Art philosophy p 52 at 2.5 inches. It is only just big enough. I would recommend trying 2.75 inches just so the design is not right at the edges. I have used Pear and Smoothie as colours for this sample.

????????

Once I had all my love notes done I went through and added sparkle, triangle studs and even washi tape to put a little bling into the finished pieces.

I was experimenting when making these. I am more pleased with some than others and that is largely through colour and shape choices. Don’t be afraid to play because the sentiments on this months stamp of the month are very suitable for lunchbox love notes and your family is sure to appreciate you popping one in as a surprise ‘Just ‘cos’ one day!

Remember Stamp of the Month is available for $24 in May ONLY, or you can purchase it for $5 with every $75 from your consultants online store – Jen’s Creative Classroom at Close To My Heart. (AU only) I love to have comments and feedback so please leave a comment before moving on!  Thank you for stopping by. I hope you have enjoyed this little venture into stamping techniques and you can produce some cute little love notes for your family.  Your next place on the hop is Patricia Manhire She is sure to have come up with something special for you!

Supplies used in the love notes: Available from Jen’s Creative Classroom. 

Arbooking Cricut collection Z1906

Art Philosophy Cricut Collection Z1686

Natural Metallic Bakers Twine z1921

Micro Tip Scissors z1836

Durables Triangle Studs z1928

3d Foam Tape z1151

Washi Tape 

Flamingo Dots z1934

Exclusive Inks – Pigment inks –  Cranberry, Pear, Outdoor Denim, Whisper, Black, Cocoa, Pear, Smoothie, Slate,

Cardstock – Sweet leaf x5639; Crystal Blue 1292; White, Whisper

Free to Be Me Paper Collection – National Scrapbook Month Offer

7

Everything ABC’s Blog Hop H

abc bloghop

Welcome to the Everything ABC’s Blog Hop! For this hop we will be featuring the letter H This may be the name of a paper, a stamp set or an embellishment. Whatever the crafter has chosen as their # element will be featured in their post

If you have just hopped onto my blog, please start at the beginning at Linda’s blog ~ Scrappy Therapy  If you came from “Pam Trostle ~ Pam’s Crafty Creations”

H is for HEXAGONS

Our idea book and Catalog is not only a catalog but a wonderful source of inspiration! There are many places to find Hexagons in Close To My Heart products. For this project I have chosen the Honeycomb Stamp set, Artbooking Honeycomb overlay, and Ariana papers.  The project is inspired by the layout featured on Page 95 of the Idea book and Catalog. I simply have switched papers, and embellishments. The rest is very much the same. Cricut Collections like Arbooking really open up the creative possibilities for our scrapbooking. You can follow the Artbooking Made Easy videos  too. Each week CTMH brings us a new episode to inspire us!

Artbooking Hexagon Overlay and Honeycomb hexagon stamps make a beautiful combination.

Artbooking Hexagon Overlay and Honeycomb hexagon stamps make a beautiful combination. I love Mr Mower – behaves himself. Ms Snippety is so nasty she doesn’t behave so she isn’t in a photo of my garden!

To create this layout I have used the honeycomb overlay key on page 67 using the 11 inch setting and the title spring is from page 63. I created the word ‘garden’ by grouping and linking letters in Cricut Craftroom.layered papers on mat readyfor four different colours of hexagons.

Next I did as many  Hexagons as would fit on 3 inch strips on my mat using different papers, some printed, some plain. This is cut at 11 inches from page 66. Remember these keys have images adjusted to suit the sizeof the artbooking layout they are intended for. This is the perfect size for the Honeycomb stamp set. The plain ones were stamped with Honeycomb stamp set C1537 I love the versatility of this stamp set and think it is a must for every crafter who stamps!

C1537


Next I had to get those hexagons onto the overlay. This could be a really really sticky business but doesn’t need to be with Bonding Memories Glue pen, Tweezers, and a piece of non stick baking paper. Using this paper underneath as you work will avoid things sticking where you do not want them to stick! Draw with the glue pen and stick the pieces down. Give the glue time to ‘take up’. Once it grabs, it stays stuck!

Bonding Memories Glue pen, baking paper and tweezers.

Bonding Memories Glue pen, baking paper and tweezers.

It is not necessary to fill all the spaces. You can skip some and stamp directly on the background. I also only wanted to fill those places that would be visible as the rest is covered by photos. So I focused on top and bottom. Allow this to dry really well before adhering it across 2 12×12 pages. Allow this to dry if you have used Bonding memories glue, then split into two.

To decorate I have used other strips of Ariana paper, the exclusive consultant only Petite Perks stamp set to put on some butterflies and dragonflies, (If you Host a Gathering you can be cheeky and ask for this stamp set as your gift for hosting! It is really cute. It also has a bird and a flower.) Don’t have a nearby consultant? Join and you will get these AND YOUR FREE CRICUT CARTRIDGE  if you join our family in April ready to create and do business.

During April when you join us at Close To My Heart you will get one of these Cricut Collections Free. This adds $130 value to your already fabulous $400 value kit. Talk to your consultant today!

During April when you join us at Close To My Heart you will get one of these Cricut Collections Free. This adds $130 value to your already fabulous $400 value kit. (Australia) Talk to your consultant today!

Here is a close up of the completed pages

??????????????? ???????????????

I decided to use the Rose and title bars from Ariana complements and the leaf design is from Art Philosophy Cricut Cartridge page 43. For the leaves and titles I have added dimension by daubing Olive exclusive ink to them. One stem of leaves is given dimension with Foam tape. The background paper is Sorbet Cardstock and the little images are stamped with Sunset and Sorbet. I have mounted the photos on Cashmere card stock after chalking the edges up with Chocolate distress ink. I have used the sanding kit to distress the outside edge of the pages.

Your next stop on our Everything ABC’S blog Hop is “ My Heart’s Design – Cary Magnani” and see what she has done with H. .In case you get lost along the way…go to Scrappy Therapy for a complete list of participants!

Products used in this layout

Cricut® Artbooking Collection Z1906

Cricut® Art Philosophy Collection Z1686

Honeycomb C1537

Bonding Memories™ Glue 1512

Ariana Paper Packet  X7179B

Ariana Complements X7179C

Distressing Inks Z1296

Sponge Daubers Z726

Sanding Kit  Z1294

3-D Foam Tape Z1151

Tweezers Z1382

Exclusive Inks Sorbet Z2164 Olive Z2137 and Sunset. Z2191

Floating your Fancy with Cricut Cartridge Inspiration

Hi! Thank you for visiting today!

Did you know Close To My Heart regularly gives us fabulous creative ideas for projects and techniques we can use on pages, cards and off the page projects?

Well they do and my Cricut is begging to be running hot with some of these ideas and I take these ideas to my classes and workshops. I can show you how to make the most of your kit and your cartridge and even help you source a Cricut Machine if you do not have one.

I am especially excited this much as Close To My Heart has a gift for you if you decide to join our family where everyone is welcome. You can choose the Artbooking Cartridge free if you join this month! Take a look at the ideas presented here as an example of what this Cricut Collection can do for you.

You can do these on a page, in your project 360 album, or on anything else that will work for you! The exclusive stamp sets are part of the Free cricut collection!

If you would like to know more about joining Close To My Heart and getting your creative on complete this contact form and I will respond as soon as I can!

Jen


16

Everything ABC’s Letter G- GLAMOUR!

abc bloghopWelcome to the Everything ABC’s Blog Hop!

For this hop we will be featuring the letter G. This may be the name of a paper, a stamp set or an embellishment. Whatever the crafter has chosen as their G element will be featured in their post. If you have just hopped onto my blog, please start at the beginning at Linda’s blog ~ Scrappy Therapy If you came from Darlys Recker – Crafty Happy then you’re on the right track!

G is for Glamour!

Close up of some of the Glam with CTMH

Close up of some of the Glam with CTMH

We have plenty of Glamour at Close To My Heart! There is of course lots of shimmer and bling to choose from. We have glitter papers that do not flake everywhere. We have a whole range of colours in sparkles and gems including the Sparkle Black Flourishes. I also I love our alphasets and I especially love the Glamour sets D1537 and D1522. It is this alpha set that was the starting place for my project.

Glamour Upper Case Stamp Set

Glamour Lower Case set

From this decision and selecting the photo I then went for a browse through my Cricut Collections and found an overlay in Artbooking which has doubled as a stencil and glamour icons  Artiste. There is the Eiffel Tower, a Dressmakers manikin, a dress, a coat hanger, a chandelier and more on p 40-41. I cut the overlay from page  of Artbooking p 47. Then I did a bit of everything else. I tried a few different pieces and not all made it to the completed page. But that is ok – that is what Mixed media is about!

In my stash I had gold ribbons, paper clips and some other bits and pieces along with my Gesso, Texture paste and Spray pens.

Finally I grabbed my Base and Bling rhinestones ( I could have chosen more!) and I had a rather large assortment of Glamour pieces to choose from for my page to go with the Glam look of my girlfriend and I celebrating in style.

Of course red an purple are hard to work with. By sticking with neutrals of Black, Bamboo, and Desert Sand in both Ink and cardstock I was able to back this photo and not create too much competition.

Here is the final page I came up with

The finished page  minus some journalling

The finished page minus some journalling

The How

I began with a white cardstock base and first sealed it with gesso. (Available from art supply and craft stores) CTMH cardstock is very absorbent for any wet techniques so this step is important. I then used my overlay as a stencil and added texture paste.  (Available from art supply and craft stores). Wipe the excess paste off the stencil and you then have the overlay ready when dry for inking. This step was left overnight to dry.

?????????

?????????

Use a spatula, knife or tongue depresser to spread texture paste over the stencil.

?????????

Lift the overlay (stencil) away, wipe off excess and leave to dry. Baking paper is excellent for this as nothing sticks!


I then sprayed black ink onto the surface. It looked more grey than black when dry but that was ok. You can see a touch of green in this when sprayed too.  I rubbed the dried texture paste with the ink pad and got  a nice strong black as a stark contrast. I then smudged the background with Bamboo Pigment in and then background stamped the page with Bamboo and Black. For the black I used secondary stamping technique. This means you stamp once on scrap  then on the project. This took the ‘strong’ black out so it did not compete with what was to come. The stamp set for  this section of the work is from Inspiration Flourishes Stamp Set C1581. I also used this stamp set in the embellishments on the page.

?????????

Get some nice big drips, hold the page ertical and let it run for a little more fun!

?????????

?????????

I rubbed the overlay piece with bamboo pigment ink. I also smudged this into the background.

. Next I had to bling up the Paper for the photo so I used Versamark ink and some Silver embossing powder. You could easily use Silver Glitter paper to do this without all the fuss!

Dress Ups! This is the funbit. Play around with your elements and where you may place them on the page. Once you are happy with it you can begin to stick it down.

Dress Ups! This is the fun bit. Play around with your elements and where you may place them on the page. Once you are happy with it you can begin to stick it down.

Now I finished off elements ready for the page. I used liquid glass on the Chandelier and Eiffel Tower, distressed the edges of the dress, put overlay on the manikin and stamped and distressed the title and other elements.I found the overlay needed black behind it so I did that and my piece of scrap silver was too big so I made it smaller. I added and took away bits of ribbon and things from my sewing stash too. You get the idea. play dressups and see what you come up with.

My Gold ribbon was wired. To stick it down I used Liquid Glass and a bit of weight thanks to a craft knife and scissors while the glue dried. I also used foam tape to help with height for the other pieces.

Weight used to allow liquid glass time to dry and hold the ribbon

Weight used to allow liquid glass time to dry and hold the ribbon

I then went ahead sticking all the other bits down. At last minute I decided to add the ivy lane flowers and therefore needed a bit of green – I had some other pieces I had cut and the negative spaces from these so they did the job. The finished arrangement is not like the first – the dress or the tower….I wanted the Eiffel Tower to fit in. I also needed to sponge a little more black under the dressmakers manikin so it didn’t get lost.

Finally I decided the page needed an edge so with the help of daubers and Bamboo and Desert sand I got a distressed edge.

Here is another look at the finished piece.

????????? ????????? ?????????

I hope you have enjoyed this project and are inspired by this way of taking your scrapbooking to a new level with mixed media and the help of the Cricut Collections. I hoe you know by now you can get a Cricut Collection Free this month if you join us at Close To My Heart.Discover the Art of Business Promotion. That is a whopping $130 AU extra for your kit to get started. Please chat to your consultant  about the April 2014 CTMH opportunity!

This is the final stop on our Everything ABC’S blog Hopfor the letter G. I hope we have inspired you! You can go back to the beginning  Linda Norman- Scrappy Therapy . If you have just entered the hop be sure to head over there and go through all the posts. Hop on over there and See what she has done with G!

CTMH Products used in this project are available to purchase online. 

  • Glamour Upper Case Alphaset D1537
  • Inspiration Flourishes C1581
  • Inks: Black Bamboo Desert Sand
  • Black and silver Glitter paper  Z1829
  • Cricut Collection Artbooking Z1906
  • Cricut Collection Artiste Z1790
  • Spray Pen Z1380
  • Liquid Glass z679
  • 3D Foam Tape z1151
  • Ivy Lane Assortment Z3001
  • Sparkles Black Flourishes z1745

In case you get lost along the way…go to Scrappy Therapy (link: found on signup doc) for a complete list of participants!