6

Home for the Holidays S1014 September Stamp of the Month


sotm blog hopHello and welcome aboard our Stamp of the month Australasian Close to My Heart Blog Hop. If you have arrived here from Lauren, CTMH Craftings  then you are in the right place. If you landed here by accident, no problem, please join in by following the link at the end of this post.

It is that time of year again when Christmas suddenly looms closer and the shops are already selling decorations! (Even before the AFL Grand Final was done!) For those of us who are crafters we need to make the most of the warmer spring air and get down to making our Chrsitmas goodies. This stamp set – Home for the Holidays S1410 is perfect for this task. Home for the Holidays S1410 is available for $29 or for just $5 when you spend $75 this month only. When shopping online, just place your order of $75 or more and you will be prompted to add it to your order.

1410-sotm-cricut-box

Artwork by Close To My Heart – Another idea befitting my theme today!


Do you do Kris Kringle in your workplace or in your family? In my other job we KK from Dec 1 until we break for Xmas and we are always looking for little goodies to make our KK smile for the day. Below are 4 such goodies that are well priced and easy to do thanks to the stamp set and the Cut Above kits.

wpid-ctmhs1014.jpg

Starting at the right I have popped 3 Lindt Chocolates into the Cut Above Holiday treat bag. Z2057 I stapled it up with our Mini stapler z2027(a new fab tool) , added some Ruby Red Chevroned Washi, z1933 and stamped a read Bauble from the stamp set using Cranberry. I also added some Topiary mini Chevron Ribbon. z1929 A few minutes and the task was done. I could easily knock up the whole 10 of these in no time and they look so Colourful!

Holiday Treat Bag Kit. All you need in addition to this is the lollies and a stamp to go on the labels! Or use a different label or tag as I have!)


Treat kits come with sticker to adhere to lollies, but these Lindt chocolates (divine) are round so while I have the stickers there I am thinking the rest of my stickers may be used to make fast simple cards. I could not find a nice flat round wrapped sweet for the bag so will repurpose the stickers.I am now enthused (non Halloween person here) to get the Halloween treat bags because I love the colours and think they will make nice party favours, or just become part of my door prize repertoire at workshops. I am sure to find some children who would want the ‘Halloween’ stickers and I have lovely labels I can add to the bags.

Next we have 2 cards. I love the lolly stamp, and am enjoying the colours in the Snowhaven Paper Collection x7188b. I first did a lolly border on the card on the right, added some paper then pieced and layered up the bear. I stamped it in Glacier twice and Red once. A piece of black cardstock seemed to support this the best on the paper. I used clear embossing powder Z2088 on the bear that I fussy cut and popped up.

This card gave me the idea for the second one…a simple lolly background. This could be repeated for any occasion, in any colour!  I stamped the red ones and used the stamp carrier sheet to work out the spacing between them. I then stamped the Glacier ones. I did not manage to go straight…can you notice that? I finished it with Red Bakers Twine and the Dreaming, Believing, Wishing sentiment.

Finally I decided to have my first go ever at stamping on our My Creations Muslin Drawstring Bags z1822. I am very pleased with the result. I stamped directly on the cloth with exclusive inks. Be sure to stick some scrap paper inside to prevent bleed through to the back! It is filled with Lindt goodies and finished off with the Bauble stamp and some bakers twine.

There are 3 stampable bags in each pack


Home for the Holidays S1410 is only available until Oct 31st from your CTMH consultant. I’d love you to leave a comment before heading off to the next stop,

Natalie – Close To My Heart with Natalie

Supplies Used


Girl’s Night In October 10th in Mildura.

girls night in inky pinky

It is Inky Pinky Time!

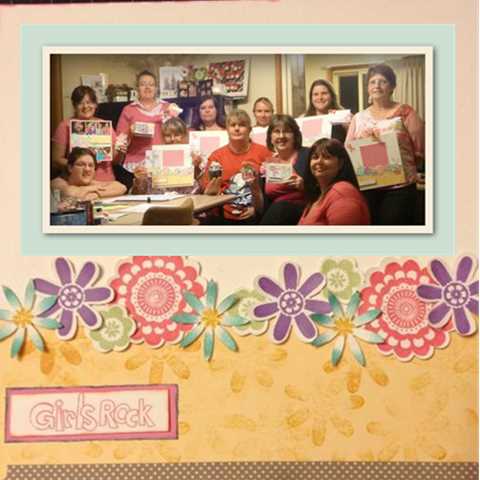
Last year my small group and I had a blast for our Girl’s Night In gathering called Inky Pinky. We raised $400 for the Anti Cancer Council, wore Pink, ate Pink and got pink ink on our fingers. I provided a page layout, a bookmark and an off the page project.

Take a look at some of the fun we had!

WE completed this page and of course got a photo to go on it!  The Girls Rock C1538 stamp set is still available. It is not in the printed Inspirations but you will see it in the online store - along with many more stamp sets!

WE completed this page and of course got a photo to go on it! The Girls Rock C1538 stamp set is still available. It is not in the printed Inspirations but you will see it in the online store – along with many more stamp sets!

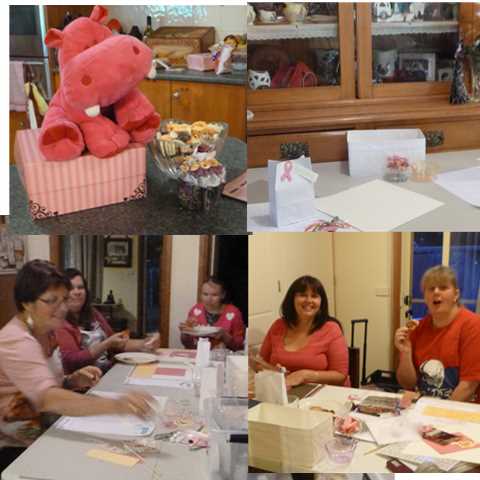
Pink decoration, Pink Food, projects using pink and a goodie bag with the Pink Ribbon Motiff are all a feature of this event!

Pink decoration, Pink Food, projects using pink and a goodie bag with the Pink Ribbon Motiff are all a feature of this event! As we cramed into my house, the two girls in the study declared themselves relegated to the Cupboard!!! (You had to be there) This year I have a venue. That means room for more participants than last year! 

This year I am going to run my Girl’s Night In event on October 10th. There will be a a page layout, a card, and something fun off the page to complete. This time I am charging $50 per head. A meal, a page project and more is included. There will be time to work on your own projects as well. And, the dress code is pink. You can even come in your PJ’s if you like!
To register for the event complete the form below and I will get back to you. If you wish to simply donate you can got to my Official Girls Night In page and make a donation for this worthy cause.

If you live in around or near Mildura why not come and join us?

Happy crafting

Jen

jenny sig


4

Everything ABC’s Blog Hop T is for Tree

abc bloghopWelcome to the Everything ABC’s Blog Hop!

For this hop we will be featuring the letter T. This may be the name of a paper, a stamp set or an embellishment. Whatever the crafter has chosen as their # element will be featured in their post. If you have just hopped onto my blog, please start at the beginning at Linda’s blog ~ Scrappy Therapy 

If you came from Catherine Nowak ~  you are on the right track!


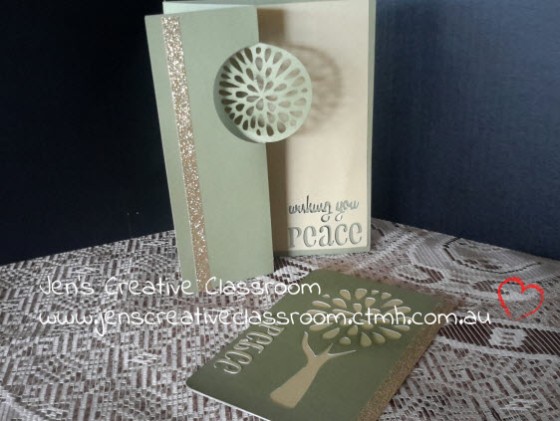
Hi everyone! For my T Project I decided to look for a T or a tree. We have lots of trees on stamp sets but since I just go my brand new Artfully Sent Cricut Collection I looked at the T page and found a Peace Tree tree there on a card and on a pocket card. And there is more….I found more than one TREE!  – there is a kind of tree for a sympathy card. These are on page 15.

%artfully sent 1a

artfully sent To key 2

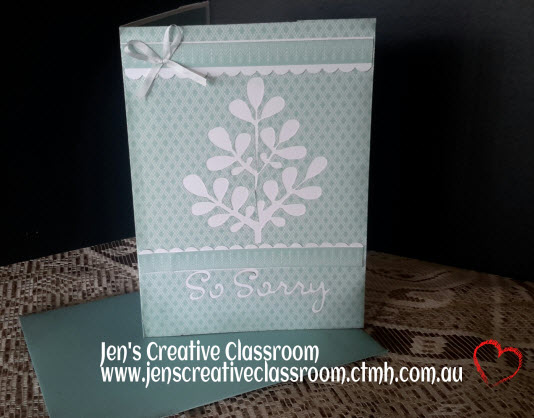
I cut this one with the pale blue print from Snowhaven. It is so pretty and because we can only get 2 sheets at a time in one packet, that makes this a pretty special card! I used the zip strip to trip, burnished edges with glacier ink and added the bow from my ribbon stash. The coordinating envelope is made with Glacier card stock and cut with this cartridge too!

20140925_214209

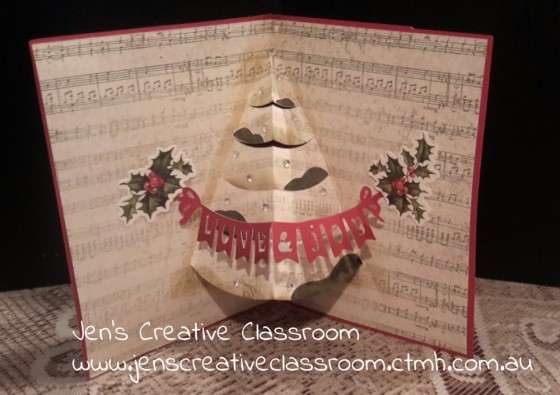
This Cartridge offers us 400 projects…more than a card a day for a year! I just had to try a popup card. The Christmas tree popup is on page 48.

tree pop up

I used ruby for the base and the music print from Yuletide carol for the inside. I have decorated with the Yuletide Carol Complements.

Artfully Sent comes with 3 stamp sets and a pack of white cardstock to get you started.


20140925_214933

20140925_214958

Tips!

  • CTMH Artfully sent Cartridge has relative size projects – all your pieces will cut in the size needed for the size card as suggested. You can of course cut any size you like using real dial size.
  • There are 7 card types to choose from – pop ups, swing, build a scene, sentiment, sleeves and pocket scrapping cards as well as envelopes.
  • Score marks will be cut by the cricut so you know exactly where to score and get great folds. You can ink, texturise and decorate to your hearts content! I hope you have enjoyed this first post of more cards to come! Loving this cartridge!!!

Products used to make these cards are available at my online store/ Be sure to join this months virtual gathering to be in the draw for host rewards. 

Happy Crafting

Jen

jenny sig


Your next stop on our Everything ABC’S blog Hop is Lauren Moore – CTMH Craftings 

In case you get lost along the way…go to Scrappy Therapy 


Simple Stunning Picture My Life part 2!

Hi everyone

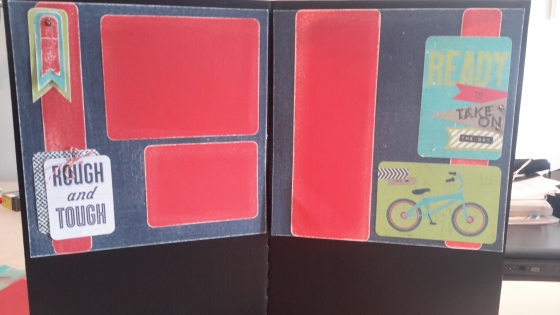
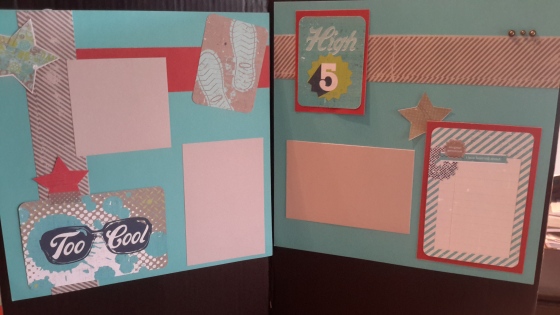
I took my Picture my life page layout from the last post and showed my weekly class students. They have boys and wanted to have a shot at it. They have given me permission to share the work they did and they did an awesome job! These pages were put together quickly. Almost all are what we call level 1 pages – which simply means there is no stamping. PML cards are brilliant for the non stamping scrapbooker!

20140923_153710

20140923_213615

20140923_213709


My Tuesday Technique class students did these pages so quickly they got to do a second one – 2 double pages done in less than 2 hours! “The hardest part is choosing the cards!’

This one used a background stamp on 2 strips making it a level 2 layout.

20140923_153649

One more…

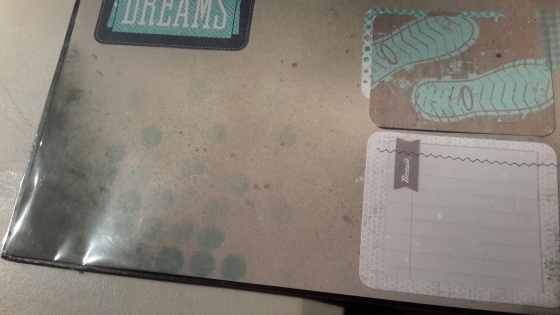
On this page I made I tried to replicate some of the background and texture on the cards. First I sanded. Then I added the colour to the corners. Bubble wrap would have been good but I did not have any so a dauber did the work. I also used my spray pens to splotch it up a bit. Finally I rubbed in some darker colour. A close reflection of the background of one of the cards on this page was made. I hope we get a checker plate stamp some time as that would have been awesome!

20140923_213944

20140923_213950

Closeup of the background artwork

Picture My Life sets can be viewed here. Add some Washi Tape and some Embellishments and you are done! There are so many to choose from! If you would like a class using PML cards and live within cooee of me in Sunraysia book a class and you and your friends will be able to select from a large range of cards to make your pages. Use the form below to get started!

Happy crafting!

Jen

jenny sig


9

Everything ABC’s Blog hop – S is for SIMPLE!

Welcome to the Everything ABC’s Blog Hop!

abc bloghop

For this hop we will be featuring the letter S. This may be the name of a paper, a stamp set or an embellishment. Whatever the crafter has chosen as their # element will be featured in their post. If you have just hopped onto my blog, please start at the beginning at Linda’s blog ~ Scrappy Therapy 

If you came from  Lauren Moore – CTMH Craftings youu are in the right place. 


S is for Super Simple!

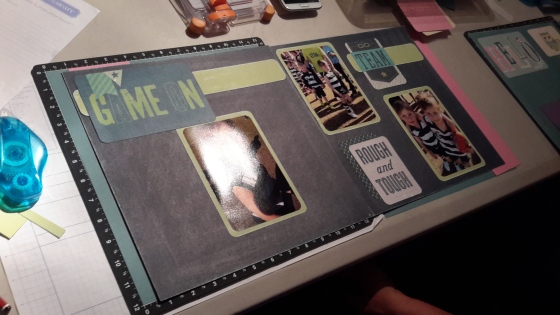
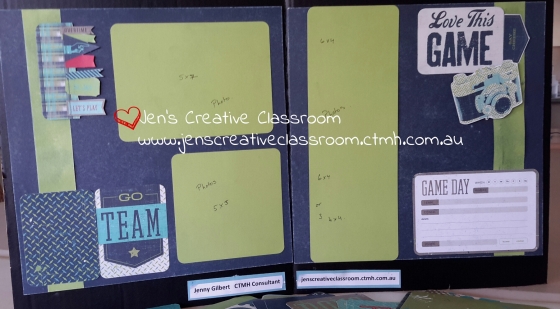
I recently have been watching from a distance on FB the success of my nephews in their sporting activities this year and that got me thinking about how we might scrapbook the stories of a teenage boy and his almost double figure younger brother and their awesome season. This is what I came up with. I will be giving one of these nephews this page layout when he visits in the school holidays.

Completed super simple and very fast page.

Super simple PML page layout in the traditional way. Picture My Life cards are truly very versatile! Close To My Heart have a lovely range for us to choose from too!

The page is built on our awesome Picture My Life Scrapbooking Program. The design used here is Later Sk8terZ1945.  While we do not have the paper pack of this design we do have these cards and the card stock to match! PML cards are the source of titles, embelishments, photo mounts and journalling boxes all rolled into one! You can use them to pocket scrap, make cards and do more traditional layouts like this one. The price of them makes them very cost effective for a themed album too.

Each card is double sided. There are 22 of each 6 x 4 design (44 cards)  and 3 of each 2 x 4 design cards (78 cards) giving you a total of 122 cards to play with. Each set comes with a title page and a variety of pocket pages for your album. You can mix pocket pages and normal pages up in your album using layouts like this one..

Sand the base cardstock to match the texture of the cards. The extra white little bits come from paper crumbs (corner rounder bits) under the cardstock - a happy accident!

Sand the base cardstock to match the texture of the cards. The extra white little bits come from paper crumbs (corner rounder bits) under the cardstock – a happy accident!

I decided to use the same colours that are in the set – Outdoor Denim and Pear. To get ‘the look’ of the cards I have scrubbed the card stock with the sanding tool in our sanding kit. I did smudge the pear strips with a little outdoor denim ink using a sponge, but this is the only ink on this layout!

Fussy cut embellishments from a card or use them whole. Here I have taken a big card, cut the banner embellishment away and turned the remainder into a title card.

Fussy cut embellishments from a card or use them whole. Here I have taken a big card, cut the banner embellishment away and turned the remainder into a title card.

I have fussy cut 2 of the cards for embellishments, chosen a journalling card and a title. the rest are pure decoration. The suggested photo sizes for the layout especially on the right could really change according to what you have on hand.

And there is more!!! While I was at it I used these cards to creae a birthday card and some congratulations cards for both my nephews since they had had such an awesome season.

Later Sk8ter PML cards

Front of the congratulations card!

Front of the congratulations card!

Many consultants are offering PML Buffet classes for page layouts like this and I am one of them. If you would like to host a Picture My Life Buffet workshop, or come to a class to make one of these layouts and see how simple it is let me know!

Shopping List

Use some of your cards for quick card notes. In this example I have done some little notes to congratulate my nephews. The journal cards were perfect for the inside and ther cards work for the outside of the card.

Use some of your cards for quick card notes. In this example I have done some little notes to congratulate my nephews. The journal cards were perfect for the inside and ther cards work for the outside of the card.

Your next stop on our Everything ABC’S blog Hop is  Melissa Hegwood- Scrappin’s More Mom

In case you get lost along the way…go to Scrappy Therapy 

Confetti Wishes Exploding Card with a cupcake!

A great big Happy Birthday to CTMH as we celebrate #30yearsofhappy stamping and enjoy the FREE stamp set with 30 mini stamps! This month I am also featuring all things Birthday at my Monthly crop and the best paper collection for this lind of celebration is Confetti Wishes.

Birthday Explosión box

Birthday Explosión box

I have created this exploding box card for display and inspiration at my upcoming workshop on September 21st. (If you are local be sure to book now!). This piece showcases what we can achieve with Confetti Wishes X7189B paper, the Artiste Cricut cartridge and our awesome Pink glitter paper Z1792!

If you have not tried the glitter paper out yet then I suggest you do. It doesn’t flake and cuts clean on the cricut with blade set to 6 and doing a double cut as I did for the title here. Slow it down for intricate designs, and lift carefully from your mat. If it is really a really sticky mat you will need the spatula.

1410505545045


There are a lot of tutorials on exploding box cards so I will not detail that here. For the cupcake I cut a cupcale holder from artiste at 4 inches. I guestimated the size I needed and it worked out just right. I stamped and embellished this before folding it with ‘Gliitter girl’ from Glitter Glam B1465 and the foliage from ‘Love This’.B1432. I sat a 3 inch styrofoam ball in the cupcake holder and covered that with double sided tape and removed the covering from the tape leaving sticky side ready for use.

Time to decorate the cup Cake!

Thoroughly wet 3 1/2inch pieces of Thistle card stock and scrunch each one up. Gently unfold these and lay them on the open double sided tape on the top of the Cup Cake. It won’t stick while it is wet – just position it , prod it, move it till you are happy with the look. (Dressmakers pins will hold it if need be) Here is the trick….Allow to dry overnight. By then it will be stuck and nice and firm again for you to play with.

1410505229588

Add a touch of Bonding Memories glue 1512 around the top of the cupcake rim and over the iced top. Sprinkle with glitter. (My messy mat  – All purpose Mat Z2045 helps make this job much easier to clean up!) Add something on top, some Bitty Sparkles Z1263 and you are done. I have adhered the cup cake to the card by stacking 4 layers of 3D foam tape Z1151 in the centre of the card so the stack reaches the bottom of the styrofoam ball. On the lid of the box I have used sponge daubers and more glitter to finish it off. 

Glitter Paper Tip

I have found the stickers are not staying put on the glitter paper. The answer to that problem is liquid glass.!!! Our answer to anything that needs to be Stuck! 3D Foam tape also works well on this surface. 

Shopping list – Note – this shoping list entitles you to add – Free #30yearsofhappy stamp and Stamp of the month Family is Forever! – That is and additional $48 worth of stamping fun for just $5!

You might also need these inks – Thistle, Canary and Pacifica.

Additional Supplies – available as 50% off host reward items

Thank you for stopping by. I would love to have some feed back in a comment before you go! I hope you are inspired by this project. If you are local to Mildura and would learn to make one of these in a class setting please let me know in your comment below. Don’t forget our workshop is coming up. Here is a sneak peek.

1410505656103

You can order all you need online right here. Be sure to join my September Virtual Gathering to be in the draw for the Host rewards. Happy Stamping Month! 

Jenny

jenny sig

3

Everything ABC’s Blog Hop R is for Remember this Day

abc bloghop

Welcome to the Everything ABC’s Blog Hop! For this hop we will be featuring the letter R. This may be the name of a paper, a stamp set or an embellishment. Whatever the crafter has chosen as their # element will be featured in their post. If you have just hopped onto my blog, please start at the beginning at Linda’s blog ~ Scrappy Therapy  If you came from “Linda’s blog ~ Scrappy Therapy ” then you’re on the right track!

R is for Remember this Day

Recently I my family lost someone we loved dearly and I wanted to give all the members of the family a card to express both condolences and the encouragement to remember a great lady with love. I created this card for all the immediate family and granddaughters who were effected by the loss.

Remember this Moment

Remember this Moment

In our range of stamp sets we have a lovely Cameo set called ‘Sweet Moments’ C1467. I fell in love with it and got it as soon as possible and stashed it into my card making pile, to wait for a day of inspiration for using it. (I love doing heritage work!) I needed little inspiration when I had a need to express my love for a beautiful lady and the loss the family were suffering. On this stamp set I found the Cameo and all it represents in femininity, lace, delicate and nostalgic and sentiments such as ‘Remember this day’, a butterfly, and a lovely tiny saying ‘It’s moments like this we want to hold in our hearts forever’.

20140905_223832

Sweet Moments C1467

I have teamed all of these with two core (I think at least) card making stamp sets. Sincere Expressions A1146 and D1584 Big Hug. The card itself can be simply stamped but I decide to be a little creative and have embossed with Cameo with clear embossing powder. I finished the work with Clear Sparkle flourish, Small Sparkles and Silver Shimmer trim. I stamped the Rose on the envelop as an added touch of elegance.

Sincere expressions A146

Big Hug D1584

It is hard to say I hope you enjoy this project, but sincerely hope you are inspired by it to give this stamp set a go for when ‘Remembering’ a special someone really matters.

Products Used in this project

Your next stop on our Everything ABC’S blog Hop is Lauren Moore – “CTMH Craftings” 

In case you get lost along the way…go to Linda’s blog ~ Scrappy Therapy for a complete list of participants!

Jen

jenny sig


7

Family is Forever S1409 CTMH Australiasian Stamp of the Month Blog Hop

sotm blog hop

Hello and welcome aboard our Stamp of the month Australasian Close to My Heart Blog Hop. If you have arrived here from  Monika English – a Sprinkle of Glitter you are in the right place. If you landed here by accident, no problem, please join in by following the link at the end of this post.


Family Is Forever

Before I start let me say I LOVE this stamp set! The big title, the big tree, the hearts and the smaller title are all very useful and can go on many projects. Family truly is forever. I would like to share with you this (your creation) which features September Stamp of the Month Family is Forever S1409  available exclusively throughout September for $27 or for just $5 when you spend $75.

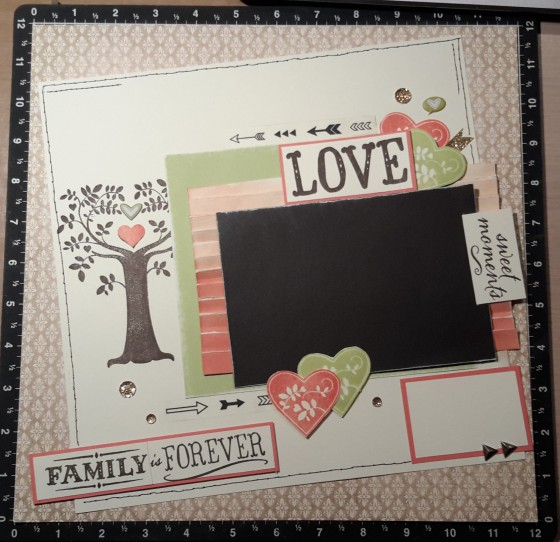
I have been a wee bit busy but just for once decided not to reinvent the wheel. Instead I have created the page we see in our Annual Inspirations book on page 13. I just love this layout and could see a few techniques in it to try. First there is the look of weather board and second there is the stitching.

20140828_190121

I have altered the colours according to the product I had available. My base page is the first B and T paper from Yuletide Carol paper. It has a lovely cream damask look. My next piece was Colonial White cut at 10.5 inches square. The coordinating colours I chose were Sweet Leaf and Sunset. (Sorbet would do just as well.)

Weatherboard paper technique

To do the weather board piece I began with a piece of 6 x 8 inch Colonial White card stock and applied Sunset ink to it using my sponge across from left to right. ( It turned out not to be big enough so I would do 8 x 8 next time. ) I did this in one go then went back in two, three and a fourth time deepening the layers of colour nearer the bottom.

20140828_171637


After this I scored it at 3/4 inch and 1 inch. I suspect it may even be scored at 0.5 inches, .75 inches, 1 inch – repeat the pattern, but my two score lines got me a result I was happy with. I then folded and pressed the edges, finishing the look by sanding it all.

20140828_173315

I stamped the tree in Slate ink and did it again in Sorbet to get the heart on the tree another colour. I cut this out and mounted it with foam tape. I also used foam tape for the hearts which were stamped in Sorbet and Sweet leaf and fussy cut. I have done my title differently to the sample including the whole thing lower down on the page. Because I was time poor my stitching was achieved by using the ruler, paper piercing tool and mat and the  Marvy Uchida journalling pen to draw the stitching on. I finished it off with the gold gems, gold shimmer trim, some hearts from the Chalk it up assortment and Arrow washi tape. I am very pleased with my interpretation of this artwork in the Annual Inspirations book. The recipe for the original can be found under the link for the online version of Annual Inspirations Idea Book  by clicking ‘recipes’  or ask your consultant for some assistance to get these supplies.

Product Used

Stamp of the Month Family is Forever S1409 is only available until 30th September from your CTMH consultant. or by visiting Jen’s Creative Classroom.  I’d love you to leave a comment before heading off to the next stop,  Wendy Hopper -Wendy’s Expression of the Heart

Thanks for Stopping by

jenny sig