Sticky Boy Has Arrived in my Studio!

OMG I am so excited….if you are a CTMH sister who has been to a CTMH event you will get this. If not…imagine the fun! I am one of the many fully grown people who have looked and looked and looked…..on walls, on pillars, on tables, under tables, on railings, on mirrors, on glass, on pitchers, … in short…On IN or Under anything within cooee of a foyer or registration desk at one of our CTMH functions, looking for the elusive Sticky Boy.He comes in all sizes and loves to dress up! (my kind of guy 😉 )

Back in 2013 when my connection to the company started I was like many wondering ‘who or what is this sticky boy?’ Then I saw Him – elusive fellow he is,  and someone let me stamp him on my paper, but he wasn’t mine and I had only the stamped image to remember him by. Back then, I also watched the Sticky Boy Video, and learned the Sticky Boy Story. One thing is for sure, as far as acrylic stamps go I am in love with My Acrylix and truly appreciate the range by CTMH. Watch this video and you will see Sticky Boy at his best!

I did manage to get a teeny weeny Sticky Boy Dressed in Aussie slouch hat carrying a suitcase at convention but I am so afraid of losing him I keep him tucked in my convention attendance holder. Soon he will make an appearance on pages I scrapbook when I am up to convention USA in 2014. (I am working on it – up to week 3 of my trip!) So for this little cutie you will have to wait!

I am not going to repeat the whole sticky boy story here.  You can follow Sticky Boy yourself on Facebook or instagram – just look for the hashtag #whereintheworldisstickyboy and you are sure to find not only his story but some awesome artwork too.   I am very lucky to have an upline who was willing to share her stick boy with me. I am axcited to be able to share and pass on the legacy (or is that legend, cos Sticky Boy is a Leg (pronouncedd lej) ya know!)

So, this is where sticky boy is in my part of the world. #whereintheworldisstickyboy   Mildura, Australia. As soon as he arrived in my mailbox I started sharing my day with Sticky Boy. We went out to visit my parents.

The First artwork featuring my Sticky Boy –

IMG_20150122_215107

Make the most of your scraps – I love using them to make cards 🙂


20150122_205952

I used the scraps from my Year Noted paper I had cut Honeycomb style and the stamp set C1537 Honeycomb flair to make the card. It isn’t too late to get your Year Noted paper kit with qualifying orders. If you order online it can be sent right to your door (Australia Only) and you will be in the monthly host draw.

More artwork featuring Sticky Boy is to come since now I have that awesome task!

Have a great weekend Australia….

Close your eyes…imagine what you will be doing to celebrate being Australian! Stay tuned….

Jen

jenny sig


13

Everything ABC’s Letter B – Birthday!

abc bloghopWelcome to the Everything ABC’s Blog Hop!

For this hop we will be featuring the letter B. This may be the name of a paper, a stamp set or an embellishment. Whatever the crafter has chosen as their # element will be featured in their post. If you have just hopped onto my blog, please start at the beginning at Linda’s blog ~ Scrappy Therapy If you came from Stephanie Feist-then you’re on the right track!


 Your Birthday is supposed to be fun right? Mine is in MAY, and this is my May Calendar page!


Bis for Birthday

B is for Birthday

If you have been following the blog you will know I have been working on a Calendar project. I am up to June – but wish to share with you up close and personal my May Page, since on good advice (as above)  I plan to celebrate my birthday all month long! Right now I am into colour – and lots of it (usually I am an earthy neutrals girl unless it is red and purple…that is different!) ; and I am into finding those mantra’s and sayings that will lift me up in 2015. This is a gem!

My bestie Sandra shared this pinspiration – ‘Start each day like it is your Birthday’ with me but I have had a bit of a time locating it so pinned it myself.  The timing of her sharing this with me was impeccable. I loved the design and it’s colours. I so totally had to scraplift this one for my May page. My finidshed art work is not the same but is deeply inspired by that  pin..  I cannot give you more than the original artists website – Sketcherella – the orginal image is gone – but the pinned image remains. (go figure….)

SO…Hopscotch was the obvious paper palette choice. I had a bit of white card stock as my base about 5 x 7.  It turned out not big enough to carry birthday so I did it completely separate and trimmed it back a bit from there when done.I have used quite a number of the Close To My Heart Alphabet sets listed below, as well as the awesome new Brushstrokes stamp set C1608 (love this one completely!)  If I had it I would also have incorporated Framework Alphabet E1027. The H in Birthday is from a little M stamp that is NLA (M1030). I just stamped it without the bow and cut it up the middle. The current retiring ‘HI’ stamp would work too. I deliberately mixed up colours and stamp sets here – you do need to play and do your thing with this! My T in birthday (thanks again to inspiration from Sandra) is topped with a gift and candles all from the Build a Cake Stamp Set D1618  There is a bit of Circus Alphabet and Washi Wonder in there – all limited edition stamps from our previous catalog. (Just goes to show Host Rewards and Stamps of the Month really are spesh! Ask your onsultant – I promise they will be thrilled to tell you all about it!) ) Once all the lettering was done on the main piece I smudged colours into the background with my sponge and stamped the brushstrokes shapes into places they fit using different colours from the hopscotch palette.

Letters that needed colouring were coloured with watercolour pencils. Those which were also being fussy cut were given a lift by first spreading liquid glass onto them and allowing them to dry.  TIP – Do all the letters you intend to liquid glass on on one piece of card stock- liquid glass them all. Fussy cut when dry. I tried the other way and it is messy, requires tweezers and….yep not a good result. My repeat effort with one sheet, letting them all dry then cutting them was much better. You CAN cut dry liquid glass….it is not rock hard 🙂 It’s nice n flexible on paper.

I mounted the completed saying piece onto lagoon and this went on the Hopscotch background. I used a scrap of the reverse of Hopscotch as a strip to support the word birthday and added a flash of bling with Teal Shimmer trim Z1918. A 4.5 inch wide strip of Lagoon is there ready for Birthday photos and the added labels are a sneak peek of a Stamp of the Month that is coming for you in May.

I think that covers it. I used my stash, I used alphasets, I used lots of colour, and now in May I will be encouraged to celebreate each day as if it is my Birthday – on one of those days it will be!

Close To My Heart Products Used in this project

Please leave a comment before you move on. Your next stop on our Everything ABC’S blog Hop is “Lauren Moore – CTMH Craftings “.In case you get lost along the way…go to Scrappy Therapy 

Thanks for stopping by

Jen

jenny sig

12

Australasian Operation Smile Blog Hop You’re The Bomb

You’re The Bomb!

Operation Smile is a private,  not for profit organisation providing reconstructive surgery to children and young adults born in developing countries. On 1st December Close to My Heart Consultants released our Seasonal Expressions Idea Book. On the back page of this Idea book you will find the C- sized, You’re the bomb stamp set. By purchasing this set at full retail price  of $21 you can help change the life of a child as CTMH will donate $US3 from your purchase to Operation smile.  Since 2008, Close To My Heart has provided support to change the lives of over 1,500 children and their families.

Today we will be sharing some inspiration using “You’re the Bomb”. We hope you will be compelled to purchase this set and in so doing, contribute to the life changing work of operation smile. The blog hop is a loop with about 10 participants so follow along and you will end up right back here.  If you get lost there is a list of participants on Mandy’s Blog here.  

if you have arrived from  Shaunna’s Blog, Passionate About Pages you are in the right place!


Here is my project: – He really is the Bomb!

Double Page Layout using Pathfinding papers and Your The Bomb Stamp Set

Double Page Layout using Pathfinding papers and Your The Bomb Stamp Set

and here is the Stamp Set

If you would like further information and photos on my project and Operation Smile please continue reading,

Otherwise, pop over and see what Tracey at Tracey’s Blog   created. Remember to speak to your consultant about how you too can support Operation Smile. Enjoy your journey!


At Convention USA I started to come to an understanding of the importance of Operation Smile to Close To My Heart. However, I was deeply moved at the Australasian Convention when Brian Holman gave us a presentation of his trip as a volunteer helping the team doing the work.  He had the task of looking after the children during the fasting before the operation and was able to share his story with such heart every consultant in that convention room was moved by the story. This presentation has not only informed me about Operation Smile, it has cemented it into my very core as an essential aspect of being part of the Close To My Heart Family.

As consultants we take pride in doing something we believe is really really important.

 We show you how to celebrate relationships through discovering your creativity, to preserve and share the moments that matter most.  

These moments usually involve precious smiles that we take for granted. I have been so moved by the Operation Smile foundation and the work they do, as well as the role Close To My Heart leadership has taken in the organisation I now raise funds for Opration Smile with a monthly raffle at the Mildura crop to donate to this worthy cause. I am also no longer afraid to ask a customer if they would like to round up for Operation Smile.  I invite you to get on board with this worthy cause and include this stamp set with your next order along with a ’round up’ so Close To My Heart can provide even more smiles!

So let’s take a closer look at that art work shall we? Yes, my Grandson is all smiles…smiles of different kinds in each of these snaps from day care.

Yourthebomb2

Double Page Layout using Pathfinding paper collection and You’re The Bomb Stamp Set

yourethebombleft

Close up of the Left Hand page shows all the lovely hand written labels that would enhance any scrapbook page. Just recently CTMH has shared a lovely tip for cutting shapes like a circle from your photos with your Cricut on their facebook page. Be sure to check them out!

yourethebomb4

I cut the title William with the Cricut – so easy! I have used the Paper Fundamentals for this and they cut really well!


Thanks for joining me on this journey, the “You’re the Bomb” stamp set is available from your CTMH consultant and $3USD from every purchase will go directly to Operation Smile. This stamp set is only available until March 31. You can also choose to make a donation of any size directly to your consultant, donations over $2 are tax deductable.
To continue your journey, hop over to see what Tracey at Tracey’s Blog

2

Calendar Project

G’day reader!


I am going to be presenting you with a little more from the studio this year. To kick it off I thought I would share with you very quickly some of a calendar project I am working on. My studio students and I embarked on this before Christmas and we have made it to June. I hope to have it finished completely really soon using some of my favourite stamps sets.

Now, if you are a Northern Hemisphere reader be aware I live through temperatures of between 35 and 45 degrees celsius, usually with a super low humidity, and this can start from December and still be that hot in February when school returns. We, simply put, have a long hot summer here, so my January page just had to be focused on where the weather is a tad, (sometimes a lot), cooler – the beach. I am going to be right there at the end of the month and know I will have photos to put on the page to finish it off.

january

January – Beach theme – Summer Keys in Artbooking, Seashells stamp and Seaside papers.Oh the Australian stamp set too since Australia Day is in this month!

Random stamping and layering

Random stamping and layering. Hearts are for Valentines day and the Cupcake is a reminder I have a birthday to attend to in the month.

Seaside and Kraft Papers, Fussy cutting and smudging

Seaside and Kraft Papers, Fussy cutting and smudging


Like I said -a  quick eye candy kinda post! I hope you liked it. Close To My Heart Blank Calendars are awesome to work with and are priced at just $10.50. You can have so much fun preparing your current calendar, or as some of my customers are doing – dating it ready for 2016, and possibly using it as a gift for next Christmas! In the end this calendar is going to be an awesome sampler of techniques we can use!

If you have any questions about products used in these pages please comment below and I will get back to you!

Jen

jenny sig


8

National Papercrafting Month Blog Hop – Year Noted

Year+Noted+Blog+Badge500Hello and welcome National Paper Crafting Blog Hop Year >> Noted!  This exclusive collection available to qualifying purchase of $75 in January for just $10 includes a fun and pretty exclusve paper collection, a super stamp set and Gold Foil Stickers!  (Retail Value over $37 AUD) You also have the option of an additional Kraft album for $5 saving you even more. (This means you will receive over $52 AUD / $62 NZD worth of product for only $15 if you purchase the kit with the accompanying mini book! ) Be sure you do not miss out and see your consultant about workshop offerings using this kit.  Remember, this deal is only available for January, so make sure to get your own Year >> Noted paper kit today for the perfect start to a crafty year!


If you have hopped in from Michele Rowley You are in the right place. The blog hop is a great big circle, so you can start here and work your way all around.  If you get lost along the way, you’ll find the complete list of participating consultants on Melinda’s Blog: 

We have approximately 20 Close To My Heart Consultants from across the globe sharing their creations using Year>>Noted and other great CTMH products on their blogs. This is simple to do – just click on the link at the end of the post on each blog to move to the next one! Here we go!

20141230_215249

The year noted kit has Card stock, B and T Papers, gold foil stickers, a stamp set and if you get it a mini album as well.

I am excited about the papers and this stamp set!   From this kit I have made a double page layout with leftovers from my first project which was putting together the mini album. I have added 2 pages of Kraft paper to do this.

20150101_173905

Of Course I began by distressing y white edges! I used Glacier and Sorbet inks for this.

I cut two overlays from Artbooking. The one on the left is the Shift overlay p77  . The one on the right is the Shift Overlay from page 87. I did these using kraft and made them as big as I could within the 12 inch space. A tip here – ensure you have a sharp blade. Kraft is not so easy to cut. Cashmere would do as well as Kraft.

I then did the hardest part of this project – choosing a few photos to reflect enough on the incredible year I had in 2014 without wanting to scrap the whole story all over again! I decided 3 key events and one thing I bought were must haves – the big adventure to Mexico and Convention USA, getting acknowledged as Sr Executive Manager at the Australasian Convetion, having an awesome team who help me run great events, and my best buddy who never complains about helping and carrying anything including suitcases, my walker, Rex. To make it even harder, the photos needed to work on the places available in the mats. it took a while but by adding one at a time, and filling gaps with Year Noted prints I was able to fill it all in. Then it was time to decorate. I love Bonding Memories glue for adhering tricky spaces and made use of it here too.

Here is a closer look at some of the detail on each of the pages. I used the foil stickers, sometimes on their own, sometimes stamped. To stamp these you will need to use your Stazon Ink. Don’t forget to get Stazon Cleaner as well! Our journalling pen did not stay put so stamping them is your on;y option unless you want them plain.

20150101_173934


I cut some extra pieces from papers in the kit including the film strip – just to squeeze a couple more photos onto the page!

20150101_173919

20150101_173927

Use the scraps to make a neat banner of celebration with the little stamps!

Here is my favourite spot on this layout. I filled the space with B and T paper, I cut the diamond piece to represent the kind of stringed notice board we see around, then used the lines on the Year>>Noted stamp set to journal on some more of the papers. This is my favourite part of this whole kit and stamp set.…(yep I am excited) …..a clear well spaced set of journal lines to stamp! I just know this stamo might live permanently on a block because I an an avid believer that you need to journal all these pages! It does not solve the problem of me always running out of space, but it does solve the problem of wanting a little neatness that comes from having lines to write on! (I truly cannot be bothered typing, printing, cutting and pasting – writing by hand is much quicker!)

20150101_173941

My 2014 was cut at 2 inches with the Cricut using Artiste font. I swamped each letter in Versamark ink and then in gold embossing powder to heat set. I tipped the embossing powder in a muffin case and swished the inked letters in it.  A very fine tweezer helped me to get this job done. The excess was easily tipped back into the little pot. I used the two zip strips down each side.

I had fun making the page and it really did get me thinking about how good 2014 was for me. I am truly grateful to those I met along the way for making it wonderful!

Products Used:


Now “Hop” on over to Brenda Lapp’s Blog to see her work! Be sure to visit all the Consultants at their Blogs to get some great crafting ideas and other fun ideas! Remember, with a qualifying purchase of $75 AUD, you are eligible to purchase the exclusive Year >> Noted paper kit (which has a retail value of over $37 AUD for only $10—that’s over 80% off retail! Or, for an additional $5, you can order the Year >> Noted paper kit with an accompanying My Creations™ kraft mini book. Take a look here at our video about this awesome product. Contact your CTMH Consultant (or click here) to see how you can get this stamp set at a discount!

Thanks for stopping by

sig file black

7

Everything ABC’s Letter A is for Australia Day

abc bloghop


Welcome to the Everything ABC’s Blog Hop! For this hop we will be featuring the letter A. This may be the name of a paper, a stamp set or an embellishment. Whatever the crafter has chosen as their # element will be featured in their post. If you have just hopped onto my blog, please start at the beginning at Linda’s blog ~ Scrappy Therapy If you came from “Pam Trostle ~ Pam’s Crafty Creations –  then you’re on the right track!


A is for Australia Day

I just had to do something for Australia Day and this layout is in anticipation of attending the local Australia Day Breakfast, or joining a family and friends down the river for a BBQ somewhere. I have featured the Celebrate Australia Stamp set using the Australia Title, fireworks and flag. I love his stamp!


20150102_220157

Page Layout began with Inspiration from Magic p34. I have used the wonderful Fundamentals papers and the awesome new White Shimmer Trim.

Celebrate Australia D1640

I live in the country so this page is also the closest I will get to fireworks on Australia Day.  I am sure if you can witness fireworks in the Cities some lovely snaps would go well with this page! I also believe if you happen to have a green and gold Australia Day just switch our the Blue, Red and Silver and replace with green and gold and try colouring that white shimmer trim with either bright green or bright yellow. I would love to see a Green and Gold variation!


Here are some of the details from the page

Celebrate Australia D1640

I stamped the flag with our two step stamp using Outdoor Denim then Cranberry. I then embossed it with clear embossing powder. To put it on a paper clip I painted the clip with red nail enamel and adhered it to the flag when dry.


australia detail1

For the Australia Sections I used first and second generation stamping. Watch the tendency to wander off on an angle rather than a straight line – I was regularly correcting this will stamping. The stars were done in Cranberry and Outdoor Denim and then I wet embossed in silver in a random fashion.

australia detail

The title Australia Day was cut with Artfully Sent Alphabet using Cricut Craftroom to move the letters together and put them on a slant to match my celebrte which came from another cartridge in my stash. I added some of the fireworks from the stamp set and used foam tape to give dimension.


I really love our paper Fundamentals range. It adds texture and a completely new feel to our pages, it cuts very well with the cricut and coordinates well with our other palettes. You will need Bonding Memories glue for bedt result with adhesion due to the finish on the shiny side of these papers.

Shopping list – All these Close To My Heart items are available for purchase online at my store The Creative Heart. 


Your next stop on our Everything ABC’S blog Hop is “Marie Goetz‘ Go see what she has in store, but please leave a comment first!

In case you get lost along the way…go to Scrappy Therapy

sig file black


16

Australasian Blog Hop Stamp Of The Month This Moment S1501

sotm blog hop


Welcome to the first blog hop of 2015 by the  Australasian Close to My Heart Blog Hop group. If you have arrived here from Shaunna’s Blog, Passionate About Pages then you are in the right place. If you landed here by accident, no problem, please join in by following the link at the end of this post.


I am thrilled to share with you this mini album which features January Stamp of the Month S1501 This Moment.  S1501 available exclusively throughout January for $27 or for just $5 when you spend $75.

Love Notes Mini Journal

Ok I will fess up. I initially felt I had little use for this stamp set as I have no lover, no kids and my dogs can’t read a love note I might write. I did what I always do – I just stamped some of it out and an idea was born.

sotmjan15cover

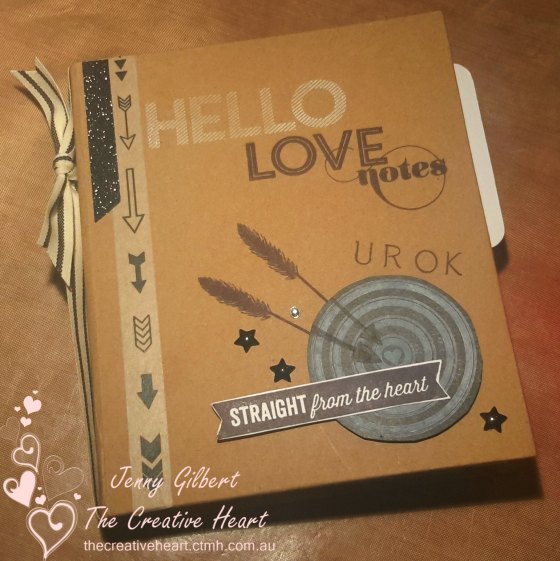
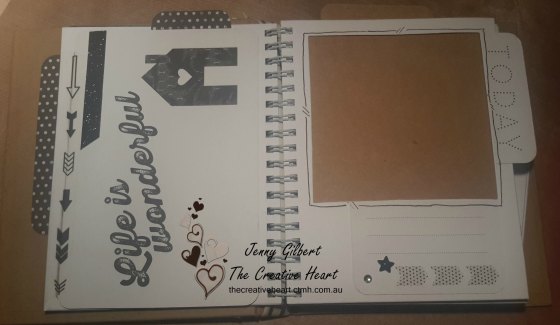
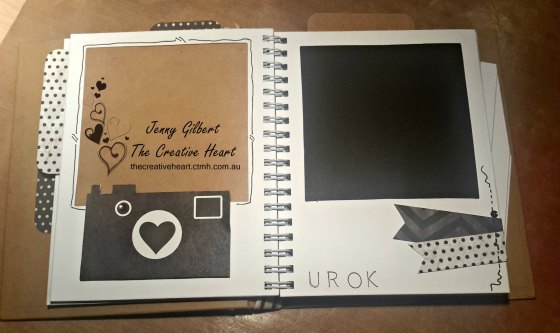
URok is a deliberate choice – This book is meant to be an affirmation not a question:)


A little back story may help with why I did this mini album. It is no secret among those close to me I suffer depression. I am OK right now because I have awesome things to do with my time, (teaching people how to be creative is awesome) and great family and great friends supporting me. But I am not always ok. I am a single 50 something living at home in an empty nest with 2 dogs. I battle the black dog daily. While I occasionally have the company of my girls and grandson, I am very much alone and that sense of isolation can exacerbate any feelings of depression coursing through my veins.

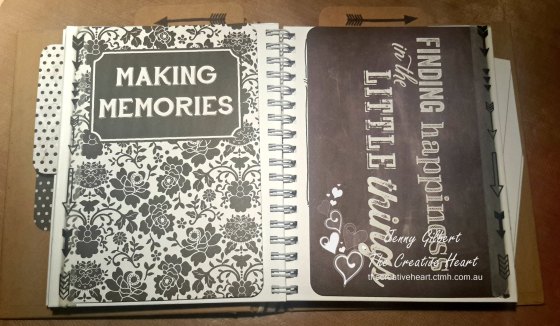
I created this project while completely alone between Christmas and New Year. It is a time in which we reflect on what we have done and achieved and what we might like to plan for the years to come. I have promised myself to take some everyday photos to fill the pages along with completing the all important journalling. Maybe one day one of my offspring will treat it as a treasure once I have done those pages. But its purpose for me is in this moment!

My mini album therefore is intended to be an antidote to feeling sad. It is a very big Love Note reminder to take care of and love myself by being in the moment and appreciating that.  It gives me great pleasure to share with you my empty Mini I put together in just one evening using a few fun, well priced CTMH products.

Get your stuff together including a selection for For Always PML cards that speak to you.

Get your stuff together including a selection for For Always PML cards that speak to you.

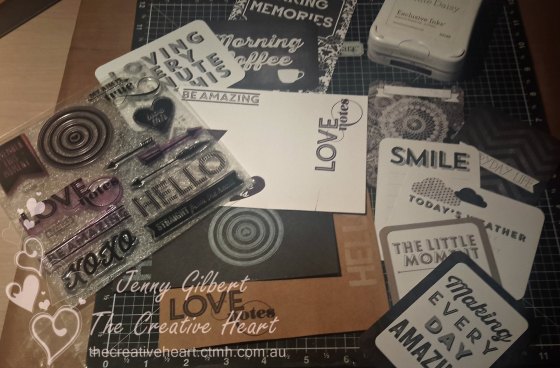
All you need is the Hip Pics Mini Album Z1956, A la Carte For Always Picture My Life CardsZ3065 , Black Arrow Washi Tape Z2003, Black Shimmer trim Z1809, Marvy Uchida LePen journalling pen Z1979, Sparkles Black and Grey Assortment Z1754, Scaredy Cat assortment (Black Stars)Z3011, and an assortment of Black, White and Kraft paper. I have used just two inks, Black Z2105 and White Daisy Z2163. I added a piece of Black Twill Z1988 ribbon to my spine too. Get set to do each page as you feel as all these products coordinate completely with the for Always cards. The stamp set could well have been created from the same designs. I had a ball bringing these pages together.

Get over creative block! 

To begin with I stamped some of the titles and icons on black, white and kraft paper. This gets my creative juices going and helps push me past creative block! Then I knew how and where I wanted to place things on the album cover. I flipped through my For Always cards and chose those that were actually very similar and even the same in style with this stamp set, and fitted my colour scheme of black, white and kraft, as well as my mood and the thoughts I was feeling. I made no definite decisions yet but I had a nice little pile of large and small cards. I flushed out a piece of Black Fundamentals paper from my stash to use as well as I loved the Zing of the black and white chevron.

I like the hip pics pages but feel the pockets need a bit of stabilising. Fill each one with a piece of card 6 x 4 1/4. I mixed these up from my colours. Then I added PML cards. NOW is the time to stamp directly on the white space of your pages if desired. If you wait it can become a little lumpy bumpy and complicated. You can always cover it up if you decide you do not like it:)If you do need to support a page from lumps elsewhere slip your Versamat in there to help.

To adhere the PML cards into the album I simply hinged them in with black arrow Washi tape and used some scraps from fussy cut cards as tabs where needed. Once it was all stuck down I came back to decorate with more faux washi (scraps from cards!) I also did pen outlines, and stuck down some shimmer trim and gems. This little album is now ready for some photos and some reflection about what makes me smile, and what matters to me so in a moment I can be reminded to be in the moment.Here is how mine came together.

sotm1051

sotm1052


sotm1052a

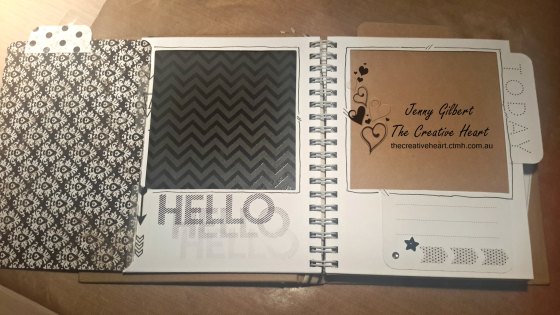
Here Hello is stamped 1st, 2nd and 3rd generation.


sotm10153

sotm10154

sotm101542

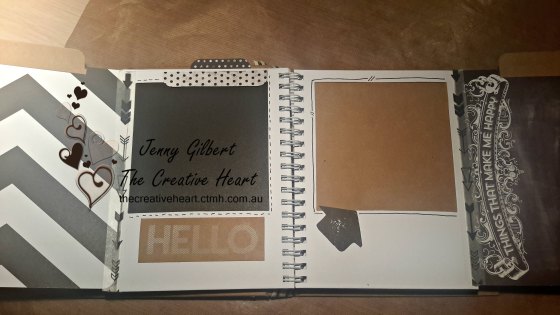
White pigment ink looks great on our Kraft card stock. Give it a try.


20141226_224443

sotm10156

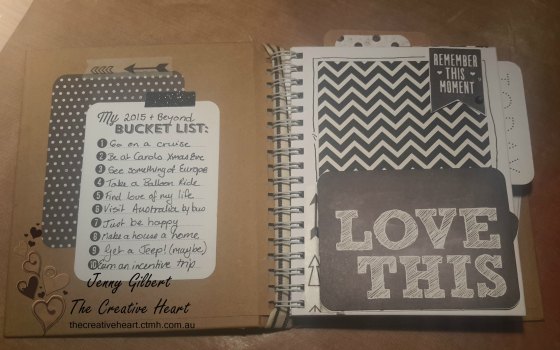
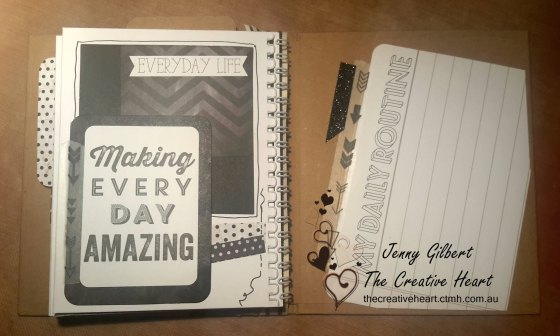
I gorgot to do photos – the crds on the left fall down revealing my precious and grately appreciated first cuppa of the day.

sotm10157

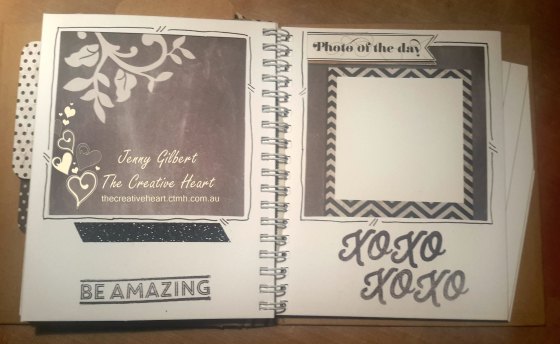
Here the photo of the day title is fussy cut from the card and popped on top – over the same card I cut it from with the hip pics frame in between.


20141226_224535

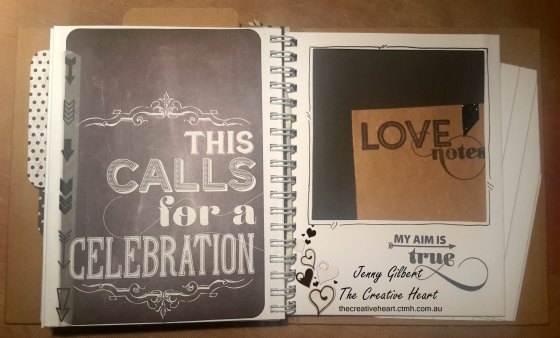
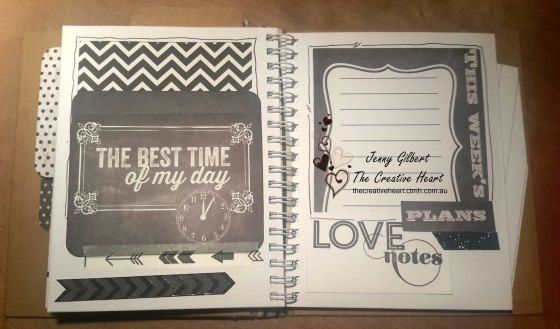
The love notes on the right included a little fold out note slipped into the pocket of the page. It is all set in place ready for me to write a nice love note.


sotm10158


Shopping list – If you have a stash – your only investment might be this cute album and the PML cards


I would love to hear from you if you decide to take this or a similar approach with this stamp set. Please let me know if I have inspired you.

This Moment is only available until January 31 from your CTMH consultant. I’d love you to leave a comment before heading off to the next stop,

Lauren Moore- CTMH Craftings

If you get lost along the way please visit  Mandy – Hall of Indulgence for a full list of hoppers.

Have a Fantastic New Year!

sig file black