28

Zoe Collection Australasian Blog Hop

Zoe

Hello and welcome to our mid month blog hop featuring the lovely new Zoe paper collection. If you came from  Lauren Moore – CTMH Craftings-  you are in the right place. As the hop goes full circle you can follow along to the next link at the bottom of this post.


Today I am bringing you a delightful double page layout featuring the Zoe Paper collection and some cuts made with the new Cricut Artistry Cartridge. I love the new icons and with over 700 images it is good value for money. I used umbrella key on page 38 to make the clouds, the umbrella, the new day and to cut the stencil for the raindrops. I cut the rain drop stencil at 6 inches and inked the drops with white pigment ink.

http://jenscreativeclassroom.ctmh.com/Default.aspx

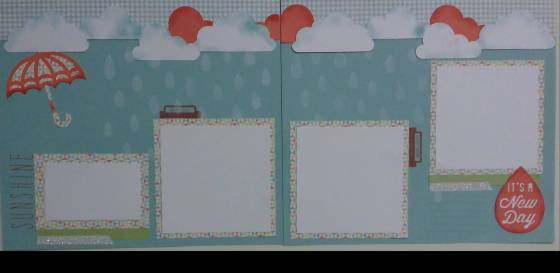
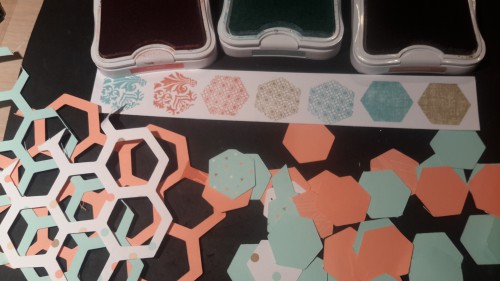
Zoe papers and raindrops from Artistry

For the rest of the pieces I distressed the edges with sponge daubers using tone on tone and Glacier on white. I also added a little extra decoration with the Zip strip and some stamps from the Zoe WOTG stamp set which I adore. It is a very versatile set for scrapbooking and even includes a set of lines for journalling. Finally I have still got Coral sequins so a little White Shimmer trim and sequins have finished off the page. All I need now is a rainy day to get some photos! (it does not rain here much!)

zoe

Use a dauber and the rain drop overlay to get the rain drops.

zoe6 zoe5

zoe3 zoe

All of the products are available from my online store. We have a fabulous Stamp of the Month and the Get organised campaign as well. The Zoe Collection is the first of the new papers we have coming your way September 1 in our new Idea Book! Get excited, there is more exciting stuff to come!

I love getting feedback, so please leave a comment before you move on to the next stop on the hop with Meryl Cheetham – Mez’s Craft Room Hop along and see what lovely artwork she has to share with you.


Close to My Heart Products used in this project include:

http://thecreativeheart.ctmh.com.au

Artistry Cricut Collection

http://thecreativeheart.ctmh.com.au

Zoe Workshop on the Go

White Daisy Pigment Ink

Dauber Value Pack

http://thecreativeheart.ctmh.com.au

Coral Reef Sequins

14

Jump on it July International Blog Hop

Hi and welcome to the Jump on it July Campaign Blog Hop.

Jump

If you have arrived here from Jeanie Burch you are in the right place. If you have just joined in please look out for the next place to hop to at the end of my post.

Jump on it July is a fabulous campaign. it almost feels like Xmas in July…could be if you got the Xmas stamp. All you need to do in Australia is purchase $32.50 worth or regular priced stamps and you are entitled to get either the fabulous Life is Wonderful Stamp of the month for Free or any of these host reward stamp sets for just $6.50.

Jump on It July Find our more at thecreativeheart.ctmh.com.au

Jump on it July

How exciting is it that you can get these exclusive stamp sets without hosting. Remember it is this month only and there is no time like the present to grab some of those retiring sets you have had your eye on!

I am a little hexagon happy. It is a great shape to use in scrapbooking and I love the Host reward stamp set Happy Hexagons. It goes really well with another stamp set called Honeycomb C1537 and of course the hexagon Overlay in Artbooking. I sized the hexagon overlay to match the Happy Hexagon sized stamp. (I have lost that ccr file in the switch to Cricut Explore) Here you can see I have made use of some scraps, matched up some inks and got ready to play mix and match. The stamp here is the Honeycomb – after that I have used the Host reward set Happy Hexagons.

C1537 Honeycomb stamp set coordinates well with Host rewards set Happy Hexagons. Shop online at thecreativeheart.ctmh.com.au

C1537 Honeycomb stamp set coordinates well with Host rewards set Happy Hexagons.

Here is the completed artwork in my album. To achieve this I randomly sponged some ink into the hexagon overlay pieces using them as a mask. I kept some to stick down and support the hexagons I stamped as well. all of this work surrounds just one special photo.

Close up of hexagon detail. Paper here are NLA - but the concept works no matter what paper collection you use.

Close up of hexagon detail. Paper here are NLA – but the concept works no matter what paper collection you use.

www.thecreativeheart.ctmh.com.au

Completed page

In this second page, my calendar is the subject. I decided to tissue stamp in the hexagon overlay and I have used colonial white for the creamy look. I added the photo frame, the faux washi and the Happy Hexagons.

hex 6

Use a tissue to sponge into the page with an overlay of hexagons

Use a tissue to sponge into the page with an overlay of hexagons

www.thecreativeheart.ctmh.com.au

I hope you are inspired by these pages to get into hexagons and grab your Jump on it July special!
Please leave a comment before hopping along to the next stop at Wendy Coffman

Jump on it July Australia

This offer enables you to get one of these stamps sets for $6.50 with every $32.50 worth of regular priced stamps you purchase. You can shop online at my website and join my monthly virtual gathering or contact your consultant.

Here are the stamps you can get in this special. Just type the code or part of the title into the shop search box.

S1507 My Acrylix® Life Is Wonderful C1614 My Acrylix® Tagged with Love C1613 My Acrylix® Paper Bird B1477 My Acrylix® Exotic Flower D1615 My Acrylix® Sweet As Sugar B1454 My Acrylix® Thanksgiving Wreath C1596 My Acrylix® Happy Hexagons C1587 My Acrylix® Sing Glory B1455 My Acrylix® Be Jolly C1593 My Acrylix® Hats Off A1169 My Acrylix® Well Wishes D1608 My Acrylix® Better with a Friend B1458 My Acrylix® Cuddly Salutations A1163 My Acrylix® Practical Planning


Products used in these projects

C1537 Honey Comb (Retiring)

Hand Written Print Alphaset (retiring)

Exclusive Inks – Creme Brulee; Autumn Terracotta, Cocoa, Barn Red, Crystal Blue, Canary, Sorbet, Colonial White Pigment ink

Calendar – Retiring

Artbooking


5

Everything ABC’s Letter Y

abc bloghop

Welcome to the Everything ABC’s Blog Hop!

For this hop we will be featuring the letter Y. This may be the name of a paper, a stamp set or an embellishment. Whatever the crafter has chosen as their # element will be featured in their post. If you have just hopped onto my blog, please start at the beginning at Linda’s blog ~ Scrappy Therapy. If you came from Catherine Nowak ~ Catscrapbooking.com ~ you are in the right place. 


For My Y project it was easy to punce on Yuletide Carol x7187b. Yay!  We have a specific product with a letter for the hop! I do hope you enjoy the way I have used this lovely paper.

It is almost Christmas and we are almost done with our Christmas crafting opportunities (yes we should be that organised….if only!)  but I had to share this really cute one sheet bag with you! No Cutting required!!!

yuletide carol bag


This can be used at ANY time of the year with any pretty paper you have. I took the idea from a number of you tube videos – but the one by Kelly Gettlefinger is the one I chose to follow for its clear instructions. Once I did one, I could do many.

Here are my variations from the dimensions and directions given. 

  • I scored 1/2 inch to fold over the top edge taking advantage of our double sided B and T papers to trip the top edge before doing anything else
  • When she folds ‘in’ to the 6 inch mark – I actually score at 3 inches to do this folding in – and it is scored opposite the first step.
  • When she scores at 5 inches and 7 inches I did 4 1/2, rotate 180  and score at 41/2. There are two reasons – 4 1/2 is because I used 1/2 for the turn down on the top and flip for the second score because our CTMH scroeboard is sized to 6 inches.
  • Please crease this fold – it does help with the next step. I like it creased all the way – it is up to you.
  • Once you reach that point in the video watch carefully – what she shows you is easier than me trying to describe it. However it is easier to do with the paper vertically placed in front of you. Pay attention 3 minutes into this video – watch what happens and you will soon be able to do it yourself.

Here is the video by  Kelly Gettelfinger

My  Verbal directions for students go like this:

  1. Remove the zip strip. Determine the  top and bottom edges. Score these at 1/2 inch and fold the desired trim forward. Stick this down with bonding memories glue. Now with that edge against the top side of the Score Board (so you have now rotated the whole thing 90 degrees) score at 3 inches. Rotate 180 degrees and score the second line of 3 inches.
  2. Take the paper to your table and fold in at the 3 inch marks so the sides meet in the middle.
  3. Now while this is folded – back to the scoring board you go. With the longest edge running across the top of the score board score at 4 1/2 inches. (The video says 5 – but we have used 1/2 inch for our trim!) Rotate 180 degrees (aka flip) score at 4 1/2 inches again.
  4. Now back to a nice flat surface. Open it all out and give those 4 1/2 inch scores a bit of a crease to make the next step easier.
  5. Turn the paper, fold it on the 3 inch lines and place it lengthwise to you. Press one finger in a scored corner (4 1/2 inch line). Use the other hand to bring the folded score line from the middle out and parallel to the edge. Crease inside. Repeat for all four corners. ‘Push out, push in and press’….(Video)
  6. We are going to push the sides in and pinch it – just as it is in the video. I describe this as ‘push it in the back and pinch it’. Keep it even at the sides and it will look nice.
  7. You bag will almost stand now. You can glue the 3 inch folds down along the top edge and I prefer you do the inner corners too or your lovely purse will flop open and not look pretty. A little glue between this gusset and the front and back will hold the bag in a nice shape and voila you have a bag without any cutting!
  8.  Decorate to your hearts content. I used a standard single hole punch to thread wide ribbon through as my handles. You could use cord, you could also loop ribbon over from the back to a button or toggle in the front. You can ad an additional flap as seen int he video. All mine at done just with ribbon from my stash.  Check your stash and use what is there!

Decoration

Cricut flores mounted

I chose to decorate my Yuletide Carol bag with black accents at first. I started with the trendy Eiffel Tower from Artfully Sent. I also cut the Silhouette lady but ended up leaving that out. My flowers are a mix of all sorts from what I now call my flower basket. I have mounted these onto a piece of card some time ago – they fit this project just right. Each flower and leaf is cut from either Art Philosophy or Artiste in a variety of shades of cardstock. I have used spray pens and liquid glass in making them. I added tht little bit fo glam with the black shimmer trim and some bling gems. Finally I tucked in the sentiment just for you from Novembers Stamp of the Month. (NLA)

Close To My Heart Products used in this project are available to order from www.thecreativeheart.ctmh.com.au 

Please have a go at this quick easy bag! You do not need to make flowers to go on it – a simple fussy cut stamp, some buttons, bows or ribbons will do. It has been a real hit with my team and customers and is a lovely way to use up some of your stash for gift giving in any season! I hope you have enjoyed this post and will come visit again. Please leave a comment before you head off on the blog hop to the next post. Your next stop on our Everything ABC’S blog Hop is Diana Saunders

In case you get lost along the way…go to Scrappy Therapy (link: found on signup doc) for a complete list of participants!

PS You can make a ruffle just like on the bag in the video by wetting 1/ to 1 inch of your B and T or card stock. Don’t be afraid to get it wet it is quite strong at this width. Gently crumple if desired then unravel. Now place it on your all purpose craft mat or other non stick surface. Mold it into the ruffle shape you want. You can use pins and mini pegs for supports to hold wet paper up if need be. leave dry over night. It is ready to be glued onto your bag. Too easy! 

Jen

The Creative Heart


Cyber Monday Special!

Cyber Monday is pretty new to me – but very popular and anticipated by online shoppers – so here we go.  CTMH have something for you on Cyber Monday!!

NB Aussie Readers Only!

cyber monday

Have you been wanting to purchase one of our four amazing Cricut collections?  Have you been dropping big hints to your family that such a collection would look good under your tree? Nudge Nudge Wink Wink 🙂  Need help with the hints? How about a 20% discount all through Monday December 1 Cyber Monday?

CTMH is participating in #cybermonday for the first time ever with 20% off all of the Cricut Collections. Choose from Art Philosophy, Artiste, Artbooking or the recently released Artfully Sent. Share a link – below – to the collection of your choice with your selected loved one (who has ultimate command of your wishlist)  by clicking an image below. This will take you right to my store to pop it into your cart.

Would you like more?…OK!

Anyone ordering their Cricut Collection online will be in the draw for host rewards! Min $30 to spend, but it could be a lot more!

cricut-artbooking-page (1)

Add a lift to your scrapbooking with Artbooking

cricut-artbooking-collection


cricut-artiste-collection

Fun dimensional possibilities with Artiste

cricut-artiste-gift-boxes

Make Pretty things! Save 20% #cybermonday

cricut-art-philosophy-collection

Art Philosophy contains many must have shapes and card bases. 700 images means super value in this cartridge!

cricut-art-philosophy-cards

14-ai-cricut-artfully-sent

Artfully Sent is loaded with many different types of cards and tons of fun elements you can use.

14-ai-cricut-opener (1)


Each collection comes with 3 exclusive stamps sets and more! Featuring Loads of images and card options these are must have cartridges for Cricut lovers. So head on over to my online store and get yours sent right to your door! Alternatively email me nenifoofer@gmail.com and I will handle the ordering for you.

Remember, here is the deal – 20% off Cricut collections, Cyber Monday, 0000 hours to 2400  Monday December 1 ONLY!

Enjoy your shoppping! If you woud like some help to decide which cartridge to get or what else to put in that parcel give me a call! nenifoofer@gmail.com


10

Everything ABC’s Letter V is for Volcanic

abc bloghop

Welcome to the Everything ABC’s Blog Hop! For this hop we will be featuring the letter V This may be the name of a paper, a stamp set or an embellishment. Whatever the crafter has chosen as their V element will be featured in their post. If you have just hopped onto my blog, please start at the beginning at Linda’s blog ~ Scrappy Therapy. If you came from “Lauren Moore – CTMH Craftings”  then you’re on the right track!


Hello and welcome to a small piece of my personal Scrapbooking world. I am a lover of mixed media and like to dabble in it from time to time. Choosing a V project isn’t easy but I have settled on this page that illustrates the fabulous Sun Pyramid, the largest structure in the Ancient City of Teotihuacan in Mexico. It is my V project because of the presence of coarse red volcanic rock which I have attempted to symbolise in the background art work on this page.
I first visited Mexico in 1979 as a child. I was an exchange student and at the mercy of host families to see the country. The day I was brought to visit these pyramids we found them closed. (I suspect that family knew little about them!) I dreamed of a return to Mexico, and promised myself that if I ever did I would go to the Sun and Moon Pyramid. Fast forward 35 years here I am on the Street of the Dead with the Sun Pyramid in the background! Volcanic rock heaven!!! I could not walk the street due to sciatica but I was there….right there…at last!
volcano texture

The Sun Pyramid of Teotihuacan. This page is presented in the Black Designed Decor Black Shadow Box frame It just makes the page even more stunning. I love how I can quickly pop pages in and out of these frames!

The pyramid rises 216 feet (66 metres) above ground level, and it measures approximately 720 by 760 feet (220 by 230 metres) at its base. It was constructed of about 1,000,000 cubic yards (765,000 cubic metres) of material, including hewed tezontle, a red, coarse volcanic rock of the region. (Read More about this fascinating landmark here).  Obsidian, a Volcanic Glass is also present in the ruins.

I have created this page in the following way:

  • Base 12 x 12 Slate cardstock
  • Overlay with Texture paste. I used the V shape of the overlay in the Sugar and Spice Key of artbooking page 80 and a knife to lay down this shape to reflect the steps of the pyramid. Allow this to dry well.
  • I used bubble wrap technique to add some spots for the round rocks evident in the stone work. I simply painted the wrap with gesso and pressed it onto the paper in places around the dried texture paste. Focus on ares that will not be hidden by the photo.
  • Smudge it all up! I used ink pads direct on the texture paste and in places of the spots. I used the sponge to add more and rub edges. I have not completely eliminated the slate grey background. I have used Slate, Cocoa, Chocolate and Barn Red inks to achieve the overall look. If you do this it will look different – it is the process rather than the outcome that is repeatable!
  • The next step is to rehearse the placement of the photos and mixed media embellishment pieces. These flowers and the champagne bottle button were from my stash. The Jute Ribbon is a product NLA from CTMH. The chain is a piece of a Base and Bling Faux Gold chain. Chain looks great on pages! Just snip a bit off with pliers!. These items are all quite deliberately grouped in the bottom right corner and help to tell the story. The hessian has the harsh texture of cloth from the time, the chiffon symbolises the wealth of the priveleged who lived here, the flowers represent Roses, a national symbol of Mexico, the bottle of bubbles my celebration for finally being there and the chain marks the sections of the city protected and still to be excavated.
  • If the eye is lost it can follow the stamped signs which are from different stamp sets. Here we Go D1600 and D1622 Wanderful WOTG set as well as A1160 All the details NLA (Host reward) Stamped embellishments are in Barn Red on Colobial White, smudged with Desert sand to age them out.
  • I adhered the photos to Kraft and Barn Red cardstock as a mount and used foam tape to stick it to the base. There is also a bit of Slate Washi Tape tucked in there.
  • Liquid glass is my best friend for sticking everything else down.

I am so pleased the Pyramids are all now under the good care of Authorities and are being properly investigated by archaeologists and historians. I am truly grateful to have had the opportunity to be gobsmacked, up close and personal with the pyramids and bringing a dream to reality!

What is really fun about mixed media is no page is ever the same. Sometimes you can start with a sketch, sometimes the photo, as was the case here. As long as you can tie it all together with a colour, a theme, and can clustering of embellishments it will work for you.

Here is a list of Current products used in this project. You can shop online at Jen’s Creative Classroom and have it delivered right to your door.


I love getting your comments and feedback. Be sure to leave a comment below before you move on in the hop! Thanks for stropping by

jenny sig

Your next stop on our Everything ABC’S blog Hop is Carol-Anne Grenier. In case you get lost along the way…go to Scrappy Therapy for a complete list of participants!

Confetti Wishes Exploding Card with a cupcake!

A great big Happy Birthday to CTMH as we celebrate #30yearsofhappy stamping and enjoy the FREE stamp set with 30 mini stamps! This month I am also featuring all things Birthday at my Monthly crop and the best paper collection for this lind of celebration is Confetti Wishes.

Birthday Explosión box

Birthday Explosión box

I have created this exploding box card for display and inspiration at my upcoming workshop on September 21st. (If you are local be sure to book now!). This piece showcases what we can achieve with Confetti Wishes X7189B paper, the Artiste Cricut cartridge and our awesome Pink glitter paper Z1792!

If you have not tried the glitter paper out yet then I suggest you do. It doesn’t flake and cuts clean on the cricut with blade set to 6 and doing a double cut as I did for the title here. Slow it down for intricate designs, and lift carefully from your mat. If it is really a really sticky mat you will need the spatula.

1410505545045


There are a lot of tutorials on exploding box cards so I will not detail that here. For the cupcake I cut a cupcale holder from artiste at 4 inches. I guestimated the size I needed and it worked out just right. I stamped and embellished this before folding it with ‘Gliitter girl’ from Glitter Glam B1465 and the foliage from ‘Love This’.B1432. I sat a 3 inch styrofoam ball in the cupcake holder and covered that with double sided tape and removed the covering from the tape leaving sticky side ready for use.

Time to decorate the cup Cake!

Thoroughly wet 3 1/2inch pieces of Thistle card stock and scrunch each one up. Gently unfold these and lay them on the open double sided tape on the top of the Cup Cake. It won’t stick while it is wet – just position it , prod it, move it till you are happy with the look. (Dressmakers pins will hold it if need be) Here is the trick….Allow to dry overnight. By then it will be stuck and nice and firm again for you to play with.

1410505229588

Add a touch of Bonding Memories glue 1512 around the top of the cupcake rim and over the iced top. Sprinkle with glitter. (My messy mat  – All purpose Mat Z2045 helps make this job much easier to clean up!) Add something on top, some Bitty Sparkles Z1263 and you are done. I have adhered the cup cake to the card by stacking 4 layers of 3D foam tape Z1151 in the centre of the card so the stack reaches the bottom of the styrofoam ball. On the lid of the box I have used sponge daubers and more glitter to finish it off. 

Glitter Paper Tip

I have found the stickers are not staying put on the glitter paper. The answer to that problem is liquid glass.!!! Our answer to anything that needs to be Stuck! 3D Foam tape also works well on this surface. 

Shopping list – Note – this shoping list entitles you to add – Free #30yearsofhappy stamp and Stamp of the month Family is Forever! – That is and additional $48 worth of stamping fun for just $5!

You might also need these inks – Thistle, Canary and Pacifica.

Additional Supplies – available as 50% off host reward items

Thank you for stopping by. I would love to have some feed back in a comment before you go! I hope you are inspired by this project. If you are local to Mildura and would learn to make one of these in a class setting please let me know in your comment below. Don’t forget our workshop is coming up. Here is a sneak peek.

1410505656103

You can order all you need online right here. Be sure to join my September Virtual Gathering to be in the draw for the Host rewards. Happy Stamping Month! 

Jenny

jenny sig

6

Balloon Talk S1404A : CTMH Stamp of the Month Australasian Blog Hop

10001517_10152327088764808_982230598_n

Hello and welcome aboard our Stamp of the Month Australasian Close to My Heart Blog Hop. If you have arrived here from Jenny’s Heart and Craft Corner  then you are in the right place. If you landed here by accident, no problem, please join in by following the link at the end of this post.

Today I would like to share with you this Family Party Time double page layout which features April Stamp of the Month Balloon Talk S1404A  available exclusively throughout April for $24 or for just $5 when you spend $75.

Family Party Tome featuring Balloon Talk SOTM available only in April.

Family Party Time featuring Balloon Talk SOTM available only in April.

Right away Balloon Talk brings to mind fun pages. The sample provided in the stamp set also takes this approach.

SOTM Balloon Talk

SOTM Balloon Talk

These fabulous labels and key words can be used on formal scrapbook pages, cards and would be great fun in any mini album or the Crush Book. 
I have pretty much completed my 50th Birthday album but there was one set of photos I had not yet done. I needed fun papers, fun titles and CTMH have provided both in the current Idea Book. 

Lolydoodle paper pack. Also available in a Card making kit and a Workshops on the go Scrapbooking kit.

Lollydoodle is funky, fun and colourful. I chose the pink highlight colour to bring out the pink outfits of the under 50’s guests and the Whisper base was a good neutral way to carry the colours through both pages. This page celebrates my family’s love of belting out a good bit of old fashioned rock from the 70’s and 8o’s, my brothers love of air guitar and us all joining our entertainer Paul for a sing along. It was this aspect of my celebration that was truly ‘AWESOMENESS’. Yes we did have a blast.

The layout is based on pattern 9 in Make it from your heart Vol 1 pp 22-23. I chose this design as I only had a few scraps of Lolloydoodle left to use after having used both the WOTG kit and the Card making kit. The frame supporting the photo on the left page is cut with the Cricut Artiste Cartridge (p 60) and the title family is on the same page. I cut the flowers from page 54. I set these up in Cricut craftroom on my mat specifically to fit the size of the paper pieces I had.

Close up of right hand page showing Balloon Talk

Close up of left hand page showing Balloon Talk

You can see them ready to go in the cricut here.

cut for family fun page ????????

I have also used Artbooking Cartridge to get Party Time title (p 87) and Live out loud title (p44).

On the right hand side, the photo mat with the stars is from page 65. (Both these Cricut collections and the Art Philosophy Cartridge are FREE in April for anyone joining CTMH in April. Please talk to your consultant today to find out more about this awesome company! ) I used daubers and ink to colour up my cutouts and ink the edges of the papers. I decided I needed a bit of an outside border so I trimmed 1/4 inch off two sides of each page and mounted the whole onto Juniper cardstock at opposite corners.

????????

Once I had the basic page layout and the photos all attached I then went to town stamp a heap of balloon talk titles on scrap white card stock. (Yes I hoard my scraps) I did various colours and more than I needed.

????????

I fussy cut them all out. Some of the set you can do cricut cuts for, but for this I wanted the other titles and they are simple to cut out. Then I played dressups. I do this a lot. I try different embellishments in different places and swap things around until I am happy. I am worried there is too much on the left hand page but justify it by saying balloon talk is my journalling!
Balloon Talk Stamp of the month is only available until April 30th from your my online store or your local CTMH consultant. Remember it  $24 to buy but with orders over $75 AU it is just $5 and you can shop online from anywhere in AU. (Or NZ with a NZ Consultant) I’d love you to leave a comment before heading off to the next stop,  Patricia Manhire’s Creative Corner Blog and see what they have created with this fun stamp set. Thank you so much for visiting. I would love it if you would leave a comment.

Have a good one

Jen

2

Stack those Yo-yos

Close To My Heart have three beautiful trees on the cover of the Holidays from the Heart shopping guide. You may have seen them. And admired them. If you haven’t seen them yet here is another peek. 1310-cc-holidays-from-the-heart-au_nz

Aren’t they just gorgeous? Naturally all of us in the CTMH family have been waiting for the opportunity to get hold of the paper, put our Cricut machines to good use and make them. So many of us in Australia are now Cricut owners and love it! (Message me if you would like to know the best way to get yours. )Some of us have completed the project and while not as stunning (because they seem to be so even and well spaced!) as those in the photo we have done a pretty good job recreating these trees.

Cut and score

Cut and score

Fold and join

Fold and join

It begins with cutting 22 pieces of paper! You need at least 2 strips to score and fold then stick end to end forming a circle once folded.

By squashing these flat and adhering a circle top and bottom with your trusty hot glue gun you end up with a yo-yo or rosette – a popular embellishment in the paper craft world.  By making these in gradually increasing widths (cricut dial sizes set from 1 inch to 2 1/2 inches you can then stack from large to small making a nice tower. It actually even feels a bit like  pine cone when done! If you want a more frilly look for the larger sizes you would cut 3 strips to push into your yo-yo.

I have a couple of tips for you if you dare to give it a go.

Lots of rosettes all glued to a circle top and bottom

Lots of yoyos all glued to a circle top and bottom

You will need 4 sheets of double sided Sparkle and Shine papers to get enough pieces to create at least 11 rosettes.

  • Scoring can be done with a ruler, stylus or bone folder and a mat if you do not have a fancy scoring board.
  • You can adhere all these with liquid gloss but you need time for this to firm up.
  • You are best to use a HOT GLUE Gun. For speed and ease, it really is the best option. Use a scrap piece of cardboard under your work to spare your table any damage from hot glue. If you have acrylic nails you may like to protect them from damage too.
  • Be careful – hot glue burns, as does the tip of the gun. Have your  spare glues sticks nice and handy ready to refill – you will need quite a few for this project.
  • When gluing pieces end to end be careful not to burn yourself with hot glue when you press pieces together – the glue will come through the holes in the pattern,
  • When making the very top rosette, before gluing the second securing circle, pierce a hole through it and insert a toothpick that will then be fixed in place with the final gluing. You need this to act as a stand to whatever you top your tree with. It can be broken off shorter if need be.
  • When layering each rosette one on top of the other you may find at times it will need a little leveling depending on how even your original rosette has been glued – use hot glue like mortar – adding more to the die that needs leveling up. Keep checking the way it is standing – you do not want to end up with the leaning Tower of Pisa! Have it nicely balanced on a vertical center all the way up. If you are really worried about this pierce all binding circles and slide the whole lot over a bamboo skewer as you build it up n layers. You are using this to keep it straight – The tree is quite sold when done so the skewer is not needed for stability. I did mine without a skewer and I am quite happy with the result. Hand made is not meant to be perfect anyway right?
  • Allow 2 hours for all of the above then you can do the decorating,
  • I used tag shapes for the tree topper – but you could also use a star or a snowflake. Tie a pretty bow, add some round shaped beads or buttons – I found 3 unique buttons in my stash.

Following the example from the flyer, I decorated my tree with snowflakes. I decided to try Mod Podge and I needed to bling it up so a shaker of fine glitter did the trick. A generous helping of Mod Podge painted on the snowflakes, sprinkled with glitter and allowed to dry.

Sparkly snowflakes

Sparkly snowflakes

Greens ones added a nice touch

Juniper ones added a nice touch

I have used baking paper underneath this part of the work for several reasons. First the snowflakes were easy to move around and second, once finished I could pour excess glitter back into the jar as it slides nicely off the baking paper. Finally clean up is easy – scrunch up the paper and bin it. Be sure to wash the brush you used to spread Mod Podge around with really well.  Sard soap is good for cleaning brushes. Mod Podge is readily available in craft stores. I used the Matt finish one.

Once again the best way to glue these on was with hot glue. If you end up with ‘hot glue strings’ don’t worry – many of us do – it is normal! These can be pulled away or melted away with a heat gun.

And there you have it – the lovely tree ready for the Christmas Table! Mine is just sitting on a nice teelight candle holder.

My Completed table tree. If you are local and would like to make one pre-order your Sparkle and Shine paper ready for next workshop.

My Completed table tree. If you are local and would like to make one pre-order your Sparkle and Shine paper ready for next workshop.

Why not plan to get one of these done for your table? Plan ahead by pre-ordering your paper, having it pre-cut and coming to a workshop to get it done! Contact me for more details or check my workshop schedule over at  my Facebook Page. (Workshops are in the Sunraysia Region)