
Anzac Day has long been an important day in the calendar of both Australia and New Zealand as we remember the lives given for our freedom at Anzac Cove during World War I. Anzac Day, April 25 is a day of such significance in our history and culture, both our countries have national public holidays. The main event of the day is the formal Dawn ceremony and parade of Veterans, the sounding of the Last Post and the minute of silence ended with ‘Lest We Forget’ in services across the nation. This solemnity is followed by some popular past times including big brekkies, BBQ’s, making and eating ANZAC biscuits, and playing Two Up down the pub.
As Australasian Close To My Heart consultants we wanted to showcase the Australasian Stamp Sets that Close To My Heart have made for us. The projects we share with you today are shared in the spirit of both gratitude and national pride.
We hope you enjoy seeing some artwork focusing on these stamp sets! They include
If you have arrived here from Savanah scraps you are in the right place.
Anzac Day Layout

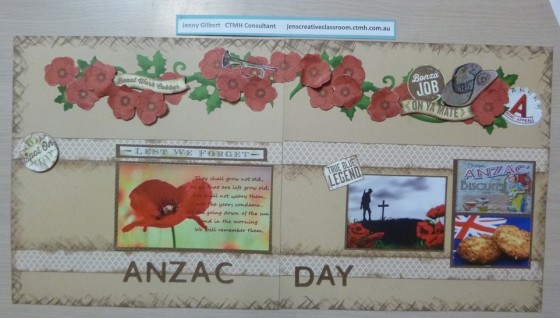
Double page layout featuring the Stamp Set Aussie Praises.
I hope with this layout you will have some photos taken on Anzac day, or perhaps have some heritage photos you can use. I recently saw a post asking followers what the would get up to for ‘Anzac Day shenannigans’ and that is very much the spirit of the day after the formalities are done. there ought to be lots of Anzac day photos you can take for this layout if you participate in a Dawn service.
I have used the new Paper Fundamentals Basics Assortment UV coated papers in this design. My Base is Cashmere card stock. I used two 4 inch strips of the beige Paper Fundamentals Basics Assortment to support the photo section and 1 inch strips of the same print the other side up to border this. (2 up anyone?) All these pieces were edge distressed with Chocolate Distressing ink. This works well with the UV coating on the paper.
We say Cut, Ink, Stick – and that is the process I followed. I cut all the pieces, prepared all the embellishments, played dressup with the layout and then stuck it all down.
I looked online for icons I wanted to use in addition to the Aussie Praises stamp set. I needed a slouch hat, the poem, a ‘lest we forget’, and since I am always haunted by the Last Post I had to have a bugle on the page. (My Dad could play one of these!) There is nothing like the sound of this haunting tune to move me heart and soul. (Save bagpipes playing Amazing Grace) I glued the icons to scrap cardstock and trimmed them out. These were to be placed through all the red poppies.
I stamped the banner stamp from Aussie Praises twice using bamboo and the two slogans in Chocolate on top. Edges are inked in Chocolate. ‘True blue’ is on Colonial White card, as are ‘Bonza Job’ and ‘Spot on’ inked with Chocolate and edged in either chocolate or desert sand. My ‘Lest we forget’ is straight from google images and printed on paper. It got some desert sand smudging too so it had the aged look. The images I found were trimmed and mounted on the dark chocolate Paper Fundamentals Basics Assortment, and the title is cut from the same using the Alphabet from Artiste Cricut Cartridge.
PS If you need to know what Bonza is go here!

Foliage border, with edges inked in New England Ivy to add shape and dimension.
For the Poppy border I found a lovely leafy border in Artbooking on page 72 that is the closest to actual poppy leaves I could find. I cut this at the recommended 11 inches and stretched it a little more in CCR. I also did the shift key for extra foliage, I have burnished the lower edges of this with New England Ivy and a sponge dauber. I try to do this as I like the extra dimension another layer of colour gives.
For the popies the perfect stamp is the flower from B1432 Love This.

I stamped with Black on a 4 inches wide piece of Ruby card stock. I then fussy cut them all out with the mocrotip scissors. (Love these guys. If you have no other reason to get a kit – get it for the scissors!) I sanded the edges of these and added more fresh ink colour using Ruby Pigment ink pad. This is brighter and added some subtle colour change in the flowers so they were not all flat. I used a gold marking pen to put in centers and added more fine lines with the Marvy® Uchida® Lepen™ in the centre to make them stand out more. I am not sure I have captured the subtle colours in the photo but I hope you get the idea.


sand, ink, bend and colour the centers to bring your poppies to life.
I have glued some down flat, others I curled with the bone folder and mounted with 3D Foam tape. So there is a lot of dimension in the poppy spray along with the other icons I found.


I hope you have an enjoyable ANZAC Day and remember the fallen with gratitude if you are an Aussie or a Kiwi. If you aren’t then take the time to find out more about one of our most revered national holidays and why it means so much to us. You can find more information about ANZAC DAY here. If you want to try your hand at making Anzac Biscuits just google for a recipe – the more golden syrup you use the crunchier they will be! You won’t regret it, they are delicious!
To finish of in honour of the solemnity of the day, here is one of the recitations at Anzac day ceremonies across our nation.

All the items used in this project are available for purchase online at Jens Creative Classroom. Thank you for visiting the hop. Now hop on over to Lauren Moore’s CTMH craftings
The following CTMH products have been used in this project.
Artbooking and Artiste Cricut collections * It is still April…either of these is still free – ask us your consultants today!
Cardstock Cashmere, Ruby, Topiary
Exclusive Inks Chocolate, Desert Sand, Black, New England Ivy
Enchantment pigment inks collection (ruby) Z2502
Marvy® Uchida® Lepen™ Z1979
Adhesives – Bonding Memories Glue, 1512 3D Foam Tape Z1151
Don’t forget this month’s Stamp of the month and your Free to be Me paper pack are just $5 with a $75 order.


 I stamped the glass with whisper and coloured it and the bottle with buttercup ink using secondary stamping. I used a heavy layer of liquid glass on each item to get a good rounded glassy look. If you are lucky you will also get a bubble in the right place. I did these on spare cardstock and cut them out when they were perfectly dry. Liquid glass is good to cut!


