Welcome to the Everything ABC’s Blog Hop!
For this hop we will be featuring the letter Y. This may be the name of a paper, a stamp set or an embellishment. Whatever the crafter has chosen as their # element will be featured in their post. If you have just hopped onto my blog, please start at the beginning at Linda’s blog ~ Scrappy Therapy. If you came from Catherine Nowak ~ Catscrapbooking.com ~ you are in the right place.
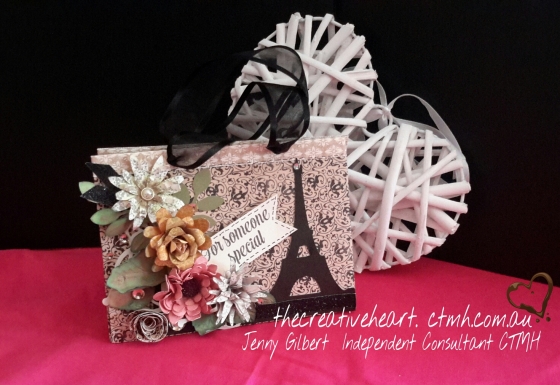
For My Y project it was easy to punce on Yuletide Carol x7187b. Yay! We have a specific product with a letter for the hop! I do hope you enjoy the way I have used this lovely paper.
It is almost Christmas and we are almost done with our Christmas crafting opportunities (yes we should be that organised….if only!) but I had to share this really cute one sheet bag with you! No Cutting required!!!
This can be used at ANY time of the year with any pretty paper you have. I took the idea from a number of you tube videos – but the one by Kelly Gettlefinger is the one I chose to follow for its clear instructions. Once I did one, I could do many.
Here are my variations from the dimensions and directions given.
- I scored 1/2 inch to fold over the top edge taking advantage of our double sided B and T papers to trip the top edge before doing anything else
- When she folds ‘in’ to the 6 inch mark – I actually score at 3 inches to do this folding in – and it is scored opposite the first step.
- When she scores at 5 inches and 7 inches I did 4 1/2, rotate 180 and score at 41/2. There are two reasons – 4 1/2 is because I used 1/2 for the turn down on the top and flip for the second score because our CTMH scroeboard is sized to 6 inches.
- Please crease this fold – it does help with the next step. I like it creased all the way – it is up to you.
- Once you reach that point in the video watch carefully – what she shows you is easier than me trying to describe it. However it is easier to do with the paper vertically placed in front of you. Pay attention 3 minutes into this video – watch what happens and you will soon be able to do it yourself.
Here is the video by Kelly Gettelfinger
My Verbal directions for students go like this:
- Remove the zip strip. Determine the top and bottom edges. Score these at 1/2 inch and fold the desired trim forward. Stick this down with bonding memories glue. Now with that edge against the top side of the Score Board (so you have now rotated the whole thing 90 degrees) score at 3 inches. Rotate 180 degrees and score the second line of 3 inches.
- Take the paper to your table and fold in at the 3 inch marks so the sides meet in the middle.
- Now while this is folded – back to the scoring board you go. With the longest edge running across the top of the score board score at 4 1/2 inches. (The video says 5 – but we have used 1/2 inch for our trim!) Rotate 180 degrees (aka flip) score at 4 1/2 inches again.
- Now back to a nice flat surface. Open it all out and give those 4 1/2 inch scores a bit of a crease to make the next step easier.
- Turn the paper, fold it on the 3 inch lines and place it lengthwise to you. Press one finger in a scored corner (4 1/2 inch line). Use the other hand to bring the folded score line from the middle out and parallel to the edge. Crease inside. Repeat for all four corners. ‘Push out, push in and press’….(Video)
- We are going to push the sides in and pinch it – just as it is in the video. I describe this as ‘push it in the back and pinch it’. Keep it even at the sides and it will look nice.
- You bag will almost stand now. You can glue the 3 inch folds down along the top edge and I prefer you do the inner corners too or your lovely purse will flop open and not look pretty. A little glue between this gusset and the front and back will hold the bag in a nice shape and voila you have a bag without any cutting!
- Decorate to your hearts content. I used a standard single hole punch to thread wide ribbon through as my handles. You could use cord, you could also loop ribbon over from the back to a button or toggle in the front. You can ad an additional flap as seen int he video. All mine at done just with ribbon from my stash. Check your stash and use what is there!
Decoration
I chose to decorate my Yuletide Carol bag with black accents at first. I started with the trendy Eiffel Tower from Artfully Sent. I also cut the Silhouette lady but ended up leaving that out. My flowers are a mix of all sorts from what I now call my flower basket. I have mounted these onto a piece of card some time ago – they fit this project just right. Each flower and leaf is cut from either Art Philosophy or Artiste in a variety of shades of cardstock. I have used spray pens and liquid glass in making them. I added tht little bit fo glam with the black shimmer trim and some bling gems. Finally I tucked in the sentiment just for you from Novembers Stamp of the Month. (NLA)
Close To My Heart Products used in this project are available to order from www.thecreativeheart.ctmh.com.au
- Yuletide Carol x7187b paper packet
- Scoreboard z1937
- Bonding Memories Glue z553
- Black Shimmer Trim z1809
- Cricut Collections – Artfully Sent and Art Philosophy
- Spray Pens
- Liquid Glass
Please have a go at this quick easy bag! You do not need to make flowers to go on it – a simple fussy cut stamp, some buttons, bows or ribbons will do. It has been a real hit with my team and customers and is a lovely way to use up some of your stash for gift giving in any season! I hope you have enjoyed this post and will come visit again. Please leave a comment before you head off on the blog hop to the next post. Your next stop on our Everything ABC’S blog Hop is Diana Saunders
In case you get lost along the way…go to Scrappy Therapy (link: found on signup doc) for a complete list of participants!
PS You can make a ruffle just like on the bag in the video by wetting 1/ to 1 inch of your B and T or card stock. Don’t be afraid to get it wet it is quite strong at this width. Gently crumple if desired then unravel. Now place it on your all purpose craft mat or other non stick surface. Mold it into the ruffle shape you want. You can use pins and mini pegs for supports to hold wet paper up if need be. leave dry over night. It is ready to be glued onto your bag. Too easy!
Jen
The Creative Heart


Don’t mind me I am just testing the new theme on the blog!
LikeLike
Fabulous bag, great flowers. I’ll be trying to make one ASAP
LikeLike
Pingback: ABC’s Blog Hop ~ Y
Wow! That is really cool. You always have such awesome projects. I am going to have to try this.
LikeLike
Lovely bag Jenny 🙂
LikeLike