
Hello and welcome aboard our Stamp of the month Australasian Close to My Heart Blog Hop. If you have arrived here from Patricia’s Blog then you are in the right place. If you landed here by accident, no problem, please join in by following the link at the end of this post.
I love our March Stamp of the Month. (SOTM) We can get ahead and create some Mother’s day cards, or simply celebrate the unique bond of mothers and daughters with this month’s SOTM Happy Place. I decided to work with a project that would give you plenty of time to complete in time for Mother’s Day in Australia and it all begins with a box and some scraps! March Stamp of the Month Happy Place S1403A available exclusively throughout March for $24 or for just $5 when you spend $75.
Ivy Lane Card gift box
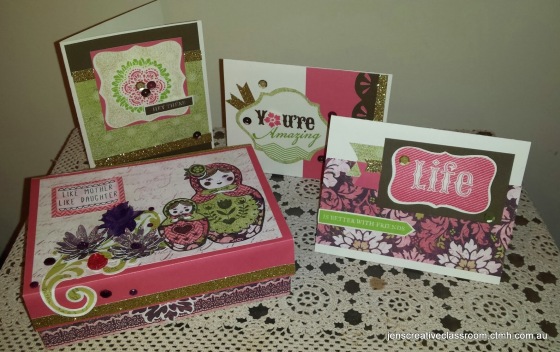
The completed gift box filled with hand made cards ready for your mum or special friend to send on call. What a lovely hand made gift this will make!
I am using leftover bits and pieces from my Ivy Lane WOTG kit, Ivy Lane Card making kit, Ivy Lane Complements and Ivy Lane Assortment , and the colour ready Card Box. Of course you will also need the SOTM My Happy Place S1403A

They say in patchwork (and building) to measure twice and cut once. I need to remember that as it did take me several goes to get the base on the lid and flap of this box. Ideally your piece will run right over the back to the bottom. I had already glued a piece to the back so I couldn’t do that. I will give you the measurements I used but please be aware some fudging is required. The box lid is slightly wider than the base. I had to trim an extra smidge to get a nice fit as I went through the process. There is also absolutely no reason you couldn’t use even smaller pieces of varying sizes of scraps and mix and match to decorate your box. The key design elements here are the top piece of B and T paper, with Babushka Mum and baby dolls and the flower cluster. The rest has been created to coordinate with that vision.

Top of the box art work
Ok so looking first at the top, I cut the focus B and T paper – the lovely one with pale ink tones and handwriting – and cut it to 6 x 4 1/4 inches. The Hollyhock piece is 6 1/2 wide and 5 7/8 long. I do try to avoid 1/8 of anything. Here I found that to be slightly too long but not even an eighth and to cut it at 5 3/4 it would have been too short. By flipping the box over onto the lid I was able to fudge the fit trimming a smidge away with a craft knife.

Fudging the fit by trimming a smidge using a craft knife and the versamat.
Now this lid opens and closes – so every fold needs more than just one score line to accommodate it. Once again paying attention to the placement of your measure – having the paper the right way around – score at 1 1/8. This will be the the bit that comes own the front over the magnetic flap on the box.

The CTMH ruler has a steel edge and 1/8 markings making it easy to measure that little 1/8
On the back I placed a piece 6 3/8 x 2 1/4 wide and did a smidge of trimming again.
I did not like having an open edge at the back. It was a bit like missing cornice or skirting boards in your house. I tried washi tape but didn’t like the result with the colours I had so I went for the Gold Shimmer trim. This shimmer trim is currently exclusive to the Ivy Lane Card making kit – and you have heaps of it left after making the cards, so why not use it here right? OK – that fixes the seem and is strong enough in bond to hold well. I fixed all these papers to the box with Bonding Memories glue.
 Around the front and sides of the bottom of the box I simply looked at the strips I had – the center one was about 1/2 inch too short to go all the way in 2 pieces. I glued these from the back to the front on each side – I had a plan to cover the gap. The bottom has the lovely strips in the Ivy Lane Complements pack. The top is more of that gold Shimmer trim. I picked a flower from the Complements sheet and the bottom was done.
Next I focused on decorating the top. I decided to work with a paper piecing technique. I stamped both the mother and baby dolls on three different colours of scrap B and T Duo and once each on white card stock. I fussy cut the pieces and then played dress ups. I tried several different colour ways and ended up going with the one you see finished here.

Stamp the images several times on different papers. Experiment a little.
The Cutting diagram will show you the different ways you can cat these designs. If necessary you can re ink the edge of pieces. There are 5 key parts – the body (which can be the whole) the apron, the head scarf, the tie and the face. On Mum there is also her flower that can be cut separately. For all dolls it is also possible to separate the hair, but I found it easier to colour this part with watercolour pencils.

Cutting diagram.

Fussy Cut

Dress rehearsal
When you have all your pieces trimmed out do some dress rehearsal. Experiment a little with colour combinations until you are happy with the result.

Colour up a little with a light shade to take the stark whit away. I used sorbet for the face, Purple for the eyes and Brown for the hair.

Glue them all together Re ink edges if cutting took too much black outline away.

carefully trim very small pieces f 3D foam tape for the flower and the scarf ties.
Once the Babushka dolls are ready it is time to plan the floral cluster. In making my Ivy Lane page layouts I cut extra flowers for the pages. I have made these more dimensional by gently rubbing in the center of them with my bone folder on the back of the versamat. This makes the petals pop upward, just like magic.

A gentle circular rub and up those petals will pop.
I layered these together to create the paper flowers on the box. It is now time for rehearsal again. Experiment with the placement of the dolls and flowers. I like to back a group of flowers with greenery and the swirl from the Ivy Lane Complements was perfect. Take care removing it from the sheet with all the curly bits. I placed this first, then my dolls, then my paper flowers. I then used the flower assortment that came with Ivy Lane WOTG. Be careful with these – cut the bit of sheet they are on to experiment rather than pull them off the backing. The adhesive is strong. If you put them in a place then change your mind you may be too late. I decided the pale pink ones did not work in this design so I left them out. I finished with the purple glitter gems.

This image is showing you the different heights and dimensions of the finished project
I chose the Like Mother Like daughter sentiment. I stamped black on white and used a dauber loaded with hollyhock to soften it and pink it up and mounted this on a bit of the pink Ivy Lane B and T paper. I have already made my Ivy Lane cards so I popped them in the box and voila, the gift is finished.

Here you can ee how i covered the gap at the front of the box way back when I started this project.
Ok – Sorry this was such a long post but I hope you can get though the instructions! Here is another look at the finished box to save you scrolling back to the top

The completed gift box filled with hand made cards ready for your mum or special friend to send on call. What a lovely hand made gift this will make!
Want more Piecing? How about this example using Skylark

Pieced card using Skylark scraps
SOTM Happy Place is only available until 31st March from your CTMH consultant. I’d love you to leave a comment before heading off to the next stop, Mandy’s Hall of Indulgence . Happy Hopping!
Shopping List
Ivy Lane Card making Kit G1079 This is where you will find GOLD shimmer trim!
Stamp of the Month – Happy Place
Art Philosphy Cricut Collection (Use to make the flowers) Z1686

Amazing love what you have done with this set & I love how it works so well with the Ivy Lane. I would not had thought to put the two together. I love the paper piecing technique.
LikeLike
Lovely work Jenny. Your box has turned out great 🙂
LikeLike
Pingback: CTMH Stamp of the Month: Happy Place S1403A Australasian Blog Hop | Hall of Indulgence
This is lovely! I would not have thought of paper piecing. Thank you for the detailed instructions and tips. Yes, your post is long, but there was no way to condense it without leaving out useful information.
LikeLike
Oh my goodness, so much work and love has gone into this project! Simply stunning Jenny.
LikeLike
I love this! So effective.
LikeLike
Totally gorgeous and thanks so much for the detailed instructions, I am SOOO going to make one of these for my Ivy lane WOTG cards.
LikeLike
Pingback: Bright Babushka and Lolly Doodle | Jen's Creative Classroom